From an Early Diary Entry to a Backyard System
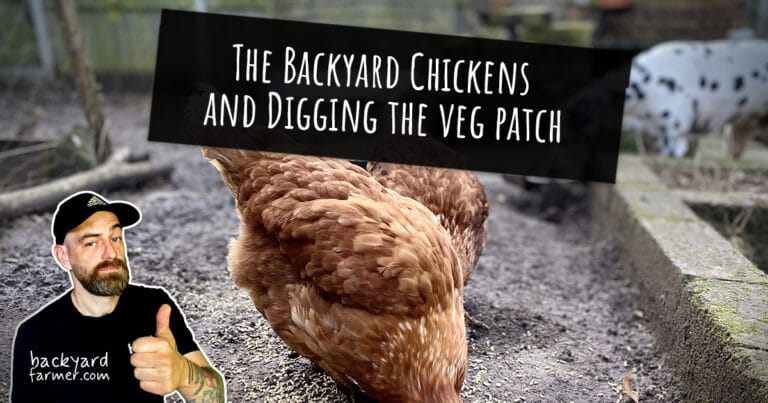
This article started life as a simple progress update about backyard chickens and digging out a vegetable patch.
At the time, I was documenting what I’d done that day in the garden, with very little thought given to structure, systems, or long‑term outcomes. However, looking back now, it’s clear that this moment marked the beginning of something much bigger: the foundations of what would become the Backyard Farmer approach to small‑scale food growing.
What began as a shed conversion for chickens and a freshly dug vegetable patch slowly revealed itself as more than just a weekend project.
Not perfection. Not self‑sufficiency overnight.
Instead, it was about small, practical steps towards understanding where food comes from, how chickens fit into a vegetable garden, and how even a modest backyard can be shaped into something more thoughtful and productive.
At the time, I didn’t have a grand plan for keeping chickens or growing vegetables.
I had a few rescued chickens, some basic tools, spare fence panels, and a patch of grass I was willing to turn over with a spade. Like many beginners starting with backyard chickens, I was learning by doing. Some decisions were instinctive, while others were shaped by what I’d seen work in other small gardens. A few, inevitably, came from limited experience.
That matters.
Because this article isn’t about presenting a polished blueprint for a chicken coop or a perfect veg plot. Instead, it shows how simple backyard systems actually begin — unevenly, gradually, and through use.
What ties the chickens and the vegetable patch together isn’t just proximity.
Rather, it’s the idea that gardens work best when their parts support one another. Chickens aren’t just egg‑layers or pets, and a vegetable garden isn’t just a collection of crops. When designed with intention, even at a small scale, they can form the beginnings of a living system — one that improves soil health, reduces waste, and encourages a more ethical relationship with food.
This updated version of the article keeps the original spirit intact, while adding the context I didn’t yet have.
So, if you’re starting out with backyard chickens, digging your first veg patch, or figuring out how to combine chickens and vegetable growing in a small garden, this is what those first steps can realistically look like.
Continue your backyard chickens and garden care journey
If you’re dealing with chickens exploring the vegetable patch, these guides will help you manage poultry, protect your crops, and plan a chicken-friendly garden.
- How to make your garden wildlife-friendly – Ideas to balance a productive vegetable patch with support for beneficial wildlife — useful when chickens are free-ranging.
- How to keep chickens in the suburbs – Practical tips for managing chickens in a garden setting and keeping peace with neighbours and plants.
- What can I feed my backyard chickens? – A comprehensive guide to safe and nutritious feeding for backyard chickens.
Why Chickens Belong in a Vegetable Garden
When people think about keeping backyard chickens, fresh eggs usually come to mind first.
Eggs are a genuine benefit. However, they’re only a small part of what chickens actually bring to a vegetable garden. When kept with intention, chickens can play a practical role in maintaining soil health, managing garden pests, and closing small nutrient loops that would otherwise go to waste in a small garden.
At their core, chickens are natural foragers. They scratch, peck, and hunt constantly, which makes them surprisingly effective at reducing slugs, beetles, larvae, and other common vegetable garden pests. Left unmanaged, that same behaviour can cause problems. However, when chickens are rotated, supervised, or kept out of active vegetable beds, those instincts become a strength rather than a liability.
Scratching, in particular, is often seen as a downside of keeping chickens in a garden. Yet, it has its place. Chickens naturally disturb the top layer of soil, helping to break down organic matter and expose pests that would otherwise overwinter unnoticed. Between growing seasons, this light soil disturbance can act as useful preparation rather than damage.
Chickens also contribute fertility. Their manure is rich in nutrients and, when handled properly, becomes a valuable input instead of a waste product. Bedding mixed with droppings can be composted and returned to the vegetable garden once it has fully broken down, feeding soil life and improving soil structure over time. The key here is patience and separation — fresh chicken manure doesn’t belong directly on growing crops.
Beyond these practical benefits, chickens subtly change how you think about a garden. They turn food scraps into eggs. They turn pests into protein. They turn otherwise idle corners into productive spaces. As a result, the veg patch, compost heap, and chicken area stop feeling like separate zones and begin working together as parts of the same backyard system.
That doesn’t mean letting chickens roam freely everywhere. Boundaries still matter, and timing matters just as much. A vegetable garden works best when chickens are integrated thoughtfully, rather than given unrestricted access. Even with a simple setup, chickens can support vegetable growing instead of competing with it.
In a small backyard, this balance becomes especially important. Space is limited, and every element needs to earn its place. Chickens that actively contribute to soil health, pest control, and waste reduction do exactly that, making them a natural companion to a productive vegetable garden, rather than an added complication.
Rescuing Ex-Battery Chickens (and What That Really Means)
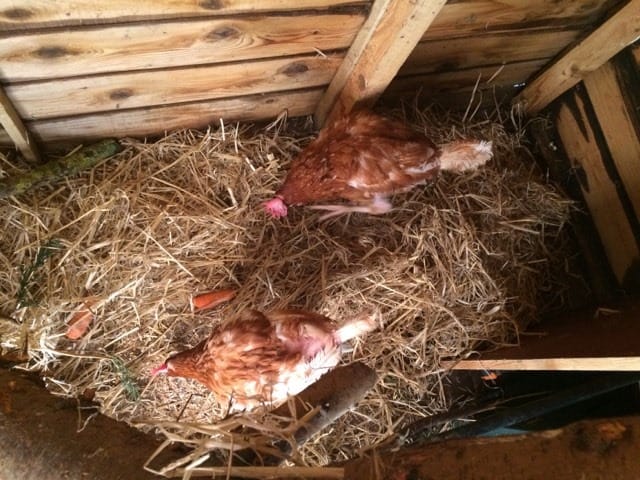
The chickens I brought into the garden weren’t chicks. Instead, they were ex-battery hens — rescue chickens coming from a system that had already taken most of what it could from them.
There’s often a romantic idea attached to rescuing ex-battery chickens. In reality, the experience is far more grounded. These hens usually arrive underweight, stressed, and unfamiliar with behaviours that free-range chickens take for granted. Grass, soil, insects, and open space can all be completely new. As a result, recovery takes time, and progress isn’t always linear.
Rescuing ex-battery hens means accepting that the early weeks focus on rehabilitation rather than egg production. Egg laying may be irregular, or it may stop altogether while their bodies recover. Feathers can be missing, and confidence needs time to rebuild. Above all, these chickens need calm, consistency, and a stable environment that doesn’t overwhelm them.
Because of that, space, hygiene, and shelter matter enormously when keeping rescue hens. A clean, dry chicken coop with good ventilation helps reduce stress and illness. Clear nesting areas encourage routine, while adequate roosting space allows proper rest, which is essential for recovery. These aren’t luxuries — they’re the basics of responsible chicken keeping after confinement.
Choosing ex-battery hens wasn’t about making a statement. I eat eggs, and I eat meat. However, I also believe that if I benefit from animals, I have a responsibility to improve their quality of life wherever possible. When done properly, backyard chicken keeping offers one small way of stepping away from industrial egg production and taking personal responsibility for how food is produced.
There’s no illusion that a few rescued hens fix a broken food system. Still, they do change your relationship with it. When you watch rescue chickens regain strength, start foraging, and slowly express natural behaviours, it becomes much harder to ignore where supermarket eggs come from — or to see food as something disconnected from land and life.
In a backyard garden, ex-battery chickens also influence how you design space. You begin thinking differently about access, safety, and long-term care rather than short-term output. That mindset naturally carries through to the vegetable patch as well. In the end, both become part of the same ethical decision: to grow food in a way that causes less harm and encourages a bit more care, even on a small scale.
Converting a Shed into a Functional Chicken Coop
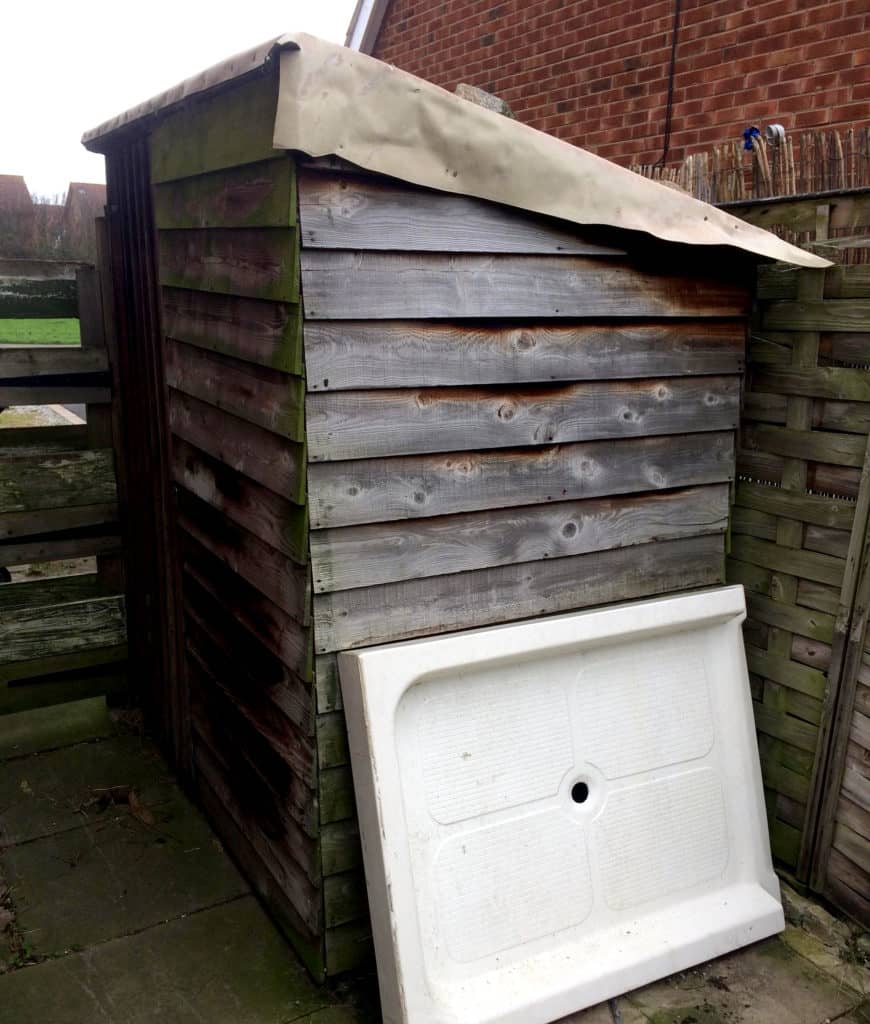
I didn’t start with a purpose‑built chicken coop. Instead, I started with a solid garden shed that had already housed chickens in the past. That alone removed a lot of complexity from the project and made it easier to focus on adapting an existing shed into a functional chicken coop, rather than building from scratch.
When they’re dry, sturdy, and easy to modify, sheds make excellent chicken coops. They already provide weather protection, security, and enough internal space to create clear areas for roosting, nesting, and movement. As a result, converting a shed into a chicken coop often comes down to working with what’s already there and shaping it to suit the birds.
One of the first priorities was the internal layout of the chicken coop. Chickens respond well to clear, predictable spaces. Nesting boxes work best when they’re slightly darker and tucked away, which helps encourage calm behaviour and reduces stress around egg laying. Meanwhile, roosting areas need to sit higher than the nest boxes, giving the birds a natural place to rest at night without fouling where they lay.
For roosting bars, I chose natural branches instead of uniform timber. Branches with varying thicknesses give chickens a more comfortable grip and help keep their feet healthy. At the same time, it’s a simple, low‑cost solution that suits the improvised, practical nature of a backyard chicken coop setup.
Ventilation is non‑negotiable when converting a shed into a chicken coop. Chickens produce a surprising amount of moisture and ammonia, especially overnight. Without airflow, coops quickly become damp and unhealthy. Good ventilation keeps the space dry and helps reduce respiratory problems, which is particularly important for ex‑battery hens that may already be vulnerable. Openings need to allow stale air to escape without creating direct draughts at roosting height.
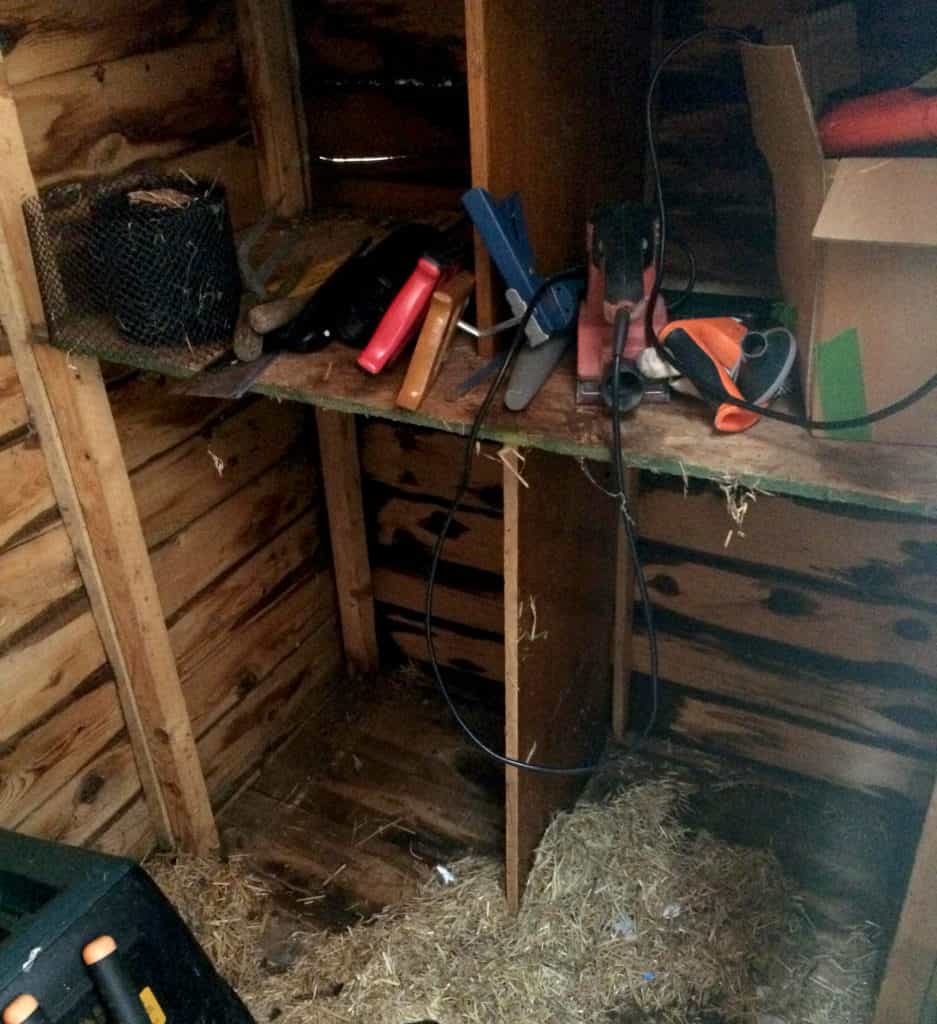
Ease of cleaning matters more than most beginners expect when keeping chickens. A chicken coop that’s awkward to clean soon becomes neglected, even with the best intentions. Flat surfaces, removable bedding, and clear access points all make regular maintenance far more manageable. Hygiene isn’t just about comfort — it directly affects long‑term chicken health.
I also thought carefully about access for the chickens themselves. While the main shed door worked well for human entry, adding a smaller pop‑hole door and ramp gave the hens a consistent way in and out of the coop. In turn, this made it easier to manage their movement and reduced the need to leave the main door open, which can quickly invite pests into a backyard chicken coop.
Ultimately, the goal wasn’t to build a perfect chicken coop. Instead, it was to create a functional, adaptable space that met the chickens’ basic needs and could evolve over time. Using reclaimed materials, such as spare fence panels, kept costs down and reinforced an important point: effective backyard chicken coops don’t need to be expensive — they just need to be thoughtfully designed.
Digging My First Vegetable Patch (Traditional vs No-Dig)

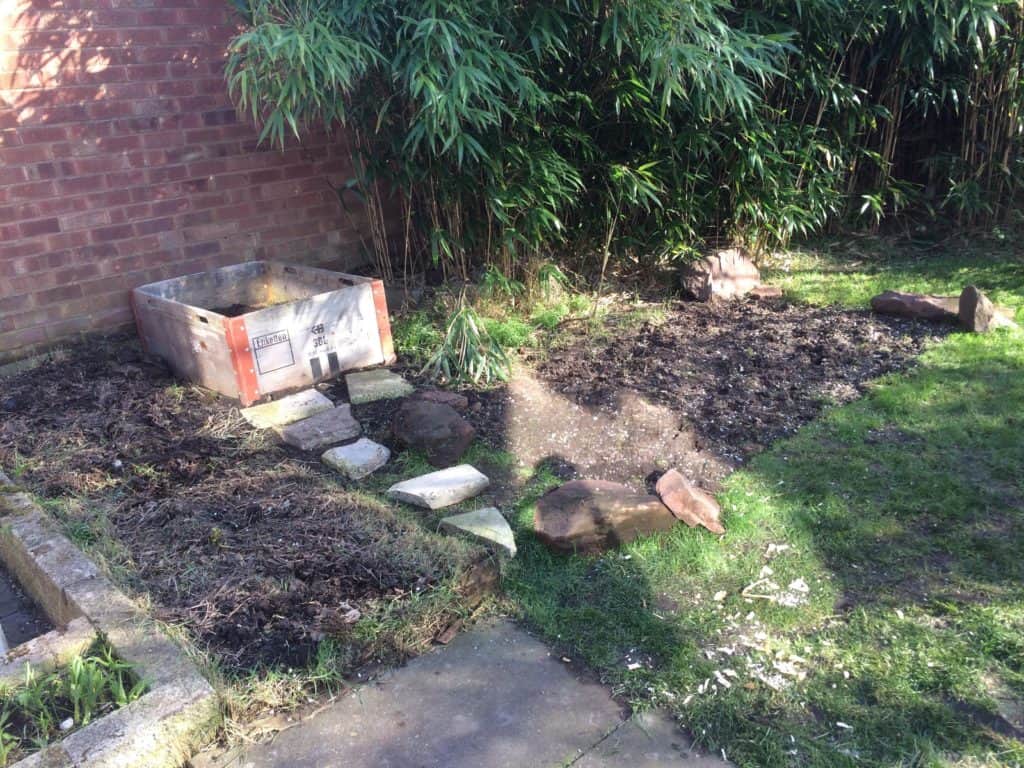
Alongside the chickens, I was also preparing my first proper vegetable patch. At that stage, the goal wasn’t scale or maximum yield — it was simply to get started growing vegetables in a small garden.
I chose a modest area, roughly eight feet by four, because it felt manageable as a beginner. Although there was plenty of unused garden space, I was keen not to bite off more than I could realistically maintain. By starting with a small vegetable patch, it became much easier to see what worked, what didn’t, and just how much time and energy growing your own food actually takes.
Location mattered from the outset. Because the garden is south facing, the vegetable patch would receive sun for most of the day, which is ideal for most crops. Before digging, I marked the area out carefully, paying close attention to how the light moved across the space and where shade might fall later in the growing season.
To create the garden bed, I started by cutting cleanly into the turf around the edges with a spade, clearly defining the shape of the patch. Once the outline was set, I divided the turf into manageable sections, rolled it back, and exposed the soil beneath. It wasn’t quick work. Even so, it was surprisingly satisfying. There’s something grounding about turning a piece of lawn into a productive vegetable garden.
After removing the turf, I turned the soil over to a depth of around a foot, breaking up roots, stones, and compacted areas as I went. This is very much a traditional digging approach, and even then I was aware that no-dig gardening methods existed. However, as a beginner, working the soil directly helped me understand its structure, drainage, and condition in a way that reading alone never could.
No-dig gardening places a strong emphasis on protecting soil life and maintaining fungal networks, and it’s an approach I’ve grown to appreciate more over time. Back then, though, digging the vegetable patch felt like part of the learning process. It allowed me to see what was happening below the surface and gave me a clear, practical starting point for the growing season ahead.
Once the bed was shaped and the edges squared off, the vegetable patch immediately felt more intentional. What had been a rough stretch of grass became a defined growing space, ready for onions, radishes, and salad crops. It wasn’t perfect, but it didn’t need to be. It was workable, accessible, and well suited to a beginner vegetable garden.
That balance between ideal gardening methods and practical beginnings is something I’ve carried forward ever since. There’s always room to evolve, experiment, and improve over time. However, the most important step was the first one — creating a space where vegetables could grow and learning from it as I went.
How Chickens and Veg Patches Support Each Other
Once the chickens had settled and the vegetable patch was taking shape, the connection between the two became much clearer. What started as separate projects slowly began to function as parts of the same backyard gardening system.
Chickens naturally produce waste. However, in a vegetable garden, that waste quickly becomes a valuable resource. Used bedding mixed with chicken manure can be composted and, given enough time to break down properly, returned to the soil as fertility. Instead of nutrients leaving the garden, they stay on site and feed the next growing cycle, improving overall soil health.
In turn, the vegetable patch supports the chickens. Trimmings, outer leaves, bolted greens, and suitable kitchen scraps all make their way back to the flock. What would otherwise be thrown away is converted into eggs and manure, helping to close a small but meaningful nutrient loop. Even after harvest, cleared beds and spent crops become useful, offering opportunities for supervised scratching once the growing season ends.
Timing is what makes this relationship work. Chickens don’t belong in active vegetable beds full of young plants. However, they’re incredibly useful before planting and after harvest. A cleared veg patch gives them space to forage, break down remaining plant material, and expose pests hiding in the soil. As a result, the garden gets a natural reset, while the chickens gain enrichment.
This way of working gradually shifts how you think about productivity in a small garden. Instead of measuring success only by harvest weight or egg count, you start paying attention to soil structure, pest pressure, and how much less waste leaves the garden. Over time, these small efficiencies add up, especially in a limited backyard space.
It also encourages restraint and intention. Boundaries, rotations, and controlled access become part of the garden design rather than afterthoughts. Sometimes, a simple fence, a timed release, or a designated scratching area is enough to make the difference between a vegetable garden that’s constantly repaired and one that improves year after year.
In a small backyard, everything has to earn its place. When chickens and vegetables are allowed to support one another rather than compete, the garden becomes easier to manage, not harder. What develops isn’t a perfect system, but a flexible one — shaped by observation, adjustment, and the practical realities of everyday backyard food growing.
What I’d Do Differently Now
Looking back, the early backyard chicken and vegetable garden setup worked. However, experience has a way of sharpening your decisions, especially when you’re managing chickens and growing food in a small garden.
The biggest change I’d make is planning chicken movement and garden boundaries much earlier. Chickens are incredibly effective when their access is controlled, but that control needs to be built in from the start. Even simple fencing or temporary barriers would have made it easier to rotate areas, protect young vegetable plants, and make better use of cleared beds without needing constant supervision.
Manure management is another area where I’d now be more deliberate. At the time, I understood that chicken manure was valuable. However, I didn’t yet have a consistent system for composting bedding and returning it safely to the vegetable garden. Now, it’s clear that simple routines — where bedding goes, how long it composts, and when it’s safe to use — make a huge difference to soil health and day‑to‑day workload.
I’d also think more carefully about access and workflow in a backyard chicken setup. Small details, such as where tools are stored, how bedding is removed, or how easily chickens can be shut in or out of the chicken coop, quietly compound over time. As a result, a setup that feels workable on day one can quickly become frustrating months later if those flows aren’t considered.
On the vegetable growing side, I’d be less concerned with making beds look perfect and more focused on protecting soil structure from the outset. While digging helped me learn early on, I’d now balance that experience with surface mulching, added organic matter, and minimal soil disturbance wherever possible.
Perhaps the biggest shift is mindset. Early on, I treated each part of the garden as a separate project. Now, I see chickens, soil, and crops as ongoing relationships that change with the seasons. Chickens age. Soil improves. Priorities shift. Designs evolve.
That perspective matters, especially for anyone starting out with backyard chickens or a first vegetable patch. You don’t need to get everything right the first time. Instead, focus on creating garden systems that can adapt as your understanding grows. A backyard garden is never finished — it’s revised continuously through use, observation, and small corrections.
If I were starting again, I wouldn’t aim for a cleaner setup or a more impressive chicken coop. Instead, I’d aim for something easier to live with, kinder to the animals, and better at supporting healthy soil year after year.
Learning by Doing in the Backyard Farm
This project didn’t start with expertise in backyard farming. Instead, it began with curiosity, a willingness to try, and an acceptance that mistakes were always going to be part of learning how to grow food and keep chickens in a small garden.
The chickens, the shed conversion, and the vegetable patch all evolved together. Each decision influenced the next, and each small success highlighted something that could be improved. Over time, the garden stopped feeling like a collection of separate jobs and began to function more like a lived‑in backyard farming system — shaped by daily use rather than fixed plans.
That distinction matters. Backyard farming isn’t about copying ideal systems seen online or chasing self‑sufficiency as a badge of honour. Instead, it’s about building practical, small‑scale food systems that fit your space, your time, and your values. What works well in one backyard garden won’t always translate perfectly to another — and that’s fine.
Learning by doing builds a different kind of confidence. You start noticing patterns. You adjust layouts. You become more attentive to chickens, soil health, and seasonal change. Progress rarely comes from doing everything right. Rather, it comes from paying attention and making small, informed adjustments as you go.
Looking back, this early setup laid the groundwork for everything that followed. It showed me that meaningful change in backyard food growing doesn’t require scale or perfection — just intention, consistency, and patience. Whether it’s rescuing a few hens, digging a first vegetable patch, or taking more responsibility for where food comes from, small actions add up over time.
So, if you’re at the beginning of a similar backyard farming journey, start where you are. Use what you have. Let the garden teach you. In most cases, the rest tends to follow.