Introduction
Looking for a mole windmill that actually works? This DIY wind-powered mole deterrent — sometimes called a “Mole-Mill” — is simple to build and surprisingly effective. If you’ve noticed molehills appearing overnight, soft spots in the ground, or uprooted plants, you likely have a mole problem. These underground diggers can quickly turn a healthy lawn into a maze of tunnels that:
- Create unsightly mounds of soil
- Weaken the ground, making it unstable
- Disrupt plant roots and damage lawn structure
Many homeowners turn to mole extermination services, but these can cost hundreds of pounds with no guarantee of success. Fortunately, there’s a natural mole deterrent that works: Mole Windmill.
The Inspiration Behind Mole-Mills
One of my gardening clients spent £300 on professional mole removal, yet the company failed to trap a single mole. Frustrated, I started researching a humane, affordable, and natural way to deter moles without harming them.
After two weeks of testing and refining, I developed the Mole Windmill—a wind-powered deterrent that uses vibrations and sound to make mole tunnels uninhabitable.
For more about my Gardening work, check out the About page here, or learn how I set up my gardening business here.
Why Mole-Mills Work
Unlike chemical repellents or mole traps, Mole Windmill work with nature, using wind energy to generate constant underground disturbances. The design:
- Amplifies sound and vibration, making tunnels feel unsafe
- Creates an uncomfortable environment for moles, encouraging them to move
- Works continuously, requiring no maintenance or harmful chemicals
It’s an eco-friendly, budget-friendly, and easy DIY solution for one of the most frustrating garden problems. For more information about Moles, check out the Wildlife Trusts article here.
What You’ll Learn
In this guide, I’ll show you:
- How to make your own Mole-Mill
- What materials you need
- How to position them effectively for the best results
Signs of Moles in Your Garden
If you’re dealing with a mole problem, you might notice molehills appearing overnight, tunnels ruining your lawn, or plants mysteriously wilting. Moles dig extensive underground networks that:
- Create raised molehills in clusters
- Weaken soil, causing soft or sinking ground
- Disturb plant roots and increase weed growth
Wondering how to tell if moles are active in your yard? Here are the key signs to look for:

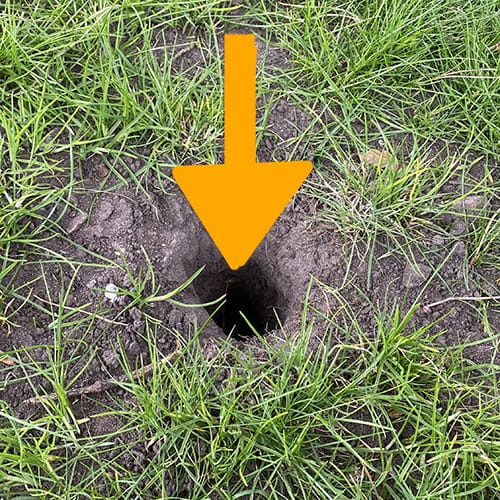
1. Molehills (Raised Mounds of Soil)
- Fresh piles of loose soil that appear overnight.
- Often arranged in a line or cluster, marking an underground tunnel system.
- Typically 2-6 inches high, with a light, fluffy texture.

2. Surface Tunnels (Raised Ridges)
- Soft, raised ridges that snake across your lawn.
- Pressing down on them may cause the ground to collapse, revealing hollow tunnels underneath.
- These shallow tunnels help moles move quickly while searching for food.

3. Soft or Sinking Ground
- Walking across your lawn may feel spongy or uneven.
- Moles dig deep tunnels, which weaken the soil structure and create air pockets.
- Over time, larger areas may sink in patches, impacting plant roots and lawn stability.

4. Damaged or Uprooted Plants
- Moles don’t eat plants, but their tunnels disturb root systems, leading to:
- Wilted or dying plants.
- Loose soil around flower beds or vegetable patches.
- Weakened turfgrass that lifts easily from the ground.

5. Increased Weed Growth
- Weeds like dandelions and crabgrass thrive in loosened, disturbed soil.
- Mole activity breaks up compacted ground, making it easier for weeds to spread.
- Watch for patches where weeds suddenly appear in clusters.

6. Presence of Predators
- More foxes, owls, or cats may start visiting your garden.
- These animals hunt moles because they feed on grubs, worms, and insects.
- Birds, especially crows, may peck at the ground, searching for exposed prey.
How to Tell if Moles Are Still Active
Not sure if the tunnels are still in use? Try this simple test:
- Flatten a section of the raised ridges and check the next day.
- If the tunnel is rebuilt overnight, the mole is still active.
- If it stays flat, the mole may have moved on.
Catching these signs early helps prevent widespread lawn damage. Using solutions like Mole Windmill can naturally encourage moles to relocate before they take over your garden.
How Mole-Mills Work
Mole Windmills offer one of the best DIY mole removal methods, using wind-powered vibrations and noise amplification to disrupt mole tunnels. Unlike expensive extermination services, this natural mole deterrent is eco-friendly, humane, and cost-effective.
1. How Mole Windmill Stop Moles from Digging Up Your Garden
Moles rely on quiet, stable environments to hunt and nest. By introducing constant motion and noise, Mole Windmill make the area unlivable, encouraging moles to relocate.
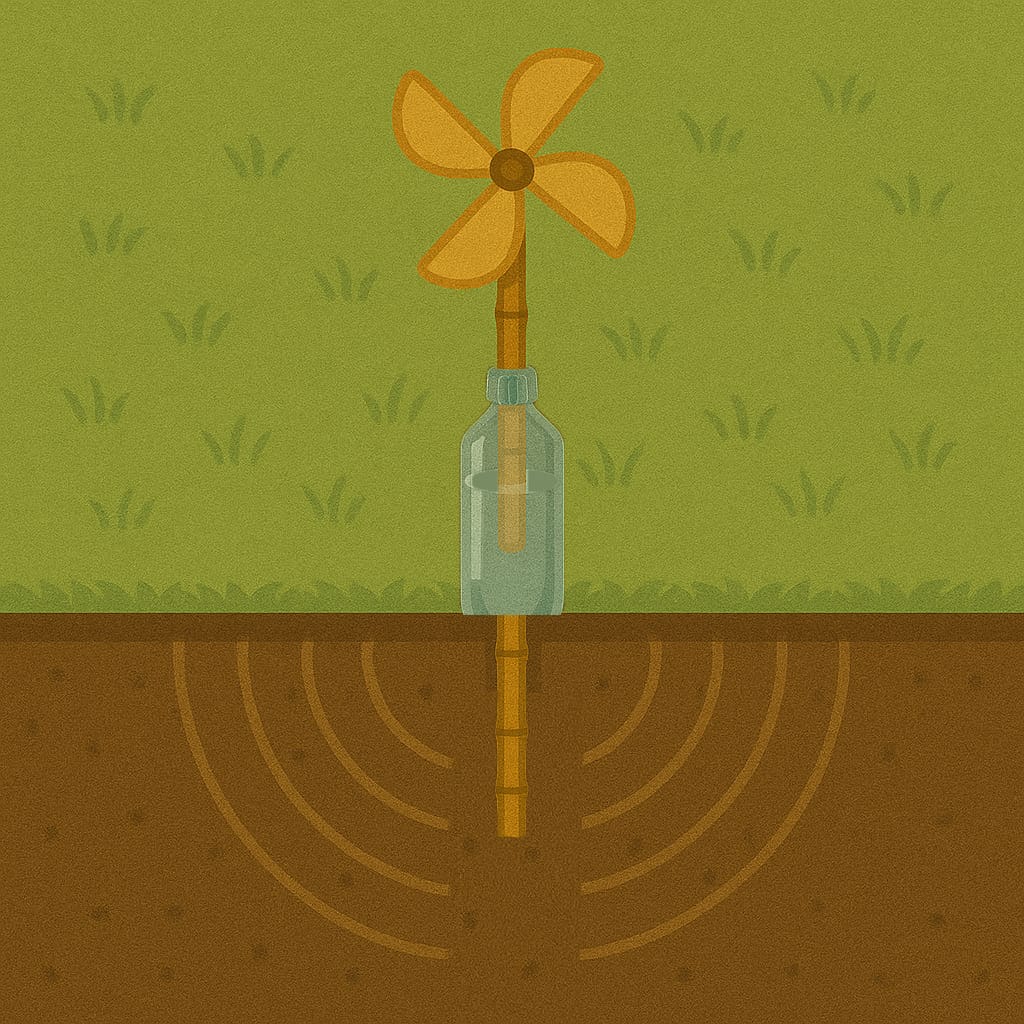
Wind-Powered Vibration
- As the windmill propeller spins, it transfers motion down the bamboo pole.
- This movement generates continuous vibrations underground, destabilizing tunnels.
- Moles, highly sensitive to ground movement, find their habitat disrupted and unsafe.

Noise Amplification
- A plastic bottle, positioned over the molehill, works as a natural amplifier.
- Vibrations travel down the bamboo and rattle against the bottle’s rim, producing low-frequency sound waves.
- These noises spread through the mole tunnel network, creating an unpleasant and noisy space, which moles instinctively avoid.

Tunnel Disruption
- Moles create feeding tunnels, travel tunnels, and nesting areas, all requiring stability.
- Mole Windmill cause constant ground movement, preventing moles from comfortably resting or hunting.
- Over time, the mole will abandon its tunnels and move to a quieter location.
2. What Makes a Mole Windmill Work So Well?
Unlike traps or poisons, Mole Windmill provide a long-term, natural mole deterrent that works with nature, not against it:
- Humane: Encourages moles to relocate rather than harming them.
- Eco-Friendly: Runs on renewable wind energy, eliminating the need for chemicals.
- Low Maintenance: Once installed, Mole-Mills require minimal upkeep.
- Budget-Friendly: Uses simple, affordable materials, reducing the cost of mole control.
3. How Long Does It Take to Get Rid of Moles?
- Most moles leave within 2-4 weeks after installing a Mole-Mill.
- For larger infestations, placing multiple Mole Windmill increases effectiveness.
- Regularly check and adjust placement to ensure continuous deterrence.
Frequently Asked Question: Do Wind-Powered Mole Deterrents Really Work?
Yes! Mole Windmill use science-backed methods—moles rely on vibration-free tunnels for survival. Continuous movement and noise disrupt their environment, making Mole Windmill one of the most effective, natural ways to stop moles from digging up your garden.
Mole Windmill provide a practical, eco-friendly, and long-term solution for keeping your garden mole-free without chemicals or expensive pest control services.
Understanding a Mole’s Nest Structure
Moles dig deep burrows and tunnel networks, which they use for nesting, foraging, and daily movement. If you’re wondering how deep moles dig or how to stop moles burrowing in your garden, understanding their tunnel structure is key. By learning how these tunnels function, you can strategically place Mole Windmill to disrupt their habitat and encourage them to relocate.
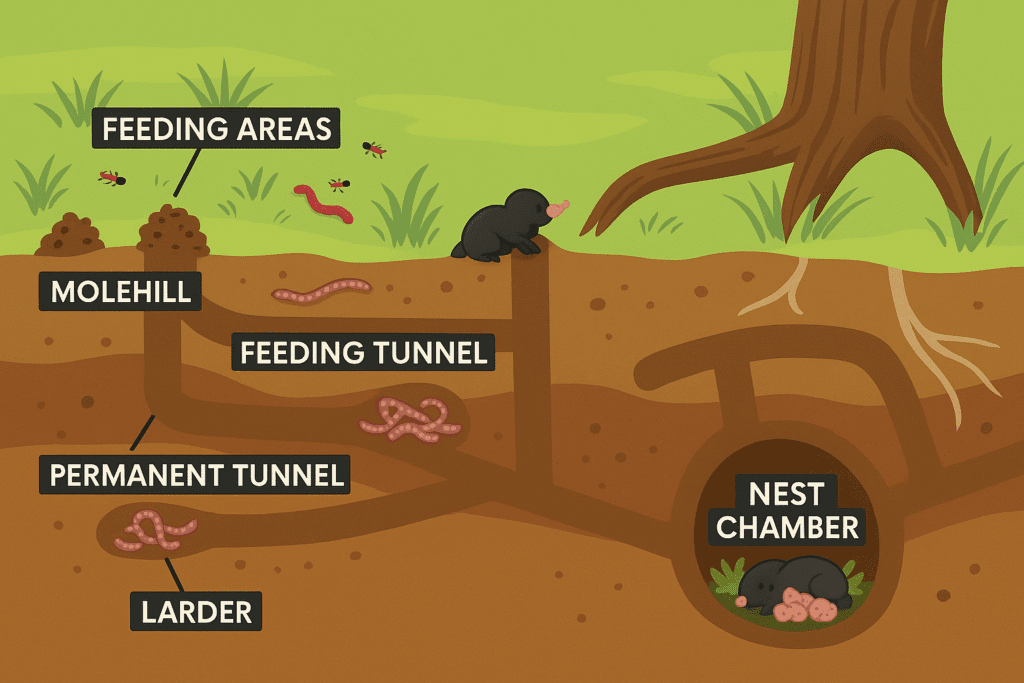
1. The Different Types of Mole Tunnels
Moles dig tunnels for different reasons, and each type plays a role in their daily routine. Knowing how they work helps in effectively deterring them.
A. Feeding Tunnels (Shallow Tunnels)
- Found just below the surface, often appearing as raised ridges in lawns.
- Used for hunting worms and insects, as moles detect prey through vibrations.
- Constantly expanded as the mole forages for food.
Speaking of worms, did you know that Worm Castings make a great natural fertiliser – Learn more here!
B. Nesting Chambers (Deep Tunnels)
- Located 6-12 inches underground, typically in sheltered areas.
- Lined with grass and leaves, providing a warm, dry space for resting and breeding.
- Moles prefer these quiet, undisturbed spaces and will return to them unless disrupted.
C. Travel Tunnels (Main Runways)
- Deeper, more permanent tunnels that connect different sections of the network.
- Frequently used by moles to move between feeding areas and nests.
- If repeatedly disturbed, moles will abandon these pathways in search of a safer location.
2. How Mole-Mills Disrupt Tunnel Systems
Disturbing Feeding Areas
- Since feeding tunnels are near the surface, vibrations from Mole Windmill easily penetrate and create an unstable hunting ground.
- Moles rely on quiet, stable conditions to detect prey—constant movement discourages them.
Making Nesting Chambers Unlivable
- Sound waves and vibrations travel downward, disturbing deeper tunnels where moles rest.
- Moles prefer peaceful nesting areas, so continuous noise and movement force them to relocate.
Interrupting Main Runways
- Placing Mole Windmill along key tunnel paths ensures that moles are constantly disturbed.
- Since moles rely on these routes for daily movement, they will eventually seek less disrupted locations.
Best Placement for Mole Windmill to Stop Moles Digging Tunnels
- Identify active tunnels by flattening a section and checking if it’s rebuilt within 24 hours.
- To stop moles from digging tunnels, place Mole Windmill near fresh molehills and along active burrows where moles are most likely to return.
- For larger gardens, installing multiple Mole Windmill increases coverage and effectiveness.
By understanding how moles use their tunnels, you can maximize the impact of Mole Windmill and make your garden an unwelcoming environment for these burrowing pests.
Materials Needed to Build a Mole Windmill
Looking for the best DIY mole deterrent? Building a Mole Windmill is an easy, affordable way to stop moles from digging up your lawn. With just a few materials, you can create an eco-friendly mole removal tool that naturally deters moles.

1. Windmill Propeller
- The key component that catches the wind and generates movement.
- You can buy one pre-made or craft your own using lightweight plastic or metal.
- Choose a weatherproof design that spins freely to ensure continuous motion.
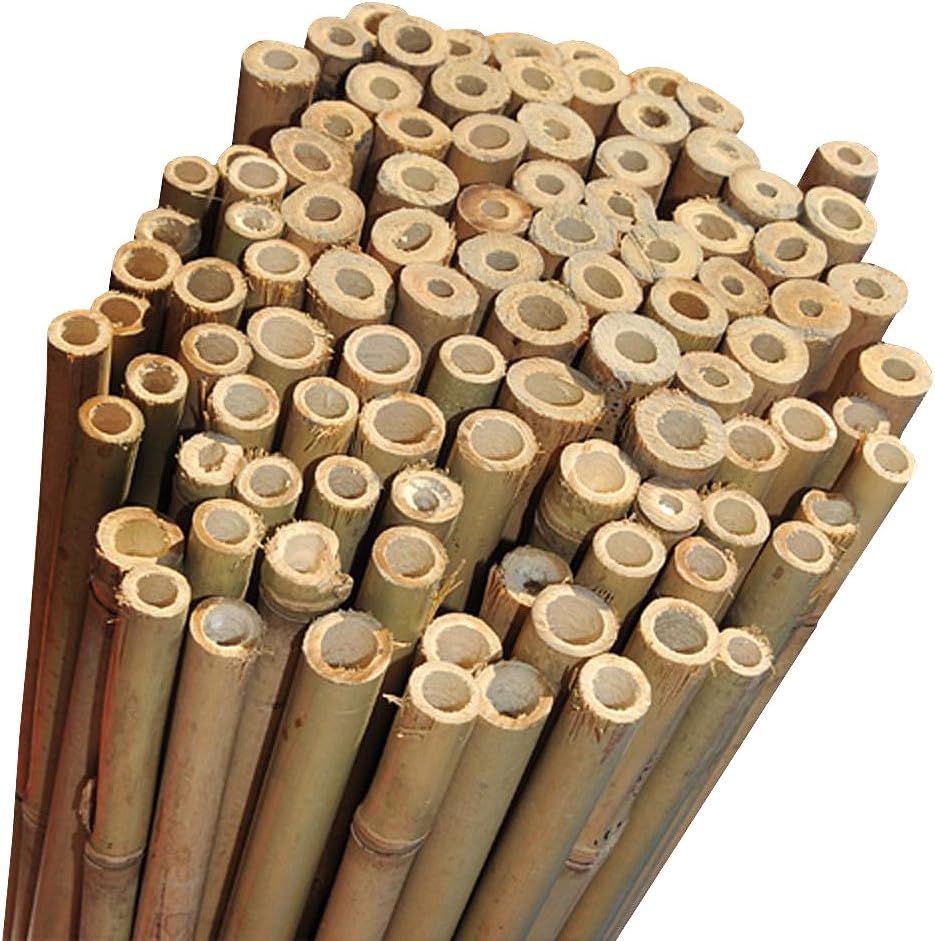
2. Bamboo Pole (4ft+ in Length)
- Serves as a vibration transmitter, carrying movement from the windmill down into the ground.
- Bamboo is lightweight, flexible, and naturally resistant to rot.
- Select a diameter that fits snugly with the windmill head to maintain stability.

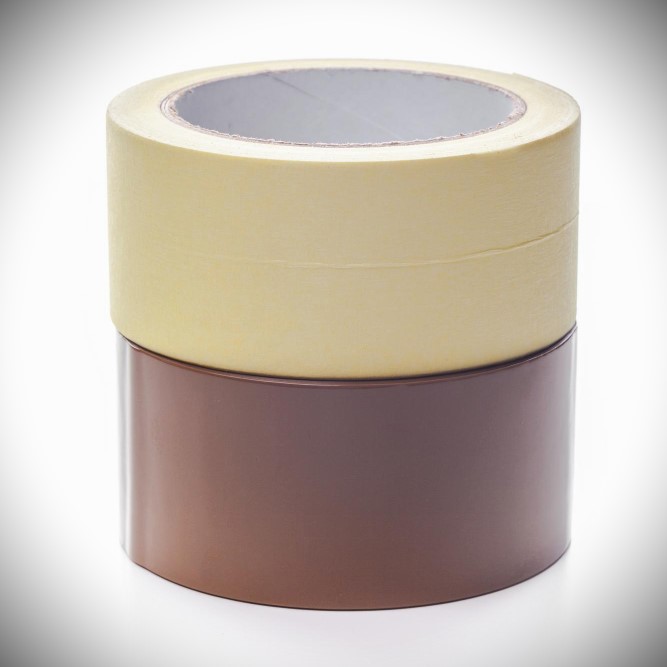
3. Large Plastic Bottle
- Enhances sound and vibrations, making mole tunnels uninhabitable.
- A 2-liter soda bottle works best—just cut off the bottom.
- The bamboo pole should pass through the bottle’s top, allowing movement to create rattling noises.

4. Scissors or a Craft Knife
- Essential for cutting the bottle base and adjusting material as needed
- A craft knife or stanley knife will ensure a precise cut (be careful!)
5. Strong Adhesive or Tape (Optional)
- If the windmill needs reinforcement, use waterproof tape or strong glue.
- Some windmill heads come with pre-fitted connections, eliminating the need for additional securing.
Optional Upgrades for Extra Effectiveness
- Metal Washers or Small Bells – Enhances noise output for stronger deterrence.
- Reflective Tape or Paint – Deters additional pests while improving windmill visibility.
- Multiple Mole-Mills – Installing several devices across your garden increases coverage and effectiveness.
With these DIY mole deterrent materials, you can build a Mole Windmill that uses wind energy to stop moles from burrowing under your lawn. This eco-friendly and humane mole control solution is simple to assemble and highly effective.
How to Build a DIY Mole Windmill: Step-by-Step Wind-Powered Mole Deterrent
Looking for the best DIY mole deterrent to stop moles from digging in your lawn? Building a Mole Windmill is a quick, affordable, and eco-friendly way to keep moles away. Follow these steps to create your own wind-powered mole control solution.
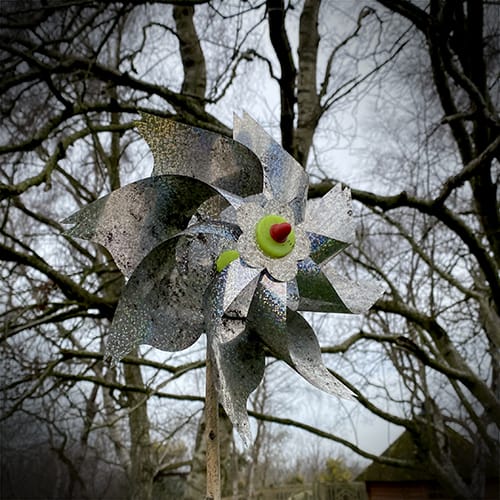
1: Prepare the Windmill Propeller
- If using a pre-made windmill, ensure it’s securely attached to its mounting piece.
- For a DIY windmill, cut lightweight plastic or metal blades and fasten them to a central hub.
- Test the spinning motion to confirm it rotates freely in the wind.
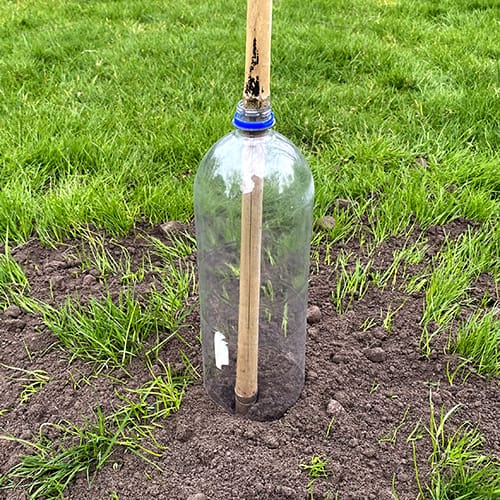
2: Modify the Plastic Bottle
- Select a large plastic bottle (a 2-liter soda bottle works well).
- Using scissors or a sharp knife, cut off the bottom to create an open-ended chamber.
- Keep the bottle top intact, as the bamboo pole will pass through it.
Prefer the Easy, No Build Option?
Not everyone has the time (or tools) to build a DIY Mole-Mill from scratch — and that’s perfectly fine.
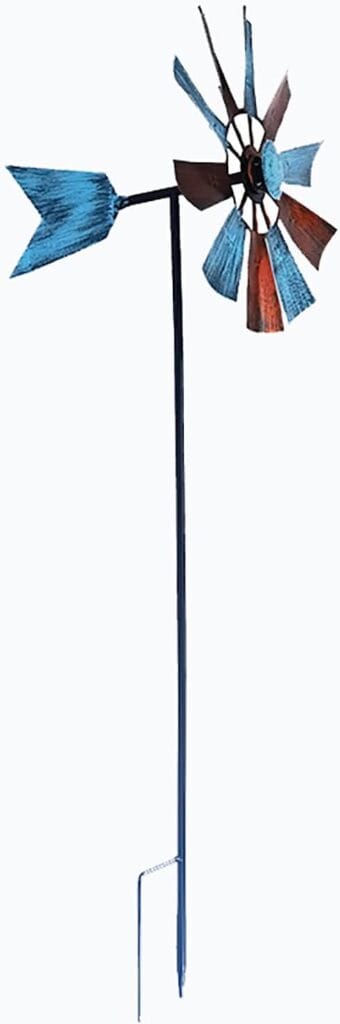
In fact, one of our readers recently picked up this ready-made windmill on Amazon after reading this very article — and it works brilliantly for deterring moles using the same principles of vibration and movement.
👉 If you’re short on time or prefer a plug-and-play option, this one is ideal:
WYSRJ 29-Inch Rainbow Metal Windmill
Durable, vibrant, and spins freely in even light wind — perfect for mole deterrent setups without the DIY hassle.
- Eye-catching flower design
- Spins well in light breezes for max vibration
- Tough metal blades — long-lasting outdoors
Price: £11.75 with free delivery
3: Attach the Windmill to the Bamboo Pole
- Securely insert the windmill head onto the top of the bamboo pole.
- Ensure it fits snugly and securely—use tape, glue, or zip ties if needed.
- The windmill should spin freely to generate continuous vibrations.
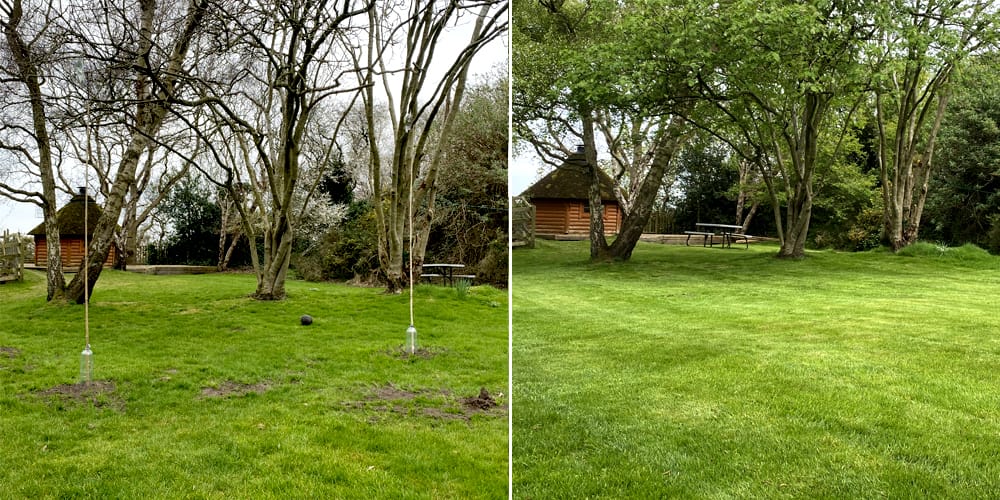
4: Install Your Mole Windmill for Maximum Effectiveness
- Locate a fresh molehill or an active tunnel.
- Insert the bamboo pole into the tunnel entrance, pushing it at least 6 inches into the ground.
- Position the rim of the bottle so it touches the bamboo pole—this enhances sound amplification.
- For larger gardens, install multiple Mole Windmill to expand coverage.

Step 5: Test the Mole Windmill
- Step back and observe the windmill spinning in the breeze.
- Listen for the rattling sounds created by the bottle against the bamboo.
- If the windmill isn’t spinning properly, adjust its position to catch more wind.
6: Maintain and Optimize
- Regularly check the windmill’s movement to ensure it operates effectively.
- If mole activity continues, relocate the Mole Windmill to another active tunnel.
- Install additional Mole Windmill for broader coverage if necessary.
How Long Does It Take for a Mole Windmill to Work?
- Most moles move on within 1-2 weeks of installation.
- If they persist, try repositioning the Mole Windmill in another active tunnel.
By following these steps, you can build the best DIY mole deterrent to stop moles from burrowing in your lawn. This eco-friendly and natural mole control solution is simple to install and highly effective.
How to Use Mole Windmill Effectively: Best Practices for Maximum Mole Control
Wondering how to keep moles out of your garden permanently? These best practices for Mole Windmill will help you stop moles in your garden by maximizing vibrations and sound amplification. Proper placement, installation, and maintenance ensure that Mole-Mills function as a long-term, eco-friendly mole deterrent.
1. Place Mole Windmill Strategically
- Identify active mole tunnels by flattening a section of a raised ridge and checking if it’s rebuilt within 24 hours.
- To stop moles from digging new tunnels, position Mole Windmill near fresh molehills and along active burrows.
- If you have a large garden, install multiple Mole Windmill to expand coverage and create a stronger deterrent.
2. Install Correctly for Best Results
- Push the bamboo pole at least 6 inches deep into the tunnel for direct vibration transfer.
- Ensure the rim of the bottle touches the pole to amplify noise and make the tunnels uninhabitable.
- Set up the windmill in an open space where it can catch enough wind for continuous motion.
3. Monitor and Adjust Regularly
- Check the windmill weekly to ensure it spins freely and isn’t obstructed.
- If mole activity continues, move the Mole-Mill to another active tunnel.
- In low-wind areas, consider installing additional units or raising the pole height to improve airflow.
4. Use Multiple Mole Windmill for Full Coverage
- Moles often create extensive tunnel networks, so a single device may not be enough.
- Place a Mole-Mill every 10-15 feet in high-activity areas for improved results.
- If your garden is large, consider using at least 3-5 Mole Windmill for maximum mole deterrence.
5. Maintain for Long-Term Success
- Replace any damaged windmill blades or broken poles to keep the system working effectively.
- Check that the bottle remains intact to ensure continued sound amplification.
- If the bamboo pole becomes loose, secure it properly to maintain effective vibration transfer.
By following these best practices for Mole Windmill, you can create an effective, long-term mole control solution. This eco-friendly, humane method will help stop moles from burrowing under your lawn and protect your garden naturally.
Best Alternative Mole Removal Solutions: Natural & Humane Options
Looking for the best alternative mole removal solutions? While Mole Windmill are an effective and eco-friendly way to deter moles, some gardens may require additional mole control methods to stop moles from digging tunnels and burrowing under your lawn. Here are some of the best natural and humane options to keep your garden mole-free.
1. Commercial Sonic Mole Repellents
- These battery- or solar-powered devices emit ultrasonic vibrations that disrupt moles.
- Some models pulse intermittently, preventing moles from adapting to the sound.
- Best suited for large areas, where multiple units can provide broader coverage.
2. Natural Mole Deterrents
- Castor Oil Solutions: Moles dislike castor oil, as it disrupts their digestion when they burrow through treated soil.
- Predator Urine: Fox or coyote urine signals danger, encouraging moles to relocate.
- Strong-Smelling Plants: Planting marigolds, daffodils, or alliums near mole tunnels can help deter them naturally.
- How to Get Rid of Moles Naturally: Combining these natural mole deterrents can enhance effectiveness and significantly reduce mole activity over time.
3. Mole Traps (Humane & Lethal Options)
- Live-Catch Traps: Capture and relocate moles safely away from your property.
- Scissor or Tunnel Traps: Highly effective but require proper placement and frequent checking.
- Legal Considerations: Always check local regulations before using lethal trapping methods.
4. Modify Your Soil to Discourage Moles
- Compact the Soil: Moles prefer loose, aerated soil. Compacting the ground makes tunneling more difficult.
- Reduce Grub & Worm Populations: Moles thrive where food is abundant—using beneficial nematodes can lower grub populations and reduce their food supply.
- Install Gravel or Wire Mesh Barriers: Placing barriers around garden beds prevents moles from burrowing in specific areas.
- Best Way to Stop Moles Digging Tunnels: A combination of soil modification and deterrents creates an environment that moles find uninviting.
5. Improve Your Mole Windmill for Better Results
- Attach Reflective Tape: This helps deter moles and birds while making the windmill more visible.
- Use Metal Washers or Bells: These add extra noise when the windmill moves, increasing the deterrent effect.
- Install More Mole Windmill: For larger infestations, set up multiple devices to cover a wider area effectively.
Which Solution Works Best?
- If you’re looking for a low-maintenance and humane option, Mole Windmill or sonic repellents are ideal.
- For persistent mole activity, combining Mole Windmill with castor oil treatments or predator deterrents can be more effective.
- If other methods fail, humane live traps allow for safe relocation without harming the moles.
By combining these alternative mole removal solutions, you can create an effective, long-term mole control strategy. Whether you choose natural mole deterrents, sonic repellents, or live traps, these methods will help keep moles out of your garden permanently.
Mole Windmill FAQ: How to Use Wind-Powered Mole Deterrents Effectively
Mole Windmill use wind-powered vibrations and noise to create an unstable underground environment that moles find unsettling. As the windmill spins, vibrations travel down the bamboo pole, while the plastic bottle amplifies sound inside the tunnels. This combination disrupts the mole’s habitat, encouraging them to move elsewhere.
Most moles leave within 1-2 weeks, but the timing depends on the size of the infestation and how many Mole-Mills you’ve installed. For larger gardens, placing multiple devices improves the chances of success.
– Near fresh molehills or along active tunnels (flatten a tunnel and check if it’s rebuilt within 24 hours to confirm activity).
– Spaced every 10-15 feet in mole-prone areas.
– In open, wind-exposed spaces to ensure the windmill keeps spinning.
Yes! If your garden has multiple mole tunnels, installing several Mole Windmill will improve coverage and effectiveness. A good rule of thumb is to place one every 10-15 feet in affected areas.
Mole Windmill are one of the best natural mole deterrents because they use wind energy to create continuous ground vibrations, making tunnels uninhabitable. Unlike traps or poisons, they don’t harm moles and provide a low-maintenance, long-term solution.
Check if the windmill blades are obstructed or need lubrication.
Ensure the pole is tall enough to catch the wind.
Try relocating the Mole Windmill to a less sheltered area with stronger airflow.
Absolutely! Pairing Mole Windmill with castor oil treatments, gravel barriers, or natural mole-repelling plants (such as daffodils and marigolds) can enhance their effectiveness.
Mole Windmill require very little maintenance, but it’s a good idea to check them occasionally to:
Ensure the windmill spins freely.
Confirm the bottle is intact and still amplifying noise.
Adjust placement if needed for better wind exposure.
Mole-Mills work best in open, wind-exposed gardens. If placed in sheltered areas with low wind, they may be less effective. In such cases, consider using multiple Mole Windmills or pairing them with additional deterrents.
Reposition the Mole Windmill to target newly active tunnels.
Increase the number of devices for broader coverage.
Combine with other deterrents to strengthen your strategy.
Mole Windmill are one of the best DIY mole deterrents that use wind energy to stop moles naturally. This eco-friendly and humane solution prevents moles from burrowing in your garden without harmful chemicals.
Conclusion: Why Mole Windmill Are the Best Natural Mole Deterrent
Looking for the best natural way to get rid of moles? Moles can wreak havoc on your lawn, but you don’t need harmful chemicals or expensive mole removal services. Instead, try a DIY wind-powered mole deterrent that encourages moles to move on naturally. Mole Windmill provide a simple, budget-friendly, and eco-conscious solution that effectively deters moles without harming them or the environment.
Why Choose Mole Windmill?
- Humane & Non-Toxic: Encourages moles to relocate without traps or poisons.
- Eco-Friendly: Powered by wind energy, reducing reliance on chemical repellents.
- Affordable & DIY-Friendly: Uses low-cost, easy-to-find materials that anyone can assemble.
- Proven Effectiveness: Generates constant vibrations and sound, making mole tunnels inhospitable.
Final Tips for Success
- Install multiple Mole Windmill if you have a large garden or widespread mole activity.
- Place them near active tunnels and adjust their position as needed for maximum impact.
- Keep them in wind-exposed areas to ensure continuous movement and vibrations.
- Combine them with proven natural mole deterrents like castor oil, predator urine, and mole-repelling plants for even better results.
Share Your Experience!
Have you built a Mole Windmill? Let us know how it worked! Join the conversation in our Facebook group, and share your results, tips, or improvements. Want to learn how to keep moles out of your garden for good? Check out our comprehensive guide on DIY mole control solutions and discover more eco-friendly pest control tips for a healthy, mole-free lawn!