Introduction
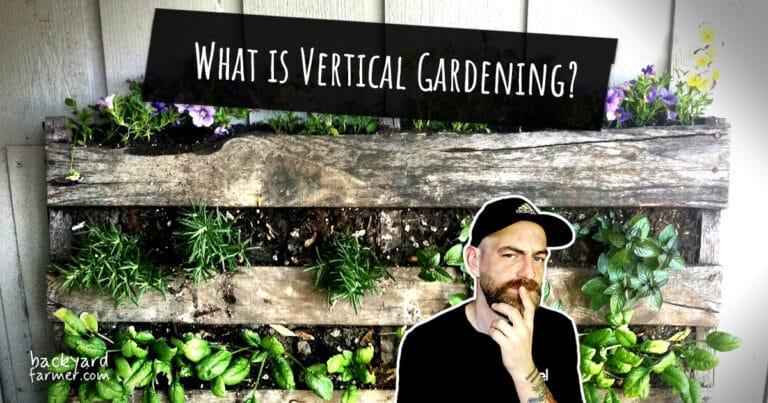
Ever wondered what vertical gardening is all about? It’s a method of growing plants in a vertical, stacked arrangement using containers, wall planters, or elaborate tower gardens. This clever technique is perfect for maximizing every inch of indoor environments with more wall space than floor space, allowing plants to thrive like they’re in high-rise apartments with fewer weeds for neighbors.
Key Benefits of Vertical Gardening:
- Space Efficiency: Maximizes limited indoor spaces by utilizing vertical areas.
- Pest and Weed Reduction: Helps deter pests and minimizes weed growth, making maintenance easier.
- Simplified Harvesting: Makes accessing and harvesting plants more straightforward.
Whether you’re an experienced gardener or a green-thumbed novice eager to turn that blank wall into a verdant display, vertical gardening is a smart, space-efficient way to bring a bit of nature indoors.
Choosing the Right Vegetables for Vertical Growing
Selecting the right vegetables for your vertical garden is crucial for success. Not all veggies are suited for upward growth; some thrive while others might struggle. Ideal candidates are those that naturally grow upright or can easily be trained to climb. Herbs like basil and mint, leafy greens such as lettuce and spinach, and climbers like tomatoes and peas are perfect for vertical spaces. However, it’s wise to avoid heavier, root-bound vegetables like carrots or potatoes that need deep soil to expand. From personal experience, let’s just say my attempt at vertical pumpkins turned into an impromptu squash fest!
Best Vegetables for Vertical Gardening
| Vegetable | Type | Why It Works Well |
|---|---|---|
| Basil | Herb | Grows compactly, easy to harvest |
| Mint | Herb | Spreads easily, manageable in confined spaces |
| Lettuce | Leafy Green | Minimal root depth required, quick turnover |
| Spinach | Leafy Green | Grows quickly, can be harvested multiple times |
| Tomatoes | Climber | Can be trained to grow up supports |
| Peas | Climber | Naturally climbs, lightweight and produces abundantly |
Understanding which plants are best suited for vertical growth will not only ensure a thriving garden but also prevent the common pitfalls of mismatched plantings in your vertical setup.
Essential Supplies and Setup
Getting started with vertical gardening requires more than just seeds and enthusiasm—you’ll need the right setup to support your verdant ambitions. First, you’ll need to choose the right type of containers. Options like stackable planters, wall pockets, or trellises are not only space-efficient but also quite stylish. Opt for lightweight materials if you plan on hanging your garden to ensure safety and ease of maintenance. Lighting is another crucial element; most vegetables thrive on 6-8 hours of sunlight. If your indoor space doesn’t get enough natural light, consider investing in LED grow lights—they mimic natural sunlight and can drive impressive growth without the hefty energy costs.
And don’t forget about the creative touches! I’ve found that repurposing old items like colanders into hanging planters not only saves money but adds a quirky charm to your garden. These planters are particularly great for herbs and small vegetables, allowing excess water to drain away naturally, which is vital for preventing root rot. Remember, the right setup not only supports your plants but also makes your gardening efforts more enjoyable and fruitful.
Estimated Costs for Essential Vertical Gardening Supplies
| Supply | Description | Estimated Cost |
|---|---|---|
| Stackable Planters | Modular units for vertical stacking | $20-$50 each |
| Wall Pockets | Fabric or plastic pockets for walls | $10-$30 each |
| Trellises | Supports for climbing plants | $15-$40 each |
| LED Grow Lights | Artificial lights for indoor gardens | $30-$100 depending on size |
| Colanders (DIY) | Used as hanging planters | $5-$15 each (if repurposed) |
Use this table as a guideline to prepare your budget and shopping list. The prices can vary based on quality, size, and material, so consider what’s most important for your specific garden needs.
Step-by-Step Guide to Setting Up Your Indoor Vertical Garden
Creating your own indoor vertical garden can be a rewarding endeavor, transforming a bland space into a lush, green sanctuary. Follow these steps to ensure your garden is both beautiful and productive:
Planning Your Garden
- Measure Your Space: Start by measuring the area where you want to install your garden. Consider the height and width, and remember that you’ll need access for watering and maintenance.
- Choose Your Style: Decide whether you want to use stackable planters, wall-mounted pockets, or trellises. Each has its own aesthetic and functional benefits.
- Select Your Plants: Based on the light availability and the space you’ve measured, choose plants that will thrive in your setup. Herbs, leafy greens, and some climbers are ideal for vertical indoor gardens.
Gathering Materials
- Containers: Purchase or repurpose containers that match your space and style preferences.
- Support Structures: Get trellises or mounting hardware suitable for your chosen plants and containers.
- Soil and Fertilizers: Opt for high-quality potting soil and suitable fertilizers to ensure plant health and growth.
- Watering System: Consider a drip irrigation system for ease and efficiency, especially in larger setups.
Building the Structure
- Assemble the Framework: Depending on your choice of structure, assemble your planters, pockets, or trellises securely. Ensure everything is stable and can support the weight of the soil and plants.
- Install Lighting: If natural light isn’t sufficient, set up your LED grow lights to provide adequate light for your plants to flourish.
Planting
- Prepare the Soil: Fill your containers with potting soil, mixing in fertilizer as recommended.
- Plant Seedlings: Place your plants or seedlings into the soil, spacing them appropriately to avoid overcrowding. Ensure climbing plants are near supports they can grow into.
- Water Thoroughly: Once everything is planted, give your garden a good watering, ensuring the soil is moist but not waterlogged.
Maintenance
- Regular Watering: Set up a routine to water your garden, adjusting based on the humidity and temperature of your indoor environment.
- Pruning and Training: Regularly prune your plants to encourage growth and prevent them from overrunning the space. Train climbers gently towards their supports.
- Monitoring Health: Keep an eye out for signs of pests or disease. Treat issues promptly to prevent them from spreading.
Enjoying Your Garden
Once your garden is established, enjoy the fresh herbs and vegetables at your fingertips. Not only will your vertical garden provide fresh produce, but it will also beautify your living space and create a healthier indoor environment.
Maintaining Your Indoor Vertical Garden
Once your indoor vertical garden is up and thriving, maintaining it becomes your next priority to ensure it continues to flourish. Regular watering, proper fertilization, and pest management are key to a healthy garden. Here’s a quick reference table for your regular maintenance tasks:
Maintenance Tasks for Indoor Vertical Gardens
| Task | Frequency | Details |
|---|---|---|
| Watering | As needed (usually daily or every other day) | Check soil moisture; use a drip irrigation system for consistency. |
| Fertilizing | Every 4-6 weeks | Use organic fertilizers suitable for indoor plants. |
| Pest Monitoring | Weekly | Inspect plants for pests; use neem oil or other natural remedies as needed. |
| Pruning | Monthly | Trim overgrowth and remove dead or diseased foliage. |
| General Inspection | Bi-weekly | Check for signs of stress, disease, or nutrient deficiencies. |
By following these regular maintenance tasks, you can keep your vertical garden healthy and vibrant. Watering deeply yet infrequently encourages strong root growth, while organic fertilizers nourish your plants without overwhelming them. Keep an eye out for pests and tackle them promptly using eco-friendly solutions. Regular pruning and cleaning not only keep your garden tidy but also promote robust growth and prevent disease. With consistent care, your vertical garden will remain a lush and productive part of your home.
Harvesting and Using Your Produce
Harvesting your produce from an indoor vertical garden is both exciting and rewarding, marking the culmination of your gardening efforts. To ensure the best quality and flavor, harvest your vegetables and herbs in the morning when they are most hydrated and the temperatures are cooler. Use clean, sharp scissors or shears to cut the produce; this prevents damage to the plants and encourages future growth. For leafy greens like lettuce and spinach, harvest the outer leaves first, allowing the inner leaves to continue growing. Herbs can be trimmed regularly to promote bushier growth and prevent them from flowering, which often diminishes flavor.
Harvesting Guide for Popular Vertical Garden Vegetables
| Vegetable | When to Harvest | How to Harvest | Usage Tips |
|---|---|---|---|
| Basil | When leaves are vibrant and large enough to use | Pinch off the leaves from the top to encourage bushier growth | Perfect for fresh pesto or adding to dishes at the end of cooking |
| Lettuce | 5-6 weeks after planting, before it bolts (flowers) | Harvest outer leaves first, allowing center leaves to continue growing | Use freshly in salads or as wraps for fillings |
| Spinach | 6 weeks after planting, before it bolts | Cut leaves at the base, about an inch from the soil | Ideal for salads, smoothies, or cooked dishes |
| Tomatoes | When fruit is uniformly colored and firm | Gently twist off the fruit or use garden shears | Eat fresh, use in cooking, or can for later use |
| Peas | When pods are plump but not overly mature | Snip or pinch off at the vine gently | Best eaten fresh, cooked lightly, or frozen for later use |
Once harvested, your fresh produce can be used immediately in your cooking, bringing a burst of flavor and nutrition to your meals. Here are some fantastic recipe ideas to help you make the most of your garden’s bounty.
Recipe Suggestions for Fresh Produce
- Basil: Enjoy the vibrant flavors of your garden with this classic Homemade Basil Pesto Recipe that’s perfect for pasta, sandwiches, and more.
- Lettuce: Refresh any meal with a simple yet delicious Garden Fresh Salad Recipe, utilizing your crisp, home-grown lettuce.
- Spinach: Start your day healthy with this nutrient-packed Green Spinach Smoothie Recipe, a perfect use for freshly picked spinach.
- Tomatoes: Capture the essence of fresh tomatoes in this Easy Homemade Tomato Sauce Recipe, ideal for a family pasta night.
- Peas: Add a touch of sweetness to your dishes with this quick and easy Peas and Mint Side Dish Recipe, a great way to use your fresh peas.
Integrating freshly harvested vegetables into your meals not only enhances the flavor but also increases the nutritional value of your food. Whether you’re whipping up a quick salad or a hearty sauce, the freshness of home-grown produce is incomparable. Don’t forget to adjust recipes based on your harvest size and personal taste preferences to get the best results from your vertical garden!
Troubleshooting Common Problems
Even the most meticulously maintained vertical gardens can encounter issues, but don’t worry—most problems have simple solutions:
- Identify Signs of Distress: Common signs include:
- Yellowing Leaves: Often indicates overwatering.
- Drooping or Wilting: Could signal insufficient water or light.
- Adjust Watering Schedule: Vertical gardens tend to dry out faster than traditional gardens. Monitor the soil’s moisture closely and adjust your watering accordingly.
- Enhance Lighting: In indoor settings where natural light is limited, consider using supplemental LED lights designed for plant growth.
- Manage Pests: Common pests like aphids and spider mites can often be controlled with:
- Organic Pesticides: Neem oil is effective and safe for both plants and humans.
- Regular Inspections: Check your garden frequently to treat infestations early and prevent their spread.
- Prune Promptly: Remove diseased or dead foliage to maintain plant health and prevent issues from spreading.
Remember, most problems in vertical gardening are manageable with prompt attention and adjustments, ensuring your garden remains a healthy and vibrant space.
In-Depth Troubleshooting for Vertical Gardens
| Problem | Possible Causes | Immediate Solutions | Preventative Measures |
|---|---|---|---|
| Yellowing Leaves | Overwatering, nutrient deficiencies, poor soil drainage | Adjust watering schedule, enhance soil nutrients with a balanced fertilizer, ensure adequate drainage in containers | Regularly test soil moisture and nutrient levels; choose soil with good aeration properties |
| Wilting/Drooping | Underwatering, insufficient light, root bound plants | Increase watering frequency, relocate plants to brighter areas, repot plants if root bound | Install a consistent irrigation system; use grow lights where natural light is insufficient |
| Pest Infestation | Aphids, spider mites, whiteflies attracted to stressed plants | Apply organic pesticides like neem oil, introduce beneficial insects such as ladybugs | Maintain plant health to reduce stress; inspect new plants before introducing them to the garden |
| Stunted Growth | Inadequate light, poor soil quality, overcrowded planting | Enhance lighting conditions, enrich soil with compost, thin out crowded plants | Plan garden layout to ensure adequate space and light for each plant; use high-quality potting mix |
| Mold or Fungus | Excessive moisture, poor air circulation | Reduce watering, improve air circulation around plants, treat with organic fungicides | Ensure good air flow in garden design; avoid overwatering and ensure soil has good drainage |
By addressing these issues promptly and adhering to these preventative strategies, you can minimize the impact of common gardening challenges and enjoy a more resilient vertical garden. Regular monitoring and maintenance are key to sustaining the health and beauty of your vertical gardening efforts.
Conclusion
Vertical gardening offers a creative and efficient way to utilize space and grow vegetables and herbs right at home. By understanding the specific needs of vertical gardening—from the correct setup and appropriate plant selection to routine maintenance and troubleshooting—you can create a vibrant, productive vertical garden that not only saves space but also enhances your living environment. Remember, the key to successful vertical gardening lies in careful planning, ongoing care, and a willingness to adapt practices as needed. Whether you’re crafting a small herb garden or a full-scale vegetable production, the principles of vertical gardening will help you make the most of your available space and provide fresh produce throughout the year.