Introduction
Composting toilets are a sustainable, water-saving solution that naturally manage human waste. Building a DIY composting toilet is an affordable, practical option that allows you to create a customized design perfect for off-grid homes, cabins, RVs, and even garden spaces.
Benefits of a DIY Composting Toilet:
- Cost-effective: Cheaper than commercial models.
- Customizable: Adjust size, materials, and features to suit your space.
- Sustainable: Reduces water waste and converts waste into usable compost.
Who is this guide for?
- Budget-conscious homeowners.
- Off-grid enthusiasts and eco-conscious individuals.
- DIYers looking for a practical and easy project.
For more information on composting toilet systems and their environmental benefits, visit the EPA’s guide on composting toilets
Continue your sustainable living journey
If you’re building a DIY composting toilet, these guides will help you explore related sustainable systems, maintenance, and composting tools.
- Best composting toilets: top picks for homes, cabins and RVs
Reviews and recommendations to help you compare systems if you’re expanding sustainable sanitation. - Composting toilet maintenance: how to clean and care for your system – Practical tips for keeping your composting toilet clean, safe, and long-lasting.
- Composting toilet odor control: practical solutions and pro tips – A guide to managing and reducing smells, so your composting toilet stays pleasant and functional.
Materials and Tools You Will Need
Materials:
- 5-gallon bucket (or similar container)
- Toilet seat (standard or custom)
- Plywood or wood for the frame
- Urine diverter (optional but recommended)
- Sawdust, peat moss, or coconut coir for cover material
- Hinges (for lid)
- Screws and nails
- Vent pipe (optional for odor control)
Tools:
- Drill and screws
- Saw (hand or electric)
- Measuring tape
- Sandpaper
- Paint or sealant (eco-friendly for finishing)
Tip: Link to recommended tools and materials for easy sourcing.
Step-by-Step Guide to Building Your DIY Composting Toilet
1: Build the Frame
- Measure and cut the plywood to create a sturdy box frame.
- Ensure the frame fits your 5-gallon bucket snugly.
- Sand all edges for a smooth finish to avoid splinters.
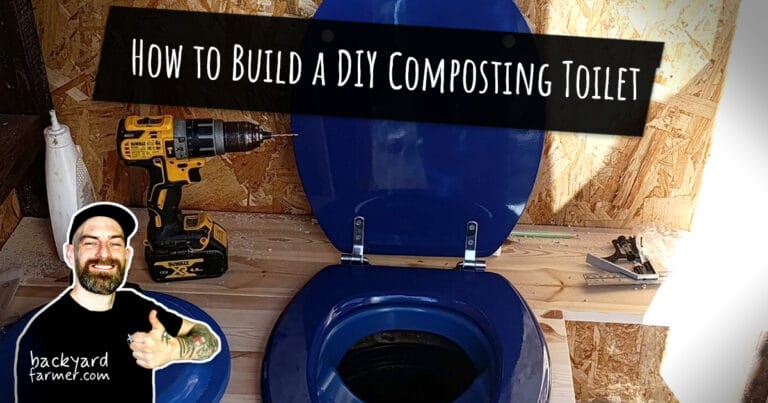
2: Attach the Toilet Seat
- Secure the toilet seat to the top of the frame using screws.
- Install hinges for a lid to cover the seat when not in use.
3: Prepare the Bucket
- Place the 5-gallon bucket inside the frame.
- Optional: Install a urine diverter to separate liquids and solids, which helps reduce odor.
4: Add a Ventilation System (Optional)
- Drill a hole in the back or side of the frame for the vent pipe.
- Attach the vent pipe to allow airflow and minimize smells.
- Extend the pipe outdoors if the composting toilet is used indoors.
5: Finishing Touches
- Sand the entire frame and paint it with eco-friendly sealant for durability.
- Place a container nearby for sawdust or other cover material.
- Test the toilet for comfort and usability before finalizing its location.
Pro Tip: Ventilation is key to keeping your composting toilet odor-free, especially for indoor use.
How to Use and Maintain Your DIY Composting Toilet
Using Your Composting Toilet
- Add a layer of sawdust, peat moss, or coconut coir to the bottom of the bucket before first use.
- After each use, cover waste with another layer of sawdust to control odor and aid decomposition.
- Use a urine diverter to keep liquids and solids separate, improving compost quality.
Maintaining Your Composting Toilet
- Empty the bucket regularly (weekly or bi-weekly, depending on usage).
- Clean the bucket with biodegradable soap and water before reuse.
- Always replace the cover material after emptying.
Odor Control Tips:
- Use proper ventilation to maintain airflow.
- Use dry, high-quality cover materials like sawdust or coconut coir.
- Avoid overfilling the bucket—empty it before it becomes too full.
Benefits of a DIY Composting Toilet
- Cost Savings: Build for a fraction of the price of commercial options.
- Eco-Friendly: Reduces water usage and turns waste into compost.
- Customizable: Design it to fit your specific needs and space.
- Portable: Ideal for RVs, tiny homes, and off-grid living.
- Sustainable: Promotes responsible waste management.
Frequently Asked Questions (FAQs)
Most DIY setups cost between $20-$100, depending on materials used.
Sawdust, peat moss, and coconut coir are excellent options for odor control and composting.
Typically once a week for regular use, but this depends on the size of the bucket and usage frequency.
Yes, but ensure proper ventilation to keep odors at bay.
Compost solids in a dedicated bin for non-edible plants (check local regulations for composting waste).
Conclusion
Building a DIY composting toilet is a simple, affordable, and eco-friendly way to manage waste sustainably. With minimal materials, tools, and effort, you can create a custom solution perfect for off-grid living, RVs, cabins, or outdoor spaces.
For a detailed comparison of the top composting toilets available, check out our guide on the best composting toilets for homes, cabins, and RVs.