Why Try a DIY Solar Food Dehydrator?
With energy bills climbing and food waste piling up, finding ways to preserve fresh produce without extra costs has never been more important. A DIY solar food dehydrator is a simple, eco-friendly solution. Using only free sunlight, it can dry fruit, herbs, vegetables, and homemade snacks — no electricity required.
Compared to running the oven for hours or plugging in an electric dehydrator, a solar food dryer relies on passive heat and natural airflow. This makes it cheaper to run, gentler on flavour, and better at preserving nutrients. In the end, you get tasty, long-lasting food while keeping your kitchen sustainable.
Who This Is For
A solar food dehydrator is ideal for:
- Gardeners and allotment growers with seasonal gluts of apples, plums, tomatoes, or courgettes.
- Eco-conscious households aiming for zero-waste food storage and passive food preservation.
- DIY and off-grid enthusiasts who enjoy practical, energy-free food preservation projects.
- Families looking for healthy, low-cost snacks and a weekend project.
What You’ll Learn
In this guide, you’ll discover:
- Why a solar dehydrator often outperforms electric models.
- What reclaimed materials you’ll need.
- Step-by-step instructions on how to build your own.
By the end, you’ll know how to turn sunlight into shelf-stable food security — while saving money and reducing waste. Pair the solar dehydrator with the firewood cooking guides for more off-grid food prep ideas.
Continue your sustainable food & DIY energy journey
- Low-energy food preservation: zero-waste pantry – Learn broader low-energy techniques for preserving food without high electricity use
- Off-grid solar kits UK complete guide – Compare different off-grid solar setups and see how energy systems tie in with DIY projects like dehydrators
- How do solar panels work — understanding the basics of solar energy – Get a plain-English explanation of solar technology that helps you see how your dehydrator and solar setups work under the hood
Why Build a DIY Solar Food Dehydrator Instead of Using an Oven or Electric Dehydrator?
Drying food is one of the oldest preservation methods, but how you do it today makes a big difference in flavour, cost, and sustainability. Many households turn to ovens or plug-in dehydrators, but both can get expensive and rely completely on the grid. A DIY solar food dehydrator delivers the same tasty results through passive food preservation — without using a single watt of electricity.
Energy Savings
Running an oven for 6–8 hours to dry a tray of apples can cost over £2 in electricity. Electric dehydrators use less, but the bills still mount up if you dry food every week. A solar dehydrator runs on nothing but free sunlight. Once built, it’s energy-free and costless to run, making it a reliable long-term investment.
💡 Cost vs kWh Saved
- Oven drying: Running for 6–8 hours can use around 2 kWh per session, costing roughly £2.00+.
- Electric dehydrator: A smaller unit may use 0.5–1 kWh per session, costing 50p–£1.00.
- DIY solar food dehydrator: Runs entirely on free sunlight — £0.00 per session.
👉 Over a summer of weekly drying, switching to solar could save £50–£100 in electricity costs while keeping your food preservation eco-friendly.
Flavour & Nutrition
Because solar food dryers use gentle, steady heat and natural airflow, food dries slowly and evenly. This process helps lock in natural sugars, preserve more nutrients, and avoid the “cooked” taste you sometimes get with oven drying.
Sustainability Benefits
Switching to solar over electric reduces household energy use, lowers your carbon footprint, and supports a zero-waste kitchen. For anyone focused on eco-friendly food preservation, a solar dryer is a practical way to cut reliance on fossil fuels while keeping food fresh for longer.
Who Benefits Most?
- Gardeners and allotment growers with seasonal gluts of apples, plums, or tomatoes.
- Budget-conscious households looking for low-cost, energy-free food preservation.
- Families wanting healthy, additive-free snacks.
- DIY and off-grid enthusiasts aiming for greater resilience and self-sufficiency.
By choosing a solar food dehydrator instead of electric methods, you’re not just saving money — you’re investing in a cleaner, more resilient way to preserve food naturally.
Materials You’ll Need (Low-Cost, Reclaimed & Sustainable)
One of the best parts about building a DIY solar food dehydrator is how affordable and sustainable it can be. Most of the project can be made from reclaimed or low-cost materials, making it perfect for anyone interested in off-grid food drying or eco-friendly food preservation. By reusing pallets, scrap wood, or old glazing, you’ll save money, cut waste, and keep the build environmentally friendly.
Core Materials
- Reclaimed timber or pallets – forms the main frame of the solar food dryer.
- Insect-proof mesh – prevents flies and debris while allowing steady airflow.
- Glazing sheet or old window glass – traps heat inside, creating the greenhouse effect needed for passive food preservation.
- Screws, nails, and hinges – essential for putting the frame and trays together.
- Wood screws or metal brackets – optional extras to reinforce larger builds.
Optional Extras
- Thermometer – helps track internal temperature for consistent drying.
- Insulation (foil or wool lining) – boosts efficiency during cooler UK weather.
- Food-safe tray mesh – ideal for herbs and smaller produce in your homemade dehydrator.
Tools Required
- Hand saw or circular saw – for cutting timber.
- Drill and screwdriver – for assembly.
- Measuring tape – for accurate sizing.
- Sandpaper or planer – for smoothing pallet wood.
Sustainability Tip
Look for materials locally to keep your project low-cost and eco-conscious. Ask about spare pallets at garden centres or construction sites (always with permission), collect offcuts from DIY stores, or find second-hand windows at reclamation yards. With a bit of scavenging, you can create a solar dehydrator that’s budget-friendly, sustainable, and built to last.
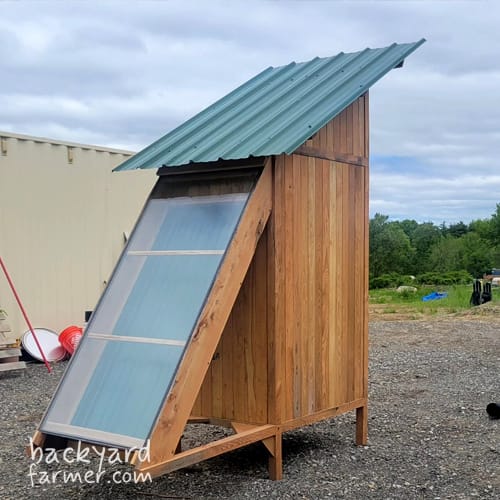
Step-by-Step Guide to Building a DIY Solar Food Dehydrator
Time needed: 3 hours
Building your own DIY solar food dehydrator is easier than you might think. The principle is simple: capture sunlight with glazing, circulate warm air through stackable trays, and let natural heat dry your produce. With a few reclaimed materials and some basic tools, you can create a reliable solar dehydrator for UK gardens that runs for free and supports passive food preservation.
- Build the Frame
– Use reclaimed timber or pallet wood to construct a sturdy rectangular frame.
– Ensure the frame is strong enough to hold multiple trays.
– Angle the top so the glazing faces the sun — ideally south-facing in the UK for maximum efficiency. - Add the Glazing
– Fix a clear perspex sheet or reclaimed window glass to the angled top of the frame.
– This creates a greenhouse effect, trapping heat inside your solar food dryer.
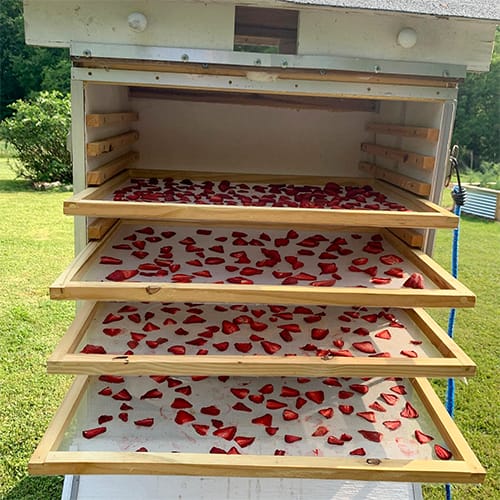
– Seal the edges with caulk or weatherproof tape to prevent warm air escaping. - Fit the Trays
– Build stackable trays from wooden frames lined with food-safe mesh.
– Leave space between trays so airflow moves freely across your produce.
– Keep trays removable for easier loading and unloading of fruit, herbs, or veg. - Ventilation & Airflow
– Cut vents at the bottom (air intake) and top (air outlet) of the frame.
– This creates a chimney effect: warm air rises and exits, pulling cooler air in at the base.
– Cover vents with insect-proof mesh to keep pests out while maintaining airflow. - Finishing Touches
– Sand down rough edges and treat the wood with a food-safe oil.
– Add a thermometer inside to monitor drying temperatures.
– Test your solar dehydrator on a sunny day with a small batch of fruit before scaling up.
If you’re planning a wider off-grid setup around your dehydrator, the solar power calculator can help estimate panel and battery size.
Pro Tip
Short on space? Build a compact tabletop version. Harvesting larger crops from your allotment? Scale up with extra trays for more drying capacity.
For a broader look at solar dehydrator designs and background on how they work, check out this guide from Mother Earth News. It’s a great complement to our UK-focused build.
When looking at sustainable projects, also explore the firewood sourcing guide to learn how to collect natural materials responsibly.
Best Foods to Dry and Typical Times (Solar Food Dehydrator Guide)
One of the biggest advantages of using a DIY solar food dehydrator is how versatile it is. From handling garden gluts to making homemade dehydrated snacks, this solar food dryer can preserve fruit, herbs, vegetables, and even jerky. With nothing more than sunlight and steady airflow, you can keep food fresh naturally while reducing waste.
Fruits
- Apples – Slice thin and dry for 6–12 hours, depending on sunlight strength.
- Plums – Halve, remove stones, and dry; usually takes 1–2 days in UK weather.
- Tomatoes – Cut into halves or quarters; often need 1–2 days of good sun for best results.
Herbs
- Mint – Dries quickly, often within a single sunny day.
- Rosemary & Thyme – Usually 1–2 days; ready when leaves snap easily.
- Chillies – Smaller chillies dry in 1–2 days, while larger ones may take longer.
Vegetables & Extras
- Courgettes – Slice into thin chips; normally ready in 1–2 days.
- Peppers – Thin strips dry evenly within 1–2 days.
- Onions & Garlic – Thin slices or crushed cloves dry in 1–2 days. (Strong smell warning — best dried outside!)
Meats & Jerky (With Care)
- Lean beef or venison strips – Slice thin, season with salt or spices, and monitor closely.
- Safety tip: While a solar dehydrator can make jerky, it requires consistent heat (≥60°C). Since UK weather can be unpredictable, it’s safest to finish jerky in a low oven to ensure food safety.
Outdoor & Prepper Uses
- Jerky & biltong-style snacks – Lightweight, protein-rich, and ideal for hikers or campers.
- Fruit leather – Purée fruit, spread thinly, and dry into chewy strips for healthy snacks.
- Backpacking meals – Dehydrate mixed vegetables for soups, stews, or trail meals.
| Food | Typical Drying Time (UK Sun) |
|---|---|
| Apples (sliced) | 6–12 hours |
| Plums (halved) | 1–2 days |
| Tomatoes | 1–2 days |
| Mint | Less than 1 day |
| Rosemary & Thyme | 1–2 days |
| Chillies | 1–2+ days depending on size |
| Courgettes | 1–2 days |
| Peppers | 1–2 days |
| Onions & Garlic | 1–2 days |
| Jerky (finish in oven if needed) | 1–2 days + oven finish |
For a more detailed guide, see the full drying times table in our How to Dry Fruit in the Oven article.
Weather Limitations in the UK & Storage Tips (Solar Dryer UK)
The British climate isn’t always predictable, so using a solar food dryer UK setup takes a little extra planning compared to sunnier countries. A DIY solar food dehydrator still works well, but you’ll need to allow for shorter summers, cloudy spells, and sudden rain showers.
Seasonal Considerations
- Best time of year: Late spring through early autumn (May–September).
- Peak drying months: July and August, when daylight is longest and the sun is strongest.
- Real-world examples: Apples often dry well in September sunshine in southern England, while herbs like mint and thyme can crisp up quickly even on cooler July days.
Just like with firewood, food drying relies on the balance of heat, airflow, and time — see our guide on how to season and store firewood properly for a deeper look at these natural drying principles.
Positioning for Success
- Place your solar food dryer facing south to maximise sun exposure.
- Raise it slightly off the ground to improve airflow and reduce moisture.
- Use removable trays so you can bring food indoors quickly if the weather changes.
Storage Tips
- Glass jars with airtight lids are perfect for herbs, fruit slices, and veg.
- Vacuum-sealed bags extend shelf life for homemade dehydrated snacks.
- Zero-waste containers: reuse tins, jars, or cloth bags for an eco-friendly storage solution.
Backup Strategies
- On cloudy days, finish off partially dried food in a low oven or an electric dehydrator to ensure food safety.
- Add insulation or reflective foil lining inside your solar dehydrator to boost heat retention in cooler conditions.
Internal Links
- Link to Season & Store Firewood to highlight natural drying principles.
- Link to Zero-Waste Kitchen for sustainable storage ideas.
Frequently Asked Questions: DIY Solar Food Dehydrator
Yes, solar food dehydrators work in the UK, but they’re most effective from May to September. Herbs dry quickly, while fruits like apples and plums may take a day or two depending on sunshine. Cloudy days may require finishing food in a low oven for safety.
Drying times vary. Herbs may take less than a day, while apples, tomatoes, or plums can take 1–2 days in UK conditions. The key is steady sunshine and good airflow.
Great options include apples, plums, tomatoes, courgettes, peppers, chillies, mint, rosemary, and thyme. You can also make fruit leathers and prepper-friendly trail snacks.
Yes, but only if the internal temperature stays above 60°C. Because UK weather is unpredictable, it’s safest to finish jerky in a low oven or plug-in dehydrator to ensure food safety.
A solar food dryer uses free sunlight and airflow, while electric dehydrators rely on grid power. Solar is eco-friendly, cost-free to run, and better for zero-waste kitchens. Electric dehydrators offer more control on cloudy days.
Store dried food in airtight glass jars, vacuum-sealed bags, or zero-waste containers like tins and cloth bags. Keep them in a cool, dark place for longer shelf life.
Absolutely. Using pallet wood, old windows, and mesh makes the project low-cost and sustainable. Check out our materials list for everything you need.
Building your own is usually cheaper and more sustainable, especially if you use reclaimed materials. However, ready-made solar food dehydrators are available if you prefer a quick option — we’ve linked some in our affiliate recommendations.
Family & Community Angle
A DIY solar food dehydrator isn’t just a handy bit of kit — it can also be a fun and meaningful project that brings people together. Whether you’re a family looking for a weekend activity or part of an allotment group aiming to cut down waste, building and using a solar food dryer adds a social side to eco-friendly food preservation.
For Families
- Educational value: Kids get hands-on experience with renewable energy, passive food preservation, and sustainable living.
- Healthy snacks: Apple rings, fruit leathers, and veggie chips become simple, low-cost lunchbox fillers.
- Budget-friendly activity: Using reclaimed materials keeps costs low while teaching resourcefulness and creativity.
For Allotment & Community Groups
- Shared builds: Pooling skills and scrap materials makes it easier to build larger or more efficient solar dehydrators.
- Cutting waste: Community projects help manage seasonal gluts — no more buckets of apples or tomatoes going to waste.
- Community resilience: Strengthens local connections and supports collective food security.
Why It Matters
When solar dehydrator projects become a shared activity, it goes beyond just keeping produce fresh. It turns preservation into a social event, encourages zero-waste values, and helps households and communities build resilience together.