
Once an LED grow light is installed, the next step is making sure your plants receive the right amount of light across the whole growing area. This means looking beyond basic hanging distances and timer settings to measure intensity, improve coverage and balance light output with the number of hours the fixture runs.
This guide explains how to assess PPFD and daily light, adjust height and dimming, automate light cycles and identify weak edges or excessive hotspots. It is aimed at growers who already understand the basics and want to improve a setup used for seedlings, leafy crops, fruiting plants or ornamentals.
For help choosing a suitable fixture, see our guide to the best LED grow lights for indoor gardens.
Set the Right Light Duration
A consistent light schedule is just as important as light intensity. Plants need regular periods of light and darkness, while the most suitable schedule depends on the crop, growth stage and strength of the fixture.
Seedlings and leafy crops are often grown under longer light periods, while flowering and fruiting plants may have different requirements. However, leaving lights on for longer does not automatically improve growth. Excessive lighting wastes electricity and may stress plants, especially when temperature, watering or nutrition cannot support the additional growth.
Consider Both PPFD and Daily Light
PPFD measures the amount of usable light reaching the canopy at a particular moment. Daily Light Integral, or DLI, accounts for both the intensity and the number of hours the light operates.
You can estimate DLI using:
DLI = PPFD × lighting hours × 0.0036
For example, a canopy receiving an average PPFD of 300 for 14 hours receives approximately 15.1 mol/m²/day.
This is more useful than judging a setup by lighting hours alone. A weaker fixture may need to run for longer, while a stronger fixture can provide the same daily light in fewer hours.
Automate the Schedule
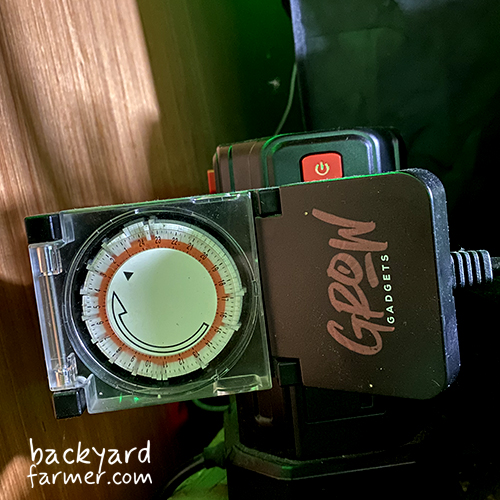
Use a reliable timer, smart plug or compatible controller to switch the light on and off consistently. More advanced controllers may also coordinate lighting with fans, heating or humidity equipment, but most home setups only need a dependable timer.
Check that any timer or smart plug is rated for the fixture’s electrical load and confirm what happens after a power cut or Wi-Fi interruption. Once the schedule is set, avoid changing it repeatedly unless plant measurements or growth show that an adjustment is needed.
Measure Light Intensity at Canopy Level
Light intensity affects plant growth just as much as the number of hours the fixture operates. Seedlings and newly moved plants generally need gentler light, while established flowering and fruiting crops can often use higher intensities. The correct level still depends on the crop, growth stage and total daily light received.
Understand What You Are Measuring
A PAR meter normally reports PPFD, measured in µmol/m²/s. This tells you how much photosynthetically useful light reaches a particular point on the canopy.
One strong reading directly beneath the centre of the fixture does not show how evenly the whole growing area is lit. The edges and corners may receive substantially less light.
How to Check Your Light Distribution
For a more useful assessment:
- Allow the fixture to reach its normal operating output.
- Position the sensor at the height of the upper leaves.
- Take readings at the centre, edges and corners of the growing area.
- Record the lowest, highest and approximate average reading.
- Repeat the test after changing the height or dimmer setting.
Take measurements in the same positions each time so you can compare adjustments accurately.
Adjust Height and Dimming
If the centre is much brighter than the edges, raising the fixture slightly may improve coverage. You can then increase the dimmer setting where necessary to restore the required average intensity.
Lowering the fixture increases intensity but may create a stronger central hotspot. Dimming reduces overall output without substantially changing the coverage pattern. The best setup often uses both height and dimming to balance intensity with uniformity.
Recheck the readings as plants grow closer to the fixture. Do not simply move lights nearer during flowering without measuring the result.
Introduce Stronger Light Gradually
Plants moved from a windowsill, greenhouse or weaker fixture may become stressed if exposed to full output immediately. Begin at a lower intensity and increase it gradually over several days while watching for paling, bleaching, curling or excessive canopy heat.
A calibrated quantum sensor provides the most dependable measurements. Less expensive PAR meters can still help compare areas and settings, while phone apps are better suited to rough comparisons than precise readings.
Once light intensity is balanced across the canopy, use the readings alongside the lighting schedule to estimate DLI. For more ways to improve the wider setup, see our guide on how to maximise your yields.
Improve Height, Coverage and Light Uniformity
Correct placement helps distribute light evenly across the canopy while reducing weak edges and excessive hotspots. The ideal position depends on the fixture’s output, beam pattern, dimmer setting, growing area and the plants beneath it, so fixed hanging-distance rules are rarely dependable.
Adjust Height and Output Together
Start with the manufacturer’s recommended height and dimmer setting, then measure the light at canopy level.
- Raising the fixture usually spreads the light across a wider area but reduces overall intensity.
- Lowering the fixture increases intensity but may create a strong central hotspot.
- Dimming the fixture reduces output without greatly changing the underlying coverage pattern.
A combination of height and dimming often produces better uniformity than adjusting either one alone. If the centre is much brighter than the edges, raise the fixture slightly and then increase the output only if measurements show that more intensity is needed.
Keep the Canopy Even
Large differences in plant height make even lighting more difficult. Group plants of a similar size together or raise shorter pots on stable trays or stands. Adjustable rope hangers make it easier to maintain the chosen distance as plants grow.
Take fresh PPFD readings whenever you:
- Raise or lower the light.
- Change the dimmer setting.
- Rearrange the plants.
- Move into a new growth stage.
- Notice the canopy growing noticeably closer to the fixture.
Light movers can improve coverage in large or unusually shaped growing areas, but they are unnecessary for most domestic setups. Good fixture positioning, an even canopy and careful adjustment of height and output will usually provide a simpler solution.
Reflective or light-coloured walls can also reduce wasted light around the edges, although heavily creased reflective materials may produce irregular bright areas. The aim is not to place the light as close as possible, but to achieve useful and reasonably even intensity across the whole canopy.
Useful Controls and Monitoring Equipment
The most useful accessories are those that improve consistency, reveal what the setup is using or help maintain suitable growing conditions. Advanced equipment can save time, but most home growers do not need every device available.
| Equipment | What it helps with | How useful is it? |
|---|---|---|
| Timer or smart plug | Maintains a consistent lighting schedule | Usually essential |
| Dimmable controller | Adjusts light output without moving the fixture | Very useful |
| PAR meter | Measures PPFD across the canopy | Useful for precise optimisation |
| Plug-in energy monitor | Tracks actual electricity use | Useful |
| Thermometer and hygrometer | Monitors temperature and humidity | Recommended |
| Environmental controller | Automates fans, heating or humidification | Optional |
Timers and Smart Plugs
A reliable timer is usually all that is needed to maintain consistent light and dark periods. Smart plugs add remote scheduling and energy monitoring, but they must be rated for the fixture’s electrical load.
Check how the plug behaves after a power cut or Wi-Fi interruption. A straightforward digital or mechanical timer may be more dependable where remote control is unnecessary.
Monitor Electricity Use
A plug-in power meter shows how much electricity the fixture actually draws. Daily energy use can be estimated using:
Daily electricity use = fixture wattage × operating hours ÷ 1,000
For example, a 300-watt light running for 14 hours uses approximately 4.2 kWh per day. Dimming can reduce consumption, but only where the plants still receive an appropriate PPFD and DLI.
Coordinate the Wider Environment
Thermometers, hygrometers and environmental controllers can help coordinate lighting with extraction fans, circulation fans, heating or humidification. This becomes more useful in enclosed grow tents where temperature and humidity can change quickly.
Supplemental CO₂ control is unnecessary for most domestic setups. It should only be considered after lighting, airflow, temperature, watering and nutrition are already well managed.
Start with a reliable timer and basic environmental monitoring. Add more advanced controls only when they solve a measurable problem rather than making the setup more complicated.
Balance Light With Temperature, Airflow and Watering
Increasing light intensity affects more than photosynthesis. Stronger lighting can raise canopy temperatures, increase water use and change the humidity around the plants, particularly inside an enclosed grow tent.
Monitor conditions at canopy height rather than relying only on a thermometer near the floor. Even efficient LED fixtures produce heat, and the driver may add noticeably to the temperature if it is positioned inside the growing area.
Gentle air movement helps distribute heat and humidity while strengthening stems. Use a circulation fan to move air around the canopy, but avoid directing a strong, constant stream at seedlings or delicate leaves, as this can cause drying and stress.
Plants under stronger light may use water more quickly, but do not increase watering automatically. Check the growing medium and root zone before watering, as poor drainage or overwatering can still limit growth even under an otherwise well-adjusted light.
When increasing output, monitor:
- Canopy temperature
- Humidity
- Air circulation
- Growing-medium moisture
- Leaf colour and posture
Change one setting at a time and allow the plants time to respond. More light will not correct unsuitable temperatures, weak roots, poor airflow, incorrect watering or nutrient problems. The best results come from balancing light with the rest of the growing environment rather than treating it as an isolated factor.
Diagnose Common LED Grow-Light Problems
Plant symptoms rarely prove that the light is solely responsible. Compare plants across the growing area, check what changed recently and rule out watering, nutrition, root, temperature and airflow problems before adjusting the fixture.
Common Problems and Practical Responses
| Symptom | Possible light-related cause | Other causes to check | Practical response |
|---|---|---|---|
| Long, weak or leaning growth | Insufficient intensity or uneven coverage | Crowding or excessive warmth | Measure PPFD at canopy height and check the edges as well as the centre |
| Pale or bleached upper leaves | Excessive intensity near the fixture | Nutrient deficiencies or root problems | Check whether symptoms are strongest closest to the light, then raise or dim it if necessary |
| Curled or dry leaf edges | Excessive light or canopy heat | Low humidity, underwatering or strong fan exposure | Check leaf-zone temperature, moisture and airflow before changing the light |
| Strong growth in the centre but weaker plants around the edges | Uneven light distribution | Differences in plant height | Raise and dim the fixture, reduce the growing area or level the canopy |
| Slow or stunted growth throughout | Insufficient daily light | Low temperatures, poor roots, watering or nutrition | Review PPFD, lighting hours and the wider growing environment |
| Stress after plants are moved under LEDs | Sudden increase in intensity | Transplant or environmental shock | Begin at a lower output and increase it gradually over several days |
Use Measurements to Confirm the Cause
An infrared thermometer can help compare leaf-surface temperatures, while a thermometer and hygrometer show whether heat or humidity is contributing to the problem. A PAR meter is useful when growth differs across the canopy or when you need to confirm whether intensity is genuinely too high or too low.
Take readings in the same positions each time. Comparing the centre, edges and corners is more useful than relying on one measurement directly beneath the fixture.
Fine-Tune the Setup
When making adjustments:
- Change one setting at a time.
- Recheck PPFD after changing height or dimming.
- Monitor conditions at canopy level.
- Allow plants time to respond before making another adjustment.
- Clean the fixture as recommended by the manufacturer.
- Inspect hangers, cables and mounting points regularly.
Keep a simple grow journal recording the date, light height, dimmer percentage, lighting hours, PPFD readings, temperature, humidity and plant response. This makes it easier to identify useful patterns and avoid repeating unsuccessful adjustments.
How to Read an LED Grow-Light Specification
Premium pricing does not automatically mean better performance. Compare fixtures using measurable specifications rather than model names, maximum coverage claims or a single high PPFD figure.
Actual Power Draw
Actual power draw shows how much electricity the fixture uses at full output. This is more useful than product names containing numbers that may resemble wattage but do not reflect real consumption.
A higher-powered light is not always the better choice. It must suit the size of the growing area and the light requirements of the plants.
PPF and Photon Efficacy
Photosynthetic Photon Flux (PPF) describes the total amount of photosynthetically useful light produced by the fixture each second.
Photon efficacy, measured in µmol/J, shows how efficiently the light converts electricity into usable plant light. A more efficient fixture can provide greater output without a proportionate increase in electricity use or heat.
PPFD Maps and Coverage
A PPFD map shows how light is distributed across a stated growing area. Look for:
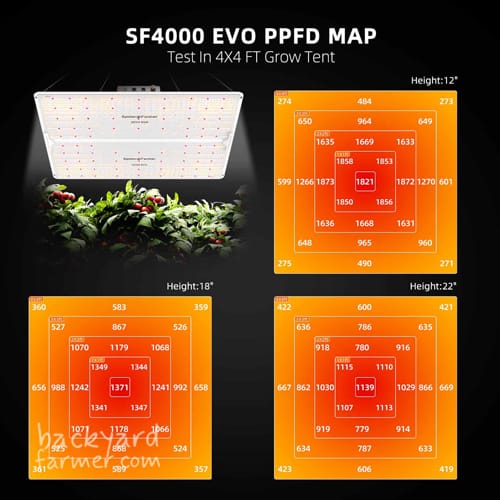
- The tested hanging height
- The dimmer setting used
- Centre, edge and corner readings
- The size of the measured area
- Whether the coverage claim is intended for seedlings, leafy growth or demanding fruiting crops
Do not judge a fixture from its highest centre reading alone. A slightly lower but more even PPFD distribution may produce better results across the full canopy.
Dimming and Heat Management
A wide dimming range makes it easier to use the same fixture for seedlings, established plants and different growing areas. Also check whether the driver can be mounted outside an enclosed tent, as this may help reduce heat around the canopy.
Build Quality and Support
Before buying, consider:
- Electrical safety and suitability for the UK supply
- Protection against moisture and dust
- Secure hanging points
- Cable and connector quality
- Manufacturer warranty
- Availability of replacement parts and customer support
Be cautious of coverage figures without a stated hanging height, comparisons made at different power settings and vague claims about “full spectrum” performance.
Once you understand these specifications, you can compare fixtures on useful output, coverage and running costs rather than branding alone. See our guide to the best LED grow lights for indoor gardens for current product recommendations.
Use LED Grow Lights Safely
LED grow lights combine electricity, heat and regular watering, so safe installation matters as much as light performance.
Keep plugs, drivers, timers and extension connections away from watering areas and anywhere condensation may collect. Do not support a fixture by its electrical cable; use secure hangers attached to suitable fixing points, then inspect them regularly for wear or loosening.
Check that timers, smart plugs and extension leads are rated for the combined electrical load. Avoid linking multiple extension leads together or overloading one socket with lights, heaters, fans and humidifiers.
Allow airflow around drivers and heat sinks, as even efficient LED fixtures produce heat. Clean dust from vents and surfaces only when the equipment is switched off and follow the manufacturer’s maintenance instructions.
Stop using a light immediately if you notice:
- Damaged cables or connectors
- Flickering or intermittent operation
- Unusual smells or discolouration
- Excessive heat around plugs or drivers
- Water entering the fixture
Choose equipment suitable for the UK electrical supply from a traceable supplier, and replace damaged components rather than attempting unsafe temporary repairs.
Final Thoughts
Advanced LED grow-light use is less about running a fixture at maximum power and more about making measured adjustments. Start with the manufacturer’s guidance, check PPFD across the canopy and consider both intensity and lighting duration when assessing daily light.
Use height and dimming together to improve coverage, then monitor temperature, humidity, airflow and watering as conditions change. Record meaningful adjustments and alter one setting at a time so you can see how the plants respond.
For help comparing output, coverage, efficiency and features, see our guide to the best LED grow lights for indoor gardens.
Frequently Asked Questions
The best schedule depends on the crop, light intensity and intended Daily Light Integral. Seedlings and leafy crops are often grown under longer light periods, but running a fixture for longer does not always improve growth. Most plants should also receive a consistent period of darkness each day.
Possible signs include pale or bleached upper leaves, curling near the top of the canopy and unusually high leaf temperatures. However, similar symptoms can result from watering, nutrition or airflow problems. Check PPFD and canopy temperature rather than relying on hanging distance alone.
Raising the fixture normally spreads light across a wider area but reduces intensity. Dimming lowers the overall output without greatly changing the coverage pattern. Where the centre is much brighter than the edges, raising the light and then adjusting the dimmer may produce more even coverage.
A PAR meter is not essential for basic indoor growing, but it is the most dependable way to measure PPFD and compare light levels across the canopy. Manufacturer PPFD maps provide a useful starting point, while phone applications are generally better for rough comparisons than precise measurements.
Yes. Excessive intensity can cause bleaching, stress and reduced growth, especially when output is increased suddenly. Plants may also struggle to use additional light when temperature, watering, nutrition or root health are unsuitable. Increase intensity gradually and monitor how the canopy responds.
Continuous lighting is unnecessary for most home-grown plants and removes their regular dark period. It also increases electricity use and may contribute to heat or stress. Use a consistent schedule based on the crop’s requirements, measured intensity and intended daily light.