
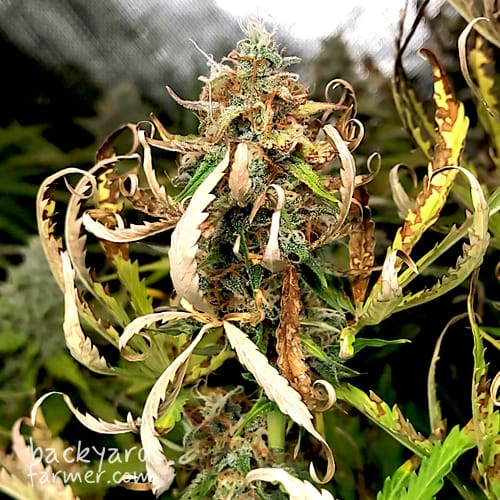
A grow light may be too close if the highest or most exposed leaves begin paling, bleaching, curling or developing dry patches. However, these symptoms do not confirm excessive light by themselves. Local heat, dry or waterlogged compost, damaged roots, fertiliser salts and pests can cause similar problems.
The strongest clues are where the damage appears, whether it follows the position of the fixture and whether it began after the light was lowered, brightened or operated for longer. There is no universal safe hanging distance because fixtures, dimmer settings, crops and growing spaces differ.
This guide will help you identify the likely cause and decide whether to raise, dim or reposition the light.
Think Your Grow Light Is Too Close? Check These First
Your grow light may be contributing to the damage if:
- The highest leaves are affected most severely.
- Symptoms are concentrated directly beneath the fixture.
- Damage becomes less severe towards the edges.
- The problem began after changing the light’s height, brightness or operating time.
Before blaming the light, also check canopy temperature, compost moisture, roots and pests.
Act quickly if damage is severe: If leaves are rapidly bleaching, severely wilting, touching the fixture or becoming unusually hot, dim the light or increase the clearance immediately. Complete the remaining checks once the damage has stopped worsening.
What Does “Too Close” Actually Mean?
A grow light being “too close” does not refer to one fixed number of centimetres. It depends on the fixture’s output, dimmer setting, design and how widely it spreads light, as well as the distance from the highest leaves rather than the pot or growing surface.
Operating time matters too. Moderate light used for longer can provide more total daily light than a stronger setting used briefly. Crop type, plant age and previous light exposure also affect tolerance, while canopy temperature and airflow influence whether heat or water stress develops alongside excessive light.
A low-powered propagation strip may be suitable close to seedlings, while a 200W panel at the same distance could deliver far more light than the leaves can use safely.
PPFD describes the light reaching the leaves at a given moment, while DLI describes the total received across the day.
Signs Your Grow Light May Be Too Close
No single symptom proves that a grow light is too close. The diagnosis becomes more credible when several clues appear together and follow the position of the fixture.
| Sign | How useful is it? | Pattern that strengthens the diagnosis |
| Pale or bleached upper leaves | Moderate | Strongest directly beneath the fixture |
| Dry or dead patches | Moderate | Confined to the most exposed tissue |
| Upward curling or cupping | Weak alone | Mainly affects upper leaves after a lighting change |
| Smaller or distorted new leaves | Weak alone | Most noticeable beneath the fixture centre |
| Lower leaves remain healthier | Supporting clue | A clear top-to-bottom pattern is present |
| Damage fades towards the edges | Strong practical clue | Closely follows the fixture’s footprint |
| Symptoms follow a height or brightness change | Strong contextual clue | Watering, feeding and other conditions remained unchanged |
Bleaching can result from excessive light, particularly when it affects the highest leaves beneath the fixture. However, pale or white tissue can also result from nutrient deficiencies or uptake problems, damaged roots, unsuitable pH, heat or disease.
Curling, crispy tissue and slow growth are less specific. They may also reflect temperature, dry compost, low humidity, fertiliser salts, pests or root stress. Dry or dead tissue confirms that injury has occurred, but not what caused it.
Excessive light can also slow photosynthesis and growth before obvious bleaching develops. Always judge symptoms against their position, recent lighting changes and the wider growing conditions.
Is It Excessive Light, Local Heat or Both?
The traditional distinction between “light burn” and “heat burn” is too simplistic. Excessive light and local heat can occur separately, but they may also affect the same leaves at the same time.
Excessive light becomes more likely when damage follows the fixture’s footprint, is strongest beneath the centre or appears after the light is lowered or brightened. Local heat becomes more likely when the upper canopy is unusually warm, leaves wilt rapidly or the compost begins drying much faster. Where both patterns appear together, light and heat may be contributing to the problem.
LED grow lights normally direct less infrared radiation towards leaves than older HPS lamps, but they are not heat-free. The fixture and driver still generate heat, while shelves, tents and other enclosed spaces can trap warm air around the upper canopy.
Room temperature may also differ from the conditions immediately around the leaves. Holding your hand beneath the fixture may reveal obvious warmth, but it cannot measure plant-usable light or confirm whether the intensity is suitable.
Problems That Can Look Like Grow-Light Damage
Before adjusting the fixture, check for other problems that can cause similar symptoms. Yellowing, curling, wilting and brown leaf edges are common plant responses and do not identify the cause by themselves.
| Possible cause | Typical pattern | First check |
| Excessive light | Highest and most exposed leaves are affected most | Fixture position and recent setting changes |
| Local heat | Upper canopy or leaves in trapped warm areas | Temperature at leaf height |
| Dry compost | Most or all of one plant begins wilting or drying | Moisture below the compost surface |
| Waterlogged roots | Yellowing and wilting despite wet compost | Drainage and root condition |
| Fertiliser salts | Brown tips or margins, sometimes after feeding | Recent feeding and visible salt build-up |
| Nutrient unavailability | Symptoms follow leaf age or a clear vein pattern | Roots, compost condition and pH |
| Pest damage | Patchy distortion, stippling, holes or webbing | Both sides of the leaves and growing tips |
| Transplant stress | A recently moved or repotted plant is affected as a whole | Repotting date and possible root damage |
Only one pot affected: This points more strongly towards that plant’s roots, compost, watering, pests or exact position. Investigate it before changing the complete lighting setup.
Every plant affected: Check conditions shared across the growing area, including the light setting, canopy temperature, timer, watering routine and recent feeding. A widespread problem is more likely to involve the overall environment or something applied to every plant.
What to Check Before Moving the Light
Before adjusting the setup, record the current conditions and check whether the damage genuinely follows the fixture. This gives you a useful baseline and reduces the risk of correcting the wrong problem.
1. Record the current setup
Write down the exact fixture model and revision, its height above the highest leaves, dimmer setting, daily operating time and the date of the last change. Measure from the canopy rather than the pots or growing surface.
2. Photograph and map the damage
Take photographs showing the fixture, tallest plant, centre and edge plants, affected leaves and differences in plant height. Compare:
- Upper and lower leaves.
- Centre and edge plants.
- Exposed and shaded surfaces.
- One affected plant and the complete group.
Damage that closely follows the fixture’s position makes excessive light or local heat more plausible.
3. Check temperature and airflow
Measure the temperature at canopy height and compare the centre with the edges. Look for warm air trapped beneath shelves or around the upper canopy, and confirm that the highest leaves receive gentle airflow.
See how to [install and position grow lights safely] for more detailed guidance.
4. Check compost, roots and recent feeding
Test moisture below the surface, confirm that drainage holes are clear and inspect for restricted or damaged roots. Look for persistently wet compost, recent overfeeding or visible salt accumulation.
5. Inspect for pests
Check growing tips, leaf undersides and leaf axils for webbing, insects, eggs, holes, stippling or sticky deposits.
6. Confirm the exact fixture guidance
Check the label, manual or original product listing for the correct model, revision and power setting. Avoid relying on a generic chart for the brand.
7. Change one variable
Raise, dim or reposition the fixture, or regroup plants by height. Avoid changing the light, feeding, watering and airflow simultaneously unless the plant is in immediate danger. One controlled change makes the result easier to interpret.
Should You Raise, Dim or Reposition the Light?
Raising and dimming do different things. The best adjustment depends on whether the problem affects the whole growing area, the centre of the canopy or only one plant.
| Situation | Best first response | Reason |
| Entire planted area appears over-lit | Dim | Reduces overall output while retaining the current footprint |
| Centre is damaged but the edges are already weaker | Raise slightly, then reassess the centre and edges | Reduces the central peak and changes the light distribution |
| Only one plant is affected | Reposition it and inspect the pot | Tests whether the problem follows the location or the individual plant |
| Plants vary greatly in height | Group them by height or safely lift shorter pots | Creates a more level canopy |
| The fixture cannot be raised | Dim | Reduces output without requiring more vertical clearance |
| The fixture has no dimmer or is already at minimum output | Raise cautiously or change the setup | No further reduction in output is available |
| The canopy exceeds the useful footprint | Reduce the planted area or change the lighting layout | Height cannot correct fundamentally inadequate coverage |
| Severe bleaching or overheating is progressing | Reduce exposure immediately | Stabilising the plant takes priority over perfect diagnosis |
Raise the fixture when the leaves need more physical clearance or a strong central peak is the main issue. Regroup plants when differences in height are causing uneven exposure. Dim the light when the footprint is suitable but the whole planted area appears to be receiving too much output. Some setups require more than one adjustment.
After making the change, recheck the centre and edges rather than assuming the problem is solved. For a fuller method, see our guide to optimising height, brightness and operating time.
My Experience Adjusting a Grow Light
I noticed this with indoor tomatoes growing beneath my 2024 Spider Farmer SF2000 Pro. As the plants became taller, the upper growth stopped developing as evenly and the leaves closest to the fixture appeared increasingly stressed. I increased the clearance while keeping the dimmer setting and daily operating time unchanged, allowing me to assess that adjustment on its own. The subsequent growth developed more evenly, with larger leaves and more natural spacing. This was my experience with one crop and fixture, rather than a universal hanging-distance rule.
How Long Should You Monitor the Plant?
Avoid making repeated changes every few hours. Plants need time to respond, and constant adjustments make it difficult to identify what actually helped.
Immediately
Check for severe wilting, leaves touching the fixture, rapidly spreading bleaching, unusual canopy heat or timer and dimmer faults. If the plant is overheating or deteriorating quickly, reduce the exposure straight away.
After One or Two Days
Look for further damage, worsening leaf posture, continued overheating or ongoing water stress. This is a useful review point, not a guaranteed recovery period.
Over Several Days
Check whether the damage has stopped spreading and surviving leaves are stabilising. Over time, look for more consistent growth across the canopy.
Through New Growth
The strongest evidence of recovery is healthy new growth developing without the same bleaching, curling or dry patches. Existing damage may remain visible after the underlying problem has been corrected.
Will Bleached or Damaged Leaves Recover?
Some mild symptoms may improve after the underlying problem is corrected. Temporary curling may relax, while mild paling can stabilise or regain some colour depending on the cause.
Clearly bleached patches often remain visible, however, and dry, brown or necrotic tissue cannot repair itself. Fully dead leaves can be removed cleanly.
Old damage remaining visible does not necessarily mean the problem is continuing. Partly green leaves may still contribute to the plant, so do not remove every marked leaf automatically. Retain them while useful healthy tissue remains, unless they are diseased, fully dead or restricting airflow.
Judge recovery mainly by whether the damage stops spreading and whether healthy new leaves develop without the same bleaching, curling or dry patches.
When the Fixture or Growing Space Is the Real Problem
Adjusting the height or dimmer cannot solve every mismatch. The fixture or growing space may be unsuitable if no safe vertical clearance remains, minimum output is still excessive, raising the light leaves the edges too weak or a strong central hotspot persists.
Other warning signs include a canopy wider than the fixture’s useful footprint, plants with very different heights, heat building up around the fixture or driver, or a crop that has simply outgrown the available space.
Possible solutions include:
- Reducing the planted area or grouping plants by height.
- Moving taller plants elsewhere.
- Choosing a less demanding crop.
- Changing the fixture layout.
- Replacing the fixture or moving the crop to a taller, cooler space.
Stop using a fixture that flickers, repeatedly cuts out, smells unusually hot or appears damaged, and follow the manufacturer’s safety guidance.
See How to Choose an LED Grow Light for sizing and coverage, Growing Vegetables Under Artificial Light for crop suitability, or compare replacement options in Best LED Grow Lights UK.
Quick Checklist
Before making further changes:
- Record the fixture height, output setting and daily operating time.
- Check whether the damage follows the fixture’s position.
- Compare the centre, edges and lower growth.
- Check canopy temperature and airflow.
- Check compost moisture, drainage, roots and pests.
- Confirm guidance for the exact fixture revision.
- Change one variable, photograph the result and judge recovery through healthy new growth.
Frequently Asked Questions
Yes. Excessive light can affect plants without the room or fixture feeling extremely hot. Local heat may still contribute, particularly in enclosed spaces, but touch cannot measure plant-level light intensity.
Dim the fixture when the whole planted area receives too much output but the coverage is otherwise suitable. Raise it when a central hotspot or insufficient clearance is the main problem. Some setups require both adjustments.
Mild paling may stabilise or improve, depending on the cause. Clearly bleached, crispy or dead tissue often remains permanently marked. Judge recovery through damage no longer spreading and healthy new growth.
Fixture-related damage often follows the light’s position and affects the highest leaves most strongly. Water and root problems more commonly affect a complete pot or plant. Check the compost, drainage and roots before adjusting the fixture.
Conclusion
There is no universal safe hanging distance for every grow light, crop or growing space. Bleaching, curling and dry patches can suggest excessive light, but they do not confirm it by themselves. The strongest clues are the position of the damage, canopy temperature and any recent changes to the fixture.
Check the compost, drainage, roots and pests before making one controlled adjustment. Then monitor whether the damage stops spreading and healthy new growth develops.
Fixture-related stress is often manageable when recognised early. Existing bleached or dead tissue may remain visible; the aim is to prevent further injury and restore healthy growth.