Introduction: How to Install a Nest Thermostat
Nest thermostats have transformed how we manage home heating and cooling by offering:
- Convenience: Control your thermostat remotely from anywhere.
- Energy Efficiency: Reduce energy bills while minimizing your environmental impact.
- Smart Technology Integration: Connect seamlessly with other smart home devices for a more automated experience.
Whether your goal is to:
- Lower your energy costs,
- Make your home more eco-friendly, or
- Enjoy effortless temperature control,
a Nest thermostat is an ideal solution.
Why Proper Installation Matters
Installing a Nest thermostat may seem challenging initially, but with the right guidance, it’s a straightforward task that most DIY enthusiasts can handle. Proper installation ensures:
- Your thermostat operates at peak performance.
- Smooth and reliable functionality.
- Smarter and more efficient energy management.
Who Is This Guide For?
This guide is designed for:
- Homeowners seeking to upgrade their heating and cooling systems with smart technology.
- Renters interested in adding energy-efficient devices to their living spaces.
- DIY enthusiasts eager to take on a manageable project with lasting benefits.
Whether you’re tech-savvy or a first-time DIYer, this step-by-step guide will help you:
- Gather the necessary tools.
- Configure your thermostat for optimal performance.
- Overcome common challenges with practical tips and solutions.
By the end of this guide, you’ll:
- Successfully install and set up your Nest thermostat.
- Gain a deeper understanding of how it can enhance your home’s comfort and energy efficiency.
Let’s get started!
Tools and Preparation
Proper preparation is essential for a smooth and hassle-free installation of your Nest thermostat. By gathering the right tools and confirming system compatibility, you can save time and avoid common pitfalls.

Tools Required:
- Screwdriver (Phillips and flathead)
- Level (for accurate mounting)
- Drill (optional, for drywall installation)
- Wire labels (provided in the Nest thermostat packaging)
- Smartphone or tablet (to access the Nest app for setup and guidance)

Preparation Checklist:
- Turn Off Power to Your HVAC System:
- Locate your circuit breaker and switch off the power to the thermostat to eliminate electrical hazards.
- Verify Compatibility:
- Use the Nest Compatibility Checker (available on Nest’s website) to ensure your HVAC system supports the thermostat.
- Gather All Tools and Materials:
- Collect all necessary tools and unpack the thermostat components before starting.

Safety Precautions:
- Confirm Power is Off: Always double-check that the power is completely off to avoid electric shock.
- Handle Wires Carefully: Prevent damage or short circuits by handling wires gently.
- Inspect Connections: Verify wire connections before proceeding with the installation.
Pro Tip:
- If your system is older or lacks a C-wire (common wire), consider purchasing a Nest Power Connector for seamless compatibility.
With the tools and preparation complete, you’re ready to move on to the next step: removing your old thermostat. Let’s continue!
Installing the Nest Base Plate
With your old thermostat removed, it’s time to install the Nest base plate. This step ensures a secure and level foundation for your new thermostat.
Step-by-Step Instructions:

- Position the Base Plate:
- Hold the Nest base plate against the wall where your old thermostat was mounted.
- Ensure the wiring hole aligns with the central opening on the base plate.
- Level the Base Plate:
- Use the built-in bubble level on the Nest base plate to ensure it is straight.
- Adjust as needed before securing.
- Secure the Base Plate:
- Use the provided screws to attach the base plate to the wall.
- If mounting on drywall, use the included anchors for added stability.
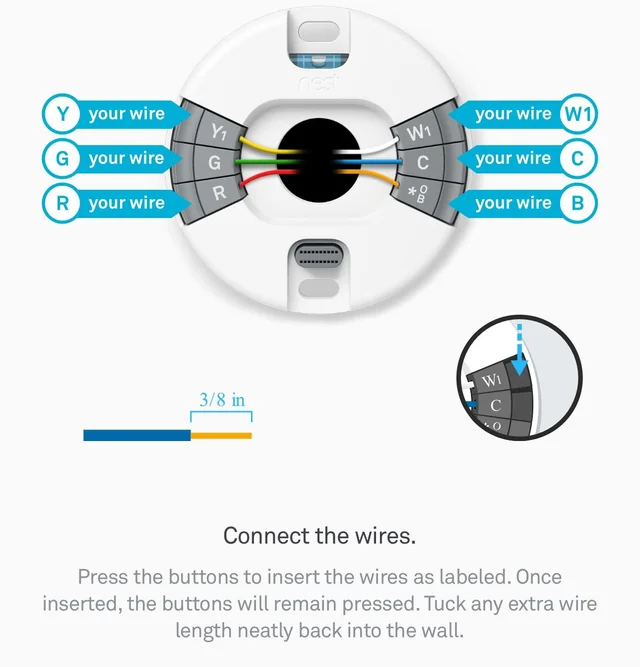
- Connect the Wires:
- Insert the labeled wires into their corresponding terminals on the base plate.
- Push the tab on each terminal to secure the wires firmly.
- Double-Check Connections:
- Confirm that all wires are correctly connected and securely fastened.
- Tuck any excess wire neatly into the wall cavity to avoid interference.
Tips for Success:
- Avoid Over-Tightening Screws:
- Over-tightening can damage the base plate or make it difficult to attach the thermostat later.
- Ensure Secure Wiring:
- Loose connections may cause the thermostat to malfunction. Gently tug each wire to ensure it is firmly in place.
- Use a Backing Plate (Optional):
- If the wall is damaged or uneven, consider using a backing plate for extra support and a cleaner look.
Common Issues and Troubleshooting:
- Base Plate Not Level:
- Reposition and adjust using the built-in level before tightening screws.
- Short Wires:
- Use wire extenders or consult an electrician if the wires are too short to reach the terminals.
Pro Tip:
- Take a moment to verify all connections before proceeding. A secure base plate sets the foundation for a successful installation.
With the base plate securely installed, you’re ready to attach your Nest thermostat. Let’s move on to the next step!
Attaching the Nest Thermostat
With the base plate installed and wires connected, it’s time to attach your Nest thermostat and complete the setup. This step activates your system and ensures it’s ready to perform.
Step-by-Step Instructions:
- Snap the Nest Thermostat onto the Base Plate:
- Align the thermostat display with the base plate.
- Gently press it until it clicks securely into place.
- Restore Power to Your HVAC System:
- Switch the power back on at the circuit breaker.
- Power On the Thermostat:
- The Nest thermostat will automatically power on when connected correctly.
- If it doesn’t, double-check the wiring connections.
- Follow On-Screen Setup Instructions:
- Use the thermostat’s display to select your preferred language and connect to your WiFi network.
- Enter details about your HVAC system to ensure proper compatibility.
- Download and Open the Nest App:
- Download the Nest app on your smartphone or tablet if you haven’t already.
- Follow the app’s instructions to link your thermostat and customize its settings.
Initial Setup Tips:
- WiFi Connection:
- Ensure a stable WiFi connection for seamless app integration.
- HVAC System Configuration:
- Provide accurate system details during setup for optimal performance.
- Enable Energy-Saving Features:
- Activate Eco Mode during setup to start saving energy immediately.
Common Issues and Troubleshooting:
- Thermostat Not Powering On:
- Confirm that all wires are securely connected and that power has been restored.
- WiFi Connection Problems:
- Move closer to the router or restart your network if the connection fails.
- Incorrect HVAC Settings:
- Revisit the setup process to verify compatibility if the thermostat isn’t functioning correctly.
Visit the official Google Nest support page for additional troubleshooting tips and detailed product support.
Pro Tip:
- Explore the Nest app’s features, such as scheduling and energy reports, to maximize your thermostat’s capabilities.
With your Nest thermostat securely attached and configured, you’re ready to test its functionality. Let’s move on to the final steps!
Testing and Finalizing Installation
With your Nest thermostat attached and configured, it’s time to test its functionality and finalize the setup. This step ensures your thermostat works seamlessly with your HVAC system and that all features are operating as expected.
Step-by-Step Instructions for Testing:
- Test Heating Functionality:
- Adjust the thermostat to a temperature higher than the current room temperature.
- Listen for the HVAC system to activate and begin heating.
- Test Cooling Functionality:
- Adjust the thermostat to a temperature lower than the current room temperature.
- Confirm that the HVAC system activates and begins cooling.
- Check Fan Operation:
- Switch the fan setting to “On” or “Circulate” using the thermostat or Nest app.
- Verify that the fan starts running as expected.
- Monitor System Response:
- Allow the system to run for a few minutes to ensure it cycles on and off correctly based on temperature adjustments.
Finalizing Setup:
- Customize Your Preferences:
- Use the Nest app to set your preferred temperature schedule.
- Enable energy-saving features like Eco Mode.
- Review Energy Reports:
- Check the Nest app for real-time energy usage insights and recommendations.
- Enable Notifications:
- Turn on system alerts to receive updates about potential issues, such as maintenance reminders or temperature extremes.
- Perform a Software Update:
- Check for available updates through the Nest app to ensure your thermostat has the latest features and fixes.
Troubleshooting Common Issues:
- System Doesn’t Respond:
- Revisit wiring connections to ensure all are secure and correctly placed.
- Confirm that power to your HVAC system is on.
- Incorrect Temperature Readings:
- Ensure the thermostat is installed away from heat sources or drafts that could affect its sensors.
- WiFi Connection Issues:
- Restart your router and reconnect the thermostat to the network using the app.
Pro Tip:
- Run a complete system test at different times of the day to ensure all settings and features work seamlessly under various conditions.
Once testing and final setup are complete, your Nest thermostat is ready to provide efficient and smart temperature control. Congratulations on your successful installation!
Conclusion and Next Steps
Congratulations! You’ve successfully installed your Nest thermostat and configured it to work seamlessly with your HVAC system. By setting up this innovative device, you’ve taken a significant step toward smarter, more energy-efficient living.
Discover the top Nest thermostats, compare models, and find the perfect one for your home in our detailed Nest Thermostat Guide.
Key Takeaways:
- Energy Efficiency and Savings:
- Features like Eco Mode and energy usage reports help reduce energy bills and minimize your environmental impact.
- Convenience and Control:
- Remote control through the Nest app ensures your home is always at the perfect temperature, no matter where you are.
- Smart Integration:
- Seamlessly integrates with other smart home devices, enhancing your home automation experience.
Recommended Next Steps:
- Explore Additional Features:
- Familiarize yourself with advanced features like scheduling, learning capabilities, and energy history insights through the Nest app.
- Optimize Energy Savings:
- Monitor your energy reports and adjust your thermostat’s settings to maximize efficiency.
- Share Your Experience:
- Inspire others by sharing your installation journey and the benefits of using a Nest thermostat.
- Access Further Resources:
- Visit our related articles for tips on troubleshooting, optimizing settings, and exploring other smart home devices.
Final Encouragement:
Your Nest thermostat is more than a device; it’s an investment in comfort, convenience, and sustainability. Enjoy the benefits of smarter living and the peace of mind that comes with an energy-efficient home.
Looking to enhance your smart home experience? Explore additional resources, guides, and product reviews on our website.


