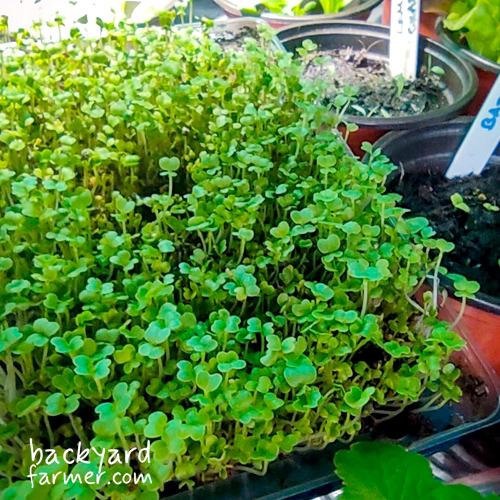
Microgreens are an easy way to grow fresh food indoors throughout the year, particularly during the UK winter when outdoor growing slows down. With a shallow tray, some compost and a bright windowsill, many varieties can be ready to harvest in just one to three weeks.
Quick Guide to Growing Microgreens
| When to sow | All year round |
| Where to grow | Indoors on a bright windowsill |
| Germination temperature | Ideally 18–22°C |
| Germination time | Usually 2–7 days, depending on variety |
| Harvest time | Generally 7–21 days, sometimes longer |
| Growing medium | Peat-free seed compost |
| Light | Bright natural light or an LED grow light |
| Watering | Keep moist but not waterlogged |
| Best beginner crops | Radish, mustard, broccoli and pea shoots |
What Are Microgreens?
Microgreens are young edible vegetable and herb seedlings harvested shortly after germination, usually when their first true leaves begin to appear.
Unlike mature vegetables, they’re grown close together and harvested while still small. Popular choices include radish, mustard, broccoli, kale, rocket and pea shoots.
They’re different from sprouts, which are usually grown in water and eaten with their roots and seeds attached. Microgreens grow on compost or another suitable medium and are cut above the surface.
Because they take up very little space, they’re ideal for windowsills, kitchens and anyone wanting to grow food without an outdoor garden.
Best Microgreens to Grow in the UK
Many leafy vegetables and herbs can be grown as microgreens, although some are quicker and easier than others.
Fast-growing brassicas are particularly suitable for beginners, while crops such as coriander and beetroot generally take longer to establish.
| Microgreen | Approx. harvest | Best for |
|---|---|---|
| Radish | 7–10 days | Fast growth, peppery flavour |
| Mustard | 10–15 days | Spicy salad leaves |
| Broccoli | 8–13 days | Mild-flavoured greens |
| Pea shoots | 10–28 days | Sweet shoots, possible regrowth |
| Kale | 10–15 days | Mild, earthy flavour |
| Rocket | 10–15 days | Peppery salads |
| Pak choi | 10–15 days | Mild mustard flavour |
| Beetroot | 16–25 days | Colourful, earthy shoots |
| Coriander | 16–25 days | Aromatic leaves |
Harvest times are approximate and depend on variety, temperature, light and the desired harvest size. Growth can take longer during the UK winter.
Radish and mustard are particularly good starting points, offering quick germination and plenty of flavour.
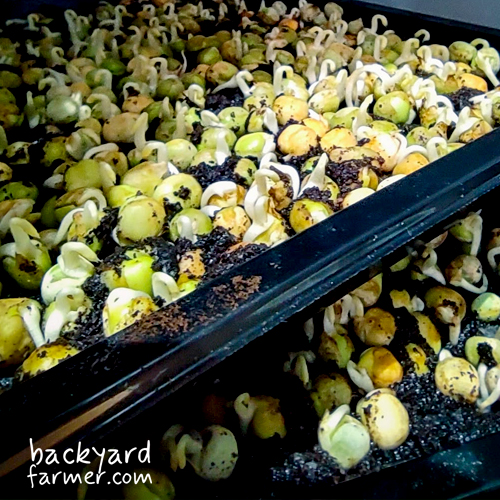
Pea shoots are another worthwhile choice, especially if you enjoy their sweet flavour. They’re usually grown slightly larger than smaller-seeded microgreens and may produce further harvests when cut correctly.
Rocket can also be grown as microgreens or left to mature into full-sized salad leaves. See our guide to growing rocket in the UK for conventional cultivation.
What Do You Need to Grow Microgreens?
You don’t need specialist equipment or a dedicated indoor growing setup. Most beginners can start with a few inexpensive materials.
- Seeds: Untreated vegetable or herb seeds suitable for growing as edible microgreens.
- Growing tray: A shallow seed tray or clean, food-safe container with drainage holes.
- Growing medium: Peat-free seed compost or fine multi-purpose compost.
- Water: Clean drinking water and a small watering can or spray bottle.
- Light: A bright windowsill, with supplementary lighting if needed.
- Scissors: Clean, sharp scissors for harvesting.
Avoid using ordinary garden soil, which can be heavy, poorly draining and introduce unwanted organisms indoors.
Microgreens grown in seed compost generally don’t need additional fertiliser during their short growing period. Specialist water-based systems may have different requirements.
Choose seeds from a reputable supplier, preferably those intended for edible microgreens. Never use chemically treated seeds or grow tomato, potato, pepper or aubergine seedlings as microgreens, as their foliage is unsuitable for eating.
Can You Grow Microgreens on Kitchen Roll?
Yes. Microgreens can also be grown on damp kitchen roll, coconut coir or purpose-made growing mats.
Kitchen roll works for small experiments but can dry out quickly, particularly on warm windowsills, and requires closer attention to moisture levels.
For beginners, peat-free seed compost is usually the more forgiving option, retaining moisture more consistently.
If you prefer a compost-free setup, DT Brown’s Microgreen Growing Kit offers a reusable tray with basil, rocket and coriander seeds. A homemade growing tray is equally suitable for getting started.
How to Grow Microgreens Indoors Step by Step
The same basic growing method works for most small-seeded microgreens, including radish, mustard and broccoli.
Step 1: Prepare Your Growing Tray
Fill a clean, shallow tray with approximately 2–4cm of peat-free seed compost.
Gently level the surface without compacting it, then moisten the compost evenly. It should feel damp rather than saturated.
Use a tray with drainage holes, placed inside a waterproof container to catch excess water.
Label the tray with the crop and sowing date.
Step 2: Sow the Microgreen Seeds
Scatter seeds evenly across the compost surface.
Microgreens are sown more densely than vegetables grown to maturity, but avoid piling seeds on top of one another. Smaller seeds can be spaced more closely than larger varieties.
Gently press the seeds into contact with the compost. Cover lightly if recommended on the seed packet.
Larger seeds, particularly peas, may benefit from soaking in clean drinking water for 6–12 hours before sowing. This isn’t necessary for every crop.
Step 3: Keep the Seeds Warm and Moist
Place the tray somewhere warm, ideally around 18–22°C during germination.
A clear propagator lid or loose cover can help retain moisture, although it isn’t essential.
Check the compost daily and mist gently if the surface begins to dry. Remove the cover once seedlings start emerging so they receive adequate light and airflow.
Step 4: Give the Seedlings Good Light
Move emerging seedlings into a bright position, ideally on a sunny windowsill.
Without sufficient light, seedlings become pale, stretched and weak.
Rotate the tray occasionally if the shoots lean noticeably towards the window. During winter, supplementary lighting may be useful.
Step 5: Water Carefully
Keep the growing medium consistently moist without allowing it to become waterlogged.
Once seedlings are established, bottom-watering is often easier than spraying the foliage.
Place the growing tray in a shallow container of water and allow moisture to soak upwards through the drainage holes. Remove it once sufficiently damp and let excess water drain away.
Avoid leaving the tray standing in water.
Step 6: Check for Harvest Readiness
Most microgreens are ready once their seed leaves have opened and the first true leaves are beginning to develop.
Harvest timing varies by crop, so use the expected growing period and appearance of the seedlings together.
There’s no need to wait for full-sized leaves. Microgreens are intended to be harvested young.
Growing Microgreens Indoors During Winter
Microgreens can be grown indoors throughout December, January and February, providing fresh greens when outdoor sowing opportunities are limited.
The main challenge during a UK winter is reduced daylight. Even in a warm house, weak sunlight can slow growth and produce thin, stretched seedlings.
A south-facing windowsill generally offers the best natural light, although nearby buildings and trees can still cause shading.
Avoid placing trays against freezing-cold glass, as temperatures beside a window may be considerably lower than elsewhere in the room overnight.
Do Microgreens Need Grow Lights in Winter?
Not necessarily. Fast-growing crops such as radish and mustard can grow successfully on a bright windowsill without additional lighting.
However, north-facing windows and prolonged dull weather may provide insufficient light, particularly during December and January.
If seedlings become pale, elongated or noticeably slow-growing, a small LED grow light can help provide more consistent conditions.
When using supplementary lighting, aim for approximately 14–16 hours of light per day, with a regular dark period. Follow the manufacturer’s guidance on positioning the light above the seedlings.
An expensive growing system isn’t necessary for a few household trays.
Do Microgreens Need Extra Heat?
Most microgreens germinate well at normal indoor room temperatures.
A heated propagator can help in an unheated room or on a particularly cold windowsill, but additional heating is usually unnecessary in a normally heated home.
Remove humidity covers as seedlings emerge and avoid allowing condensation to build up around the plants.
Remember that extra warmth won’t compensate for insufficient light. Warm seedlings growing in a dark location can still become weak and stretched.
When and How to Harvest Microgreens
Microgreens are generally ready once their seed leaves have opened and the first true leaves are beginning to develop.
Use clean, sharp scissors to cut the stems just above the compost surface, leaving the roots behind.
Harvest only healthy-looking seedlings and avoid pulling compost into the harvested crop.
Microgreens are best enjoyed fresh in salads, sandwiches, wraps and other meals. Wash gently with clean drinking water before eating and drain thoroughly.
Refrigerate unused greens promptly in a clean container. For the best keeping quality, wash just before use rather than storing them wet.
Will Microgreens Grow Back After Cutting?
Most microgreens, including radish, mustard and broccoli, are single-harvest crops. Once cut, the remaining stems generally won’t produce another worthwhile harvest.
Pea shoots are a useful exception.
If they’re cut above healthy lower leaves and growing points, they may produce further tender shoots. However, subsequent harvests can be smaller, and regrowth isn’t guaranteed.
For most varieties, clearing the tray and sowing again is the more reliable approach.
Common Microgreen Growing Problems
Most problems are caused by inadequate light, excess moisture or poor airflow.
| Problem | Likely cause or solution |
|---|---|
| Tall, pale seedlings | Insufficient light. Move to a brighter position or use supplementary lighting. |
| Poor germination | Check seed age, temperature and compost moisture. |
| Seedlings falling over | May indicate damping-off or excessive moisture. |
| White fuzz around roots | Often normal root hairs, particularly on radish seedlings. |
| Mould spreading across the tray | Possible contamination, excess humidity or poor airflow. Discard affected trays. |
| Slow winter growth | Low temperature or inadequate daylight. |
| Tough or unpleasant flavour | Variety or harvesting too late. |
Root Hairs or Mould?
Fine white hairs growing directly around emerging roots are often normal root hairs. They’re particularly noticeable on radish and other brassica seedlings.
Mould may spread across the compost, seeds or stems and can sometimes be accompanied by a musty smell or rotting seedlings.
Appearance alone isn’t always enough to distinguish the two.
If a tray develops obvious mould or decaying growth, discard the crop rather than attempting to treat it for eating.
Clean trays, suitable seeds, controlled watering and adequate airflow are the best ways to prevent problems.
How to Grow Microgreens Continuously
For a regular supply, sow a fresh tray approximately every 7–10 days rather than growing everything at once.
Start with small quantities until you know how much you’ll use. Dense sowing consumes considerably more seed than growing mature vegetables, so buying suitable seeds in economical quantities can help reduce costs.
After harvesting, remove the remaining roots and growing medium, then clean the tray before sowing again.
Used compost from healthy trays can be added to your home composting system. Avoid reusing compost from diseased or mouldy crops.
During winter, allow extra time between sowings if growth is slow. Staggering two or three small trays is usually more manageable than growing a large quantity at once.
Frequently Asked Questions
Yes. Microgreens can be grown indoors throughout the year, including winter. Adequate light and suitable room temperatures are the main requirements, although growth may be slower during the shortest days.
Some ordinary vegetable seeds can be used if they’re untreated, suitable for edible seedlings and sourced from a reputable supplier. Seeds specifically intended for growing microgreens are the preferred starting point.
Yes. Microgreens can be grown on damp kitchen roll, coconut coir or purpose-made growing mats. However, these methods require careful moisture management, and compost is often easier for beginners.
Most varieties take approximately 7–21 days under suitable conditions. Low winter light and cooler temperatures can extend this period, while slower-growing crops and larger pea shoots may take longer.
Yes. A heated propagator can help maintain suitable temperatures in a cold room. Remove humidity covers as seedlings emerge, provide adequate light and avoid overheating or waterlogging the growing medium.
Microgreens are grown on compost or another suitable medium and harvested by cutting their stems above the roots. Sprouts are typically germinated in water and eaten whole, including their roots and often the remaining seed. Their growing methods and food-safety considerations are different.