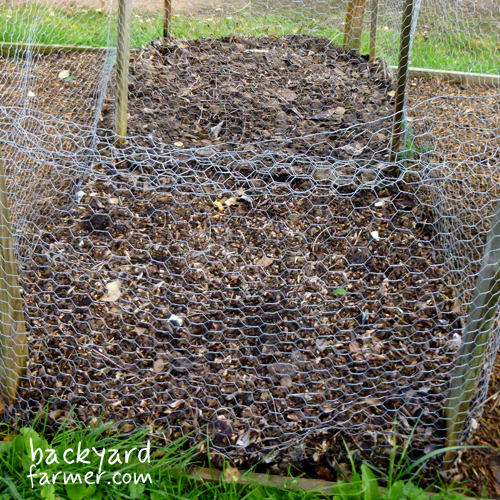
You can make a simple leaf compost bin using leftover wire mesh, four timber stakes and a few basic tools. This reusable cage holds fallen autumn leaves while allowing air to circulate, helping them gradually break down into leaf mould.
It’s an inexpensive, practical project for gardens and allotments, especially if you already have suitable fencing offcuts or reclaimed timber.
Quick Guide: DIY Leaf Mould Bin
| Project | Square wire-mesh leaf mould cage |
| Difficulty | Beginner-friendly |
| Footprint | Approx. 95 × 95 cm overall |
| Post spacing | 90 cm between centres |
| Height | Approx. 90 cm above ground |
| Materials | Four timber stakes, galvanised wire mesh and fixings |
| Tools | Tape measure, mallet, hammer and wire cutters |
| Base and lid | Neither required |
| Build time | Allow a few hours, depending on ground conditions |
| Cost | Minimal if using suitable reclaimed materials |
The basic build: Mark out a square, drive four timber stakes into the ground, wrap them with wire mesh and secure the sides. The finished cage provides a simple, ventilated enclosure for collecting and composting autumn leaves.
Materials and Tools for a DIY Leaf Mould Bin
The simplest design uses four wooden posts surrounded by galvanised wire mesh. There’s no need to construct a complete timber frame or buy a specialist composting container.
This design uses posts spaced 90 cm apart, measured between their centres.
Materials and Cutting List
| Material | Quantity | Dimensions or specification |
|---|---|---|
| Timber stakes | 4 | 1.2 m long, approximately 50 × 50 mm |
| Galvanised chicken wire | 1 length | Approximately 4.2 m long × 90 cm high |
| Galvanised fencing staples | Around 20 | Suitable for fixing mesh to timber |
| Galvanised tying wire | As needed | For securing the mesh overlap |
| Reclaimed timber bracing | Optional | Cut to suit the finished structure |
Using 50 mm square posts spaced 90 cm apart between centres gives an overall width of approximately 95 cm.
The outside perimeter is approximately 3.8 m, so a 4.2 m length of mesh provides extra material for joining the ends.
Test-fit the mesh before cutting off any excess. The actual length required depends on the post dimensions and how the wire wraps around the corners.
You’ll also need a tape measure, mallet or suitable post-driving tool, hammer, wire cutters, heavy-duty gloves and eye protection.
A spirit level and string line will help when setting out the posts.
Can You Use Reclaimed Materials?
Leftover chicken wire, suitable fencing mesh and sound reclaimed timber are all good options.
Before reusing materials, check their condition:
- Chicken wire: Look for broken sections, severe corrosion and exposed sharp ends.
- Welded mesh: Check that the welds are sound and cut edges can be secured safely.
- Timber stakes: Avoid rotten, badly split or weakened timber.
- Fixings: Use sound, corrosion-resistant staples and tying wire suitable for outdoor use.
Chicken wire is flexible and easy to shape around posts. Welded mesh is generally more rigid but can be harder to cut and bend.
Avoid barbed wire, loose plastic bird netting and materials that could create hazards for people or wildlife.
Reusing suitable materials keeps costs down and avoids unnecessary purchases.
Where to Position Your Leaf Compost Bin
Choose a reasonably level, well-drained area with some shelter from strong winds.
A position beside an existing composting area, shed or hedge can work well, provided there’s enough room to access the cage.
The ground should be firm enough to hold the timber stakes securely. Avoid areas where water regularly collects.
An open soil base is suitable, so there’s no need for concrete, paving or a wooden floor.
Before driving stakes into unfamiliar ground, check for buried cables, pipes and other services.
How to Build a Wire Mesh Leaf Mould Bin
The following method creates a square, open-topped wire cage supported by four timber stakes.
It’s based on the straightforward construction used in established leaf-mould cage designs, without adding unnecessary framing or complicated moving parts.
Step 1 — Mark Out the Footprint
Measure a square with the four corner posts positioned 90 cm apart, measured from the centre of each post.
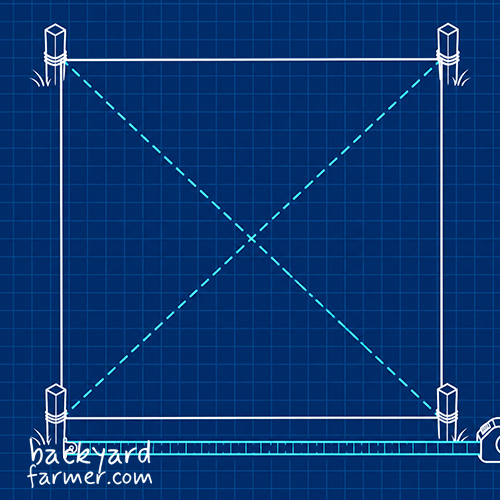
Use string or temporary markers to establish the corners.
Check both diagonals. For a square with 90 cm between post centres, each diagonal should measure approximately 127 cm.
Adjust the markers until the layout is square.
Step 2 — Install the Corner Posts
Drive the four timber stakes into the ground using a mallet or suitable post-driving tool.
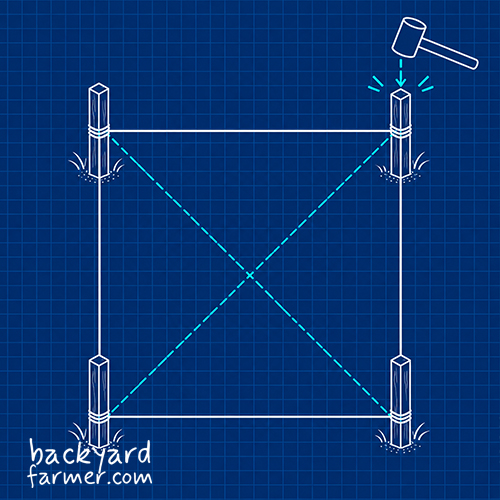
For 1.2 m stakes, approximately 30 cm of embedment leaves 90 cm above ground.
This is a starting measurement for suitable, firm ground. Loose soil or exposed positions may require longer stakes and greater embedment to provide adequate stability.
Check that each post is upright and securely installed before continuing.
If a post moves easily when pushed, improve its installation before attaching the mesh.
Step 3 — Attach the Wire Mesh
Begin at one corner post and secure the starting end of the chicken wire using galvanised fencing staples.
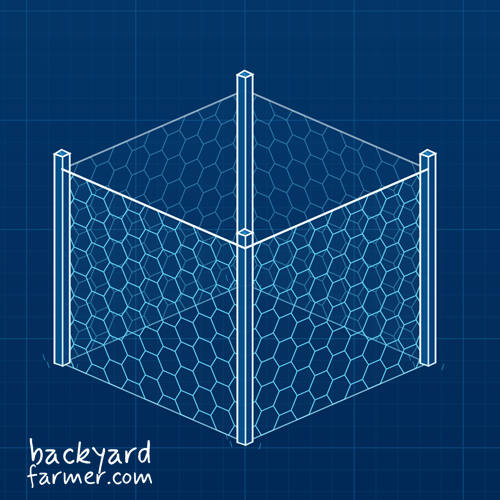
Work around the outside of the four posts, pulling the wire reasonably taut as you go.
Attach the mesh securely to each post, using several staples spaced along its height.
The wire should extend from near ground level towards the tops of the posts.
Keep the mesh supported and avoid pulling it so tightly that it distorts the posts or damages the wire.
Step 4 — Secure the Mesh Overlap
Continue wrapping the wire until the free end overlaps the starting section at the first post.
The proposed 4.2 m length provides an allowance for this overlap, although the exact amount will depend on how the wire sits around the posts.
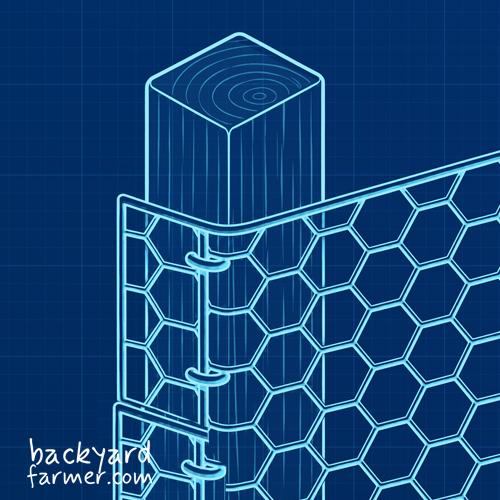
Secure the overlapping sections to the post using suitable galvanised staples.
Additional tying wire can be used to fasten the overlapping mesh edges together.
Make sure the joint is secure and there are no loose sections that could catch on clothing or injure wildlife.
Only trim excess mesh once you’re satisfied with the fit.
Step 5 — Check the Finished Structure
Inspect the cage carefully before filling it.
Check that:
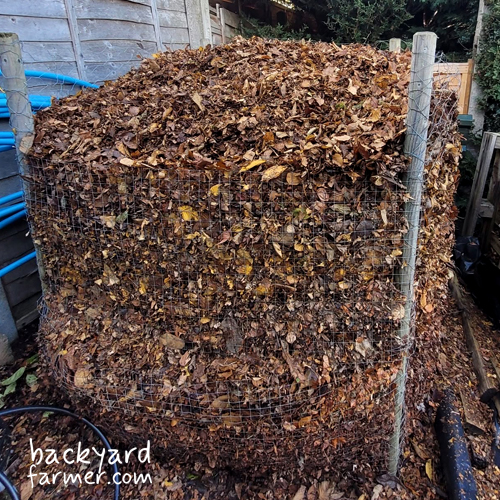
- All four posts are upright and firmly installed.
- The mesh is securely attached to each post.
- The overlapping ends are properly secured.
- There are no dangerous exposed wire ends.
- The sides are supported without excessive sagging.
Bend back and secure sharp wire ends, or cover them with suitable protective edging.
Begin filling gradually and check for movement, bowing or loose fixings. Wet leaves can exert pressure against flexible mesh.
If the cage moves or deforms significantly, stop filling and reinforce the structure before use.
How to Fill and Maintain Your Leaf Mould Bin
Fill the completed cage with fallen deciduous leaves, preferably collected from lawns, paths and other areas where clearing is necessary.
Leaves can go in whole. Shredding may accelerate decomposition, but it isn’t essential.
If the leaves are dry, moisten them as you fill the cage. They should remain damp rather than waterlogged.
The mesh allows ventilation, although exposed cages may dry out during warm or windy weather. Check occasionally and add water when necessary.
As the leaves decompose, they’ll shrink considerably.
For advice on suitable leaves, decomposition times and identifying finished material, see our How to Make Leaf Mould in the UK guide.
How to Empty and Reuse Your Leaf Mould Cage
A simple wire cage can be emptied from the top as the leaves gradually break down.
Before disturbing the contents, check carefully for wildlife sheltering among the leaves. Leaf-mould cages can provide habitat for insects, amphibians and other garden animals.
If animals are nesting or hibernating inside, avoid disturbing them.
Remove the decomposed material in manageable layers, using a hand tool carefully where necessary.
If reaching into the cage becomes awkward, you can remove some of the front mesh fixings once the contents have been reduced sufficiently.
Carefully release the wire from the front posts and fold back the section to improve access, taking care not to tear the mesh or destabilise the structure.
Once the cage has been emptied, reposition the mesh and secure it again with suitable fixings.
Check the posts, wire and staples for damage before refilling.
A well-maintained cage can be reused for many autumn collections.
Common Leaf Mould Bin Problems and Solutions
A wire-mesh cage requires little maintenance, but the posts and fixings should be checked occasionally.
| Problem | Likely cause | Solution |
|---|---|---|
| Posts become loose | Soft ground or inadequate embedment | Reinstall securely or use longer stakes |
| Wire mesh sags | Loose fixings or insufficient support | Retension and secure the mesh |
| Cage bows outwards | Flexible mesh or pressure from the leaves | Reduce the load and reinforce the structure |
| Leaves blow away | Exposed location or loose containment | Improve shelter and secure the mesh |
| Contents dry too quickly | Wind or sun exposure | Check moisture and water when necessary |
| Emptying is difficult | High sides or compacted material | Remove material gradually or release a section of mesh |
| Sharp wire becomes exposed | Damaged mesh or loose fastenings | Repair and secure the edges immediately |
Avoid forcing the mesh into position when the cage is full.
If the posts become unstable or the wire bows significantly, address the problem before adding more leaves.
Optional Improvements and Alternatives
The standard cage doesn’t require a lid, solid base or full timber frame. However, a few adjustments may be useful depending on your materials and location.
Adding Extra Bracing
If the posts move or the mesh doesn’t retain its shape, additional support may be needed.
Sound reclaimed timber can be used to brace the upper sections of the posts or reinforce the fixed sides.
Use suitable outdoor fixings and ensure the bracing doesn’t obstruct access to the cage.
A simple brace between adjacent posts can help the structure retain its shape.
Making a Circular Leaf Mould Cage
If you have flexible chicken wire but don’t need a square enclosure, a circular cage is another simple option.
Form the mesh into a cylinder, overlap the ends and secure them with suitable reusable ties.
Support the cylinder with timber stakes or sturdy bamboo canes installed in the ground.
Circular cages require less precise setting out but still need secure supports and careful treatment of sharp wire edges.
Making the Cage Wildlife-Friendly
Leaf-mould cages can provide shelter for garden wildlife, particularly when left undisturbed over winter.
Avoid loose netting, dangerous wire edges and openings where animals could become trapped.
The RSPB also describes a leaf-mould cage with a dedicated hedgehog-access opening beneath one side. This requires an alternative lower-edge arrangement and isn’t included in the standard design above.
Whether or not you provide a dedicated entrance, always check carefully before emptying or dismantling an established cage.
Frequently Asked Questions
Yes. Reclaimed chicken wire is suitable if it’s strong enough, free from significant damage and securely attached.
Inspect the material for broken sections, severe corrosion and sharp edges before reuse.
A cage with posts spaced approximately 90 cm apart and a height of around 90 cm provides useful capacity for many gardens and allotments.
You can adjust the dimensions to suit your space, provided the mesh and posts remain adequately supported and the contents are accessible.
No. A wire-mesh leaf-mould cage can remain open at the top.
If the contents become too dry, add water as needed. A sheltered location will also help reduce moisture loss.
No. An open-bottomed cage allows the leaves to remain in contact with the soil and its decomposing organisms.
Choose a reasonably well-drained position rather than a site prone to standing water.
Yes. Suitable galvanised welded mesh is generally more rigid but may be harder to bend and shape.
Make sure it can be securely attached to the posts and that all cut edges are safely finished.
Yes. A conventional compost bin can be used, provided the leaves have suitable moisture, ventilation and drainage.
However, a simple wire-mesh cage is often convenient for storing larger quantities of fallen leaves each autumn.