Introduction
Garlic harvest timing is one of those jobs where a few days can make a real difference.
Lift it too early and the bulbs may be smaller than they could have been. Leave it too long and the cloves can start splitting, the skins break down, and the bulbs won’t store as well.
In the UK, the awkward bit is that garlic doesn’t follow one neat harvest date. Weather, soil, planting time, and even small differences within the same bed can all shift the timing.
The best approach is to use the month as a rough guide, then check the plant itself. The leaf dieback, bulb firmness, skin condition, and a simple test pull will tell you far more than the calendar.
Below, I’ll walk through the signs to look for, when garlic is usually harvested in the UK, and how to lift it without ruining the crop at the final step.
If you’re starting from scratch, see my full guide on growing garlic from cloves through to harvest.
Signs Garlic Is Ready to Harvest
The usual advice is to harvest garlic when the leaves turn yellow, but that is a bit too vague on its own.
In the UK, weather, soil, and planting time can shift the harvest window by weeks, so it’s better to read a few signs together.
You’re looking for the point where the bulb has finished swelling, but the skins are still tight enough to protect it in storage.
The 50% Rule
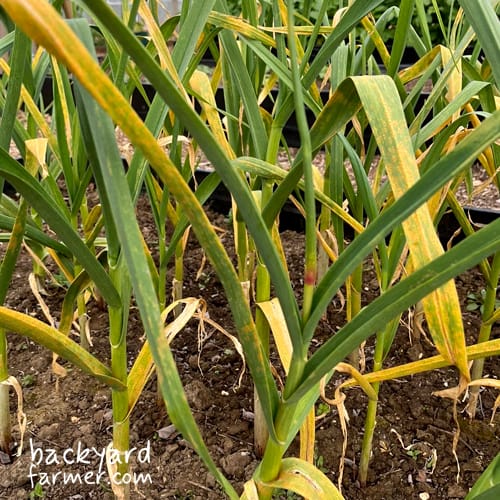
Start with the leaves.
A good harvest sign is:
- Bottom leaves yellowing, browning, or dying back
- Top 3–5 leaves still green
- Plant still standing, not fully collapsed
This matters because each green leaf helps protect a layer of skin around the bulb. If you wait until every leaf has died back, the skins may already be breaking down underground.
That is when garlic starts to split, loosen, or store badly.
Bulb and Neck Signs
You can’t see the whole bulb without lifting it, but the plant still gives you clues.
| Sign | What it usually means |
|---|---|
| Firm bulb in the soil | The cloves are filling out |
| Tight outer skins | The bulb should still store well |
| Slight softening at the neck | The plant is reaching harvest stage |
| Fully floppy, dried neck | Often past the best harvest point |
A ready bulb should feel solid, not soft or wobbly. The cloves should be formed, but still held together by tight skins.
Warning Signs You Are Nearly Too Late
Once these signs appear, don’t leave the crop much longer:
- Bulbs pushing above the soil surface
- Skins loosening around the bulb
- Cloves starting to separate
- Last green leaves dying back quickly
- Plants collapsing completely
At this stage, the bulb is no longer improving. It is more likely to split, rot, or lose storage quality if left in the ground.
Not Every Plant Will Be Ready Together
Garlic rarely matures evenly across the whole bed.
Some plants may be ready now, while others need another few days. That is normal.
Rather than waiting for every plant to match, lift the bulbs that clearly look ready and leave the greener ones to catch up. Harvesting in stages usually gives better bulbs overall than pulling the whole bed in one go.
If the signs look close but you’re still unsure, the safest next step is to lift one test bulb and check it properly.
The Test Pull Method
Even when the leaves look right, it’s worth lifting one bulb before harvesting the whole crop.
This is the easiest way to confirm whether your garlic is actually ready. Instead of guessing from the top growth alone, you can check the bulb properly and make a better decision.
How to Do a Test Pull
- Choose an average-looking plant
Pick one that looks typical — not the biggest, smallest, best, or worst. - Loosen the soil first
Use a fork or trowel to ease the soil around the bulb. Don’t just yank it by the stem. - Lift the whole plant carefully
Bring the bulb up with the roots and stem still attached. - Check the bulb properly
Look at the cloves, skins, and overall firmness before deciding what to do next.
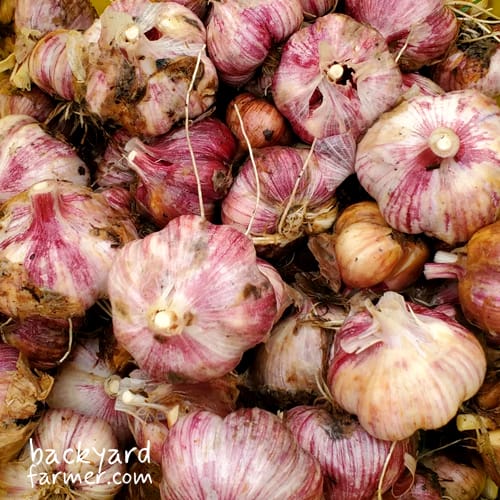
What a Ready Garlic Bulb Looks Like
A garlic bulb that is ready to harvest should usually have:
- Distinct, well-formed cloves
- A firm, solid feel in the hand
- Tight outer skins holding the bulb together
- No obvious splitting or loose cloves
If the bulb looks full, firm, and well wrapped, you’re in the harvest window.
How to Read the Result
| Test bulb result | What to do |
|---|---|
| Firm bulb, formed cloves, tight skins | Harvest now |
| Almost there, but still a bit small | Wait 5–7 days |
| Some plants ready, others still green | Harvest in stages |
| Loose skins or splitting cloves | Harvest immediately |
Why the Test Pull Matters
In UK growing conditions, garlic can shift quickly once it gets close to harvest. A dry spell can push it on, while wet soil can make leaving it longer risky.
A test pull takes most of the guesswork out of it. If the bulb looks right, lift the ready plants. If it needs more time, leave the rest for a few days and check again.
When to Harvest Garlic in the UK
In the UK, garlic is usually harvested from late June through July, though some crops can run into early August in cooler or wetter areas.
Use the month as a rough guide, not the final decision. The leaf dieback, bulb condition, and test pull matter more than the calendar.
| Timing | What it usually means |
|---|---|
| June | Possible early harvest, especially after autumn planting, a warm spring, or free-draining soil |
| July | Main UK garlic harvest window for most gardens and allotments |
| Late July to August | More common in cooler, wetter, northern, or slower-growing plots |
A June harvest is more likely if you planted in autumn and spring has been warm and fairly dry. July is the usual main window for most UK growers, especially when the lower leaves are dying back and the bulbs are firm.
Garlic may run later if the spring was cold, your soil holds moisture, or your plot is more shaded. Two beds only a short distance apart can still be a week or two different.

The best approach is simple:
- Use the month to know when to start checking
- Watch the leaf balance
- Lift one test bulb if you are unsure
- Harvest slightly early if heavy rain is coming and the bulbs are close
Garlic follows conditions more than dates, so let the plant and the weather make the final decision.
How UK Weather Affects Garlic Harvesting
UK weather can shift garlic harvest timing quickly. Even if the leaves look right and your test bulb seems close, a wet or dry spell can change the decision.
Once garlic is nearly ready, it does not benefit much from sitting in wet soil. The bulbs can split, skins can break down, and curing becomes harder.
Use the forecast alongside the plant signs.
| Weather situation | Best move |
|---|---|
| Garlic looks ready and heavy rain is forecast | Harvest slightly early |
| Garlic is close but a dry week is forecast | Leave it a few more days and check again |
| Soil is wet | Lift carefully and move bulbs somewhere dry quickly |
| Soil is dry | Ideal time to harvest, as bulbs lift cleaner and skins stay intact |
| Hot, dry spell | Check more often, as garlic can finish faster than expected |
In wet weather, the bigger risk is leaving garlic too long. A slightly smaller bulb is usually easier to deal with than one that has split or started to rot in the ground.
If the crop is close and the forecast is turning wet, it is usually better to lift the ready bulbs and cure them properly than try to squeeze out a little more size.
Should You Harvest Garlic All at Once?
You don’t have to harvest all your garlic at the same time.
Even if it was planted on the same day, garlic often matures unevenly. Small differences in soil, shade, moisture, clove size, and drainage can mean some plants are ready before others.
The better approach is to harvest in stages.
Lift the bulbs that clearly look ready, then leave the greener or slower plants to carry on for a few more days.
A simple rule:
- Harvest bulbs with the right leaf dieback and firm, formed cloves
- Leave plants that still look too green or underdeveloped
- Check again in 5–10 days
- Don’t wait for every plant in the bed to match
Waiting for the whole crop to look ready can mean the early bulbs go too far. That is when skins loosen, cloves start splitting, and storage quality drops.
If some bulbs are ready, lift them. Let the rest catch up.
Harvesting Garlic Too Early vs Too Late
There is always a bit of judgement involved when harvesting garlic. The good news is that garlic gives you some wiggle room — but one side of the harvest window is safer than the other.
| Timing | What happens | How serious is it? |
|---|---|---|
| Slightly early | Bulbs may be smaller, and cloves may be less defined | Usually fine. The garlic is still usable and can still store well |
| About right | Cloves are formed, bulbs feel firm, and skins are still tight | Best point for storage and quality |
| Slightly late | Skins loosen, cloves begin to separate, and bulbs may start splitting | More of a problem, especially for storage |
| Very late | Bulbs split badly, skins break down, and rot becomes more likely | Hard to fix once it happens |
If you harvest a little early, you might lose a bit of bulb size. If you harvest too late, you can lose storage quality altogether.
That is why, in UK conditions, it is usually better to be slightly early than slightly late — especially if wet weather is coming.
A smaller bulb will still be useful. A split, loose, or rotting bulb usually won’t keep well.
How to Harvest Garlic Properly
Once your garlic is ready, the main thing is to lift it carefully. Garlic bulbs bruise, split, and tear more easily than you might expect, especially if the soil is wet.
Step-by-Step: How to Lift Garlic
- Ease off watering if possible
Stop watering a few days before harvest so the soil can dry slightly. - Choose a dry window
A dry day makes lifting easier and helps the bulbs cure better afterwards. - Loosen the soil first
Use a fork or trowel to loosen the soil around the bulb. Give it enough space so you don’t nick or pierce the garlic. - Lift, don’t pull
Avoid yanking the plant by the stem. This can snap the neck or damage the bulb. - Keep the plant intact
Lift the bulb with the roots, stem, and outer skins still attached. This helps with curing and storage. - Shake off loose soil
Gently remove loose soil by hand, but don’t wash the bulbs. Extra moisture can make curing harder. - Move them somewhere dry and airy
Once lifted, get the garlic out of rain, damp soil, and strong direct sun.
What to Avoid
- Pulling garlic up by the stem
- Digging too close to the bulb
- Washing freshly harvested garlic
- Leaving bulbs sitting in wet soil
- Knocking, bruising, or dropping the bulbs
- Removing the outer skins before curing
Freshly harvested garlic still holds a lot of moisture, so careful handling at this stage makes a real difference. Get the bulbs up cleanly, keep them intact, and move them somewhere dry with good airflow.
What to Do After Harvest
Once your garlic is out of the ground, the next job is curing it properly.
Curing is the slow drying process that helps garlic store for months rather than going soft, mouldy, or splitting too soon. You don’t need a perfect setup, but you do need somewhere dry, airy, and sheltered.
How to Cure Garlic
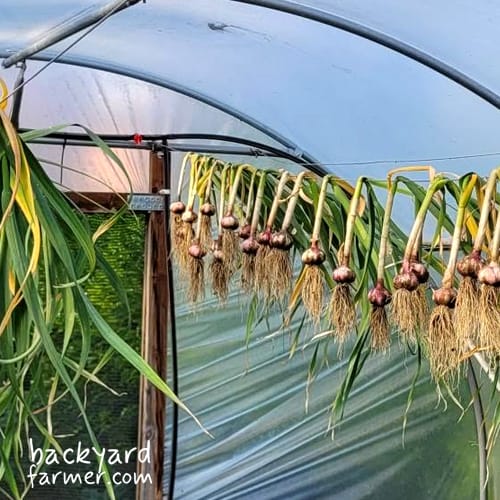
After lifting your garlic:
- Keep the bulbs whole
- Leave the stems, roots, and outer skins attached
- Brush off loose soil, but don’t wash the bulbs
- Place them somewhere dry with good airflow
- Keep them out of rain and strong direct sun
- Leave them to cure for around 2–4 weeks
A shed, garage, greenhouse bench, covered patio, or airy outbuilding can all work, as long as the bulbs stay dry and have space around them.
How to Tell Garlic Is Cured
Garlic is usually ready to trim and store when:
- The stems are dry and stiff
- The outer skins feel papery
- The bulbs feel lighter and dry to the touch
- There are no soft, damp, or mouldy patches
Avoid stacking bulbs too closely, as trapped moisture can cause mould or uneven drying.
For a full guide to trimming, curing, and long-term storage, see: How to Cure and Store Garlic Properly (coming soon)!
Common Garlic Harvesting Mistakes
Most garlic harvest problems come down to timing, handling, or waiting too long. Here are the main mistakes to avoid.
| Mistake | Why it matters |
|---|---|
| Waiting for all the leaves to die back | By the time the plant looks completely finished above ground, the skins may already be breaking down below |
| Trusting the calendar only | July is a useful guide, but weather, soil, and planting time can shift the harvest window |
| Skipping the test pull | Without checking one bulb, you’re guessing whether the cloves are formed and the skins are still tight |
| Pulling instead of lifting | Yanking by the stem can snap the neck, bruise the bulb, or leave garlic behind in the soil |
| Harvesting in wet soil | Bulbs are harder to lift cleanly, skins tear more easily, and curing becomes harder |
| Waiting for every bulb to match | Garlic rarely matures evenly, so the early bulbs may split while you wait for the slower ones |
| Chasing extra size | Leaving garlic too long for slightly bigger bulbs can lead to loose skins, splitting cloves, and poorer storage |
The simple rule is this: watch the plant, check one bulb if you’re unsure, and don’t wait for the whole bed to look perfect.
It’s usually better to lift garlic slightly early than leave it too long, especially if wet weather is on the way.
Conclusion
Knowing when to harvest garlic in the UK is less about following a fixed date and more about reading the plant in front of you.
Watch the leaf balance, lift one test bulb if you’re unsure, and keep an eye on the weather. If the bulbs look close and rain is coming, it’s usually better to harvest slightly early than leave them too long.
Once lifted, cure the garlic properly somewhere dry and airy. Get those few steps right, and you’ll have firm bulbs that store well and make the whole grow worthwhile.