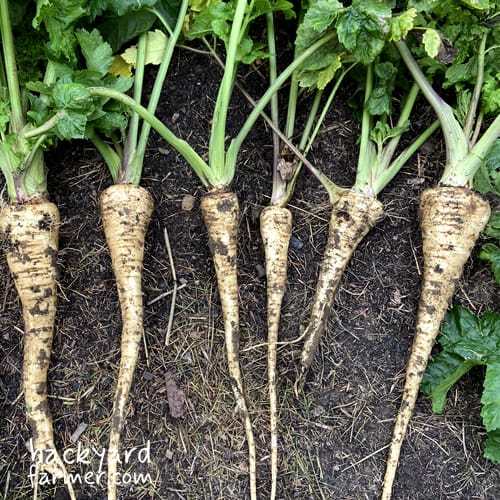
How to Grow Parsnips in the UK: A Slow-Start Winter Roots Guide

This post may contain affiliate links, which means I earn a small commission at no extra cost to you.

Table of Contents (Quick Nav)

Introduction

Parsnips are not difficult once they get going, but they can be awkward at the start. If you have ever sown a row, waited patiently, and ended up staring at bare soil for weeks, you are not alone.

The main challenge with growing parsnips in the UK is usually the germination stage, not the crop itself. Most failed rows come down to a few simple things:

  • Old seed that has lost its strength.
  • Cold spring soil that slows everything down.
  • Dry seed drills during germination.
  • Sowing too early because the packet says you can.
  • Giving up before the seed has had enough time to appear.

Once parsnips are up and growing, they become a much steadier crop. They do not need constant feeding or daily fussing. Give them deep enough soil, keep them weeded while young, and they will sit quietly in the ground until autumn and winter, when the flavour really starts to come into its own.

In this guide, I’ll walk you through how to grow parsnips in the UK, including:

  • When to sow parsnips for reliable germination.
  • How to use fresh seed and avoid patchy rows.
  • What to do if you have heavy clay or stony soil.
  • How to avoid forked, small or woody roots.
  • When to harvest parsnips for the best winter flavour.

If you just want the quick version, use the guide below. However, if parsnips have failed for you before, read on. Most of the useful work happens early, in the sowing and soil preparation stages, before the crop really gets moving.

Quick reality check: Parsnips are slow starters. Use fresh seed, wait until the soil has warmed, keep the drill moist, and give them at least three weeks before assuming they have failed.


When to Sow Parsnips in the UK

Parsnips are usually sown directly outside from March to May in the UK. You will often see February mentioned on seed packets, and it can work in mild areas or under cover. However, for most gardens and allotments, February is more of a gamble than a safe starting point.

The issue is not the calendar. It is the soil. Parsnip seed is slow even in decent conditions, and cold, wet soil can leave it sitting there doing very little.

As a simple rule:

  • Sow in March if your soil is light, workable and starting to warm up.
  • Sow in April if you want the safest main window for most UK gardens.
  • Sow in May if an earlier row failed or your soil was too cold in spring.
  • Avoid rushing February sowings unless you are in a mild area or using protection.

For many UK growers, April is the most reliable month to sow parsnips. The soil is usually warmer, the days are longer, and there is still enough growing season left for a good autumn and winter crop.

That does not mean March is wrong. If your soil is light and workable, March sowings can do well. However, if you are on heavy clay, an exposed allotment or a colder northern site, waiting until April can save a lot of frustration.

With parsnips, slightly late into warm soil is often better than early into cold, wet soil.

Best Month to Sow Parsnips: March, April or May?

MonthPractical UK Advice
FebruaryPossible in mild southern gardens or under cover, but often too cold and wet for reliable germination. Treat it as an early gamble, not the default.
MarchWorth trying if the soil is warming, workable and not waterlogged. Better on lighter soils and sheltered sites.
AprilOften the safest main sowing month for many UK gardeners because the soil is warmer but there is still plenty of growing season left.
MayGood for resowing failed rows. Roots may be smaller than earlier sowings, but they can still produce useful winter crops.
Early JunePossible as a late backup if you can keep the seedbed moist, but do not expect huge roots.

If an Early Sowing Fails

Do not write the crop off straight away. A May resow can still be worthwhile, especially if the first row went into cold soil or dried out before germination.

Before resowing, check the likely cause:

  • Was the seed fresh?
  • Was the soil cold or waterlogged?
  • Did the drill dry out while the seed was germinating?
  • Could tiny seedlings have been eaten by slugs or snails?
  • Did you give the row long enough before assuming it had failed?

How Long Do Parsnips Take to Germinate?

Parsnips can take three to four weeks to appear, and sometimes longer in poor conditions. This is one of the main reasons they catch people out.

To avoid disturbing the row too early:

  • Mark the row clearly after sowing.
  • Keep the drill moist but not soaked.
  • Watch for weeds, as they can hide tiny seedlings.
  • Give the seed enough time before resowing over the top.

Quicker crops may be up long before parsnips show, but that does not always mean the parsnip row has failed.


Where to Grow Parsnips

Parsnips grow best in an open, sunny spot with deep, loose soil. They are root crops, so what is happening under the surface matters more than how impressive the leaves look above it.

The ideal parsnip bed is:

  • Sunny, with a good part of the day in direct light.
  • Deep enough for the root to grow down without hitting a hard layer.
  • Free-draining, so the roots are not sitting in cold, wet soil.
  • Reasonably fertile, but not freshly manured.
  • Clear of large stones, old roots and hard clods where possible.

That does not mean you need perfect, sandy, show-bench soil. Most of us are not growing for a village show. The main thing is to give the root a clear enough path down without constantly hitting stones, compacted layers or fresh lumps of manure.

Avoid Fresh Manure Before Sowing

Avoid sowing parsnips in ground that has been freshly manured. Rich, lumpy or recently manured soil can encourage:

  • Forked roots.
  • Twisted roots.
  • Too much leafy growth.
  • Uneven or split roots.

A bed that was improved the previous year is usually better than one that has just had a heavy load of manure or compost dug in.

Are Raised Beds Good for Parsnips?

Raised beds can be excellent for parsnips if they are deep enough. They warm up a little faster in spring, drain better than heavy ground, and make it easier to create a loose, stone-free growing area.

They are especially useful if your garden soil is:

  • Heavy clay.
  • Shallow.
  • Stony.
  • Slow to warm in spring.
  • Prone to sitting wet after rain.

Allotment beds are also ideal, especially if you can give parsnips a dedicated root bed and keep it weeded while the seedlings are small.

Can You Grow Parsnips in Containers?

You can grow parsnips in containers, but depth is the limiting factor. A shallow pot will usually give you short, twisted or cramped roots.

If you want to try containers:

  • Use a deep tub, barrel-style planter or large container.
  • Choose a shorter variety rather than a long exhibition type.
  • Use loose, stone-free compost.
  • Keep moisture steady while the seed germinates.
  • Avoid letting the container dry out completely.
Growing SpotHow Suitable Is It?Notes
Open veg bedExcellentBest if the soil is deep, loose and not freshly manured.
Raised bedExcellentUseful for improving drainage and creating deeper prepared soil.
Allotment bedExcellentGood for longer rows, but keep young seedlings weed-free.
Deep containerPossibleChoose shorter varieties and keep moisture steady.
Heavy clay soilPossible with prepExpect more odd shapes unless you loosen the planting area.
Stony groundPossible but awkwardRemove large stones or use prepared planting stations.

Do not worry too much if your soil is not perfect. A forked parsnip is not a failed parsnip. It may not look tidy, but once it is peeled, chopped, roasted or added to soup, it still earns its place in the kitchen.


Growing Parsnips in Heavy Clay or Stony Soil

You can grow parsnips in clay soil, but it helps to be realistic. Heavy or stony ground often produces more forked, twisted or short roots because the taproot hits resistance as it tries to grow down.

That does not make the crop a waste of time. It just means you may need to help the roots a bit. In a normal kitchen garden, a few odd-shaped parsnips are not a problem. They still roast, mash and go into soup perfectly well.

The main things to avoid are:

  • Fresh manure.
  • Large stones.
  • Hard compacted layers.
  • Very wet ground.
  • Rough clods in the sowing area.

Fresh manure can encourage forking, while compacted or stony soil forces the root to split or bend around obstacles.

Best Options for Difficult Soil

If your soil is heavy clay, raised beds are often the easiest fix. They let you build up a deeper, looser growing layer and improve drainage at the same time.

You can also improve your chances by:

  • Choosing shorter-rooted varieties.
  • Removing the worst stones before sowing.
  • Loosening the planting row deeply.
  • Avoiding fresh manure before sowing.
  • Keeping the seedbed moist but not waterlogged.
  • Accepting that a few forked roots are part of the deal.

This is where it is worth being practical rather than precious. If your soil is rough, aim for useful roots first and perfect roots second.

Dibber or Crowbar Method for Parsnips

For awkward ground, you can use a simple station-sowing method to give each root an easier path down:

  1. Mark out where each parsnip will grow.
  2. Use a long dibber, crowbar or bulb planter to make a deep hole.
  3. Wiggle it slightly to open a loose channel.
  4. Backfill the hole with fine compost, soil and a little sharp sand.
  5. Sow a few fresh seeds on top of each prepared station.
  6. Thin to the strongest seedling once they are growing well.

This method is not essential if your soil is already decent. However, on heavy clay or stony allotment ground, it can reduce some of the worst forking and give the roots a better start.

Practical note: Do not chase perfect supermarket roots too hard. A forked parsnip is still a useful parsnip, and homegrown flavour matters more than tidy shapes.


How to Sow Parsnips from Seed

Parsnips are best sown directly where they are going to grow. They make a long taproot early on, and that root does not like being moved once it starts heading down.

The simplest method is to sow fresh seed into a prepared drill. However, I like station sowing for parsnips because it gives you a better chance of avoiding one thick clump in one spot and a bare gap somewhere else.

Before You Sow

Before sowing, get the bed ready properly. This is one of those jobs where a little care at the start saves a lot of disappointment later.

Aim to:

  • Rake the bed level.
  • Remove the worst stones, clods and old roots.
  • Avoid freshly manured soil.
  • Make sure the soil is workable, not cold and sticky.
  • Water the drill first if the soil is dry.

Watering before sowing gives the seed a damp layer to sit in without washing it around afterwards.

How Deep to Sow Parsnip Seed

Sow parsnip seed about 1–2 cm deep. For station sowing, place 3–5 seeds every 10–15 cm, then cover them lightly with fine soil or compost.

Once the seedlings are up and growing well, thin each station down to the strongest plant.

Step-by-Step Sowing Method

A simple sowing method looks like this:

  1. Prepare a deep, weed-free bed.
  2. Remove large stones, clods and obvious obstructions.
  3. Make a shallow drill around 1–2 cm deep.
  4. Water the drill first if the soil is dry.
  5. Sow 3–5 fresh seeds every 10–15 cm.
  6. Cover lightly with fine soil or compost.
  7. Mark the row clearly.
  8. Keep the row moist until seedlings appear.
  9. Wait at least 3–4 weeks before assuming failure.
  10. Thin to one strong seedling per station.

Thinning Parsnip Seedlings

When thinning, be gentle. If several seedlings have come up close together, snip the weaker ones off with scissors rather than tugging them out.

It might feel fussy, but it helps avoid disturbing the root of the seedling you want to keep.

Using Radish as Row Markers

You can also sow a few radish seeds between parsnip stations as row markers. Radish germinates much faster, so it shows you where the row is while the parsnips take their time.

This is useful because it helps you:

  • See where the parsnip row is.
  • Avoid hoeing through slow-germinating seed.
  • Keep the row weeded while you wait.
  • Make use of the space before the parsnips need it.

Just harvest the radishes carefully. Rough pulling can disturb tiny parsnip seedlings nearby, especially if the soil is dry or crusted.

Keep the Drill Moist

The main thing after sowing is moisture. Do not let the drill dry out completely while the seeds are trying to germinate.

You do not need to drown the row. Just keep it evenly damp until the seedlings are safely up.

This is where patience pays off. Parsnips are slow, but a well-marked, evenly moist row gives them the best chance of getting started.


Chitting Parsnip Seed, Toilet Rolls and Other Optional Methods

Direct sowing into warm, moist soil is still the simplest way to grow parsnips. However, parsnips are one of those crops where gardeners often develop their own little tricks, usually after staring at one too many empty rows.

These methods can be useful if you struggle with:

  • Poor germination.
  • Heavy soil.
  • Slug pressure.
  • Patchy rows.
  • Seed drying out before it sprouts.

However, they are not a replacement for the basics: fresh seed, warm soil and steady moisture.

Should You Chit Parsnip Seed?

You can chit parsnip seed on damp kitchen paper before sowing. This means placing the seed on damp paper, keeping it somewhere warm, and waiting for the tiny root to appear before planting.

Chitting can help because it lets you:

  • Check whether the seed is alive before sowing.
  • Avoid waiting weeks for dead seed to appear.
  • Place the germinated seed exactly where you want each plant.
  • Reduce empty gaps in the row.

The downside is that chitted parsnip seed is fiddly. The tiny root is fragile, and if it snaps, the seedling is probably finished.

If you do chit parsnips:

  • Plant them as soon as the tiny root appears.
  • Handle them gently.
  • Do not let the paper dry out.
  • Avoid leaving sprouted seeds too long before planting.

Best use: Chitting is worth trying if parsnips regularly fail for you, but it is not essential for everyone.

Growing Parsnips in Toilet Rolls

Some growers start parsnips in toilet roll tubes or root trainers, then plant the whole thing out before the taproot is disturbed. This can help if direct sowing keeps failing, or if slugs keep eating seedlings as soon as they appear.

Toilet rolls can be useful when:

  • Your outdoor rows keep failing.
  • Your soil is cold or wet in early spring.
  • Slugs are taking tiny seedlings.
  • You want more control over germination.

The risk is root disturbance. Parsnips grow a long taproot very early, and if that root hits the bottom of the tube, bends, dries out or gets damaged when planting, the final root may fork or twist.

If you want to try toilet roll tubes:

  1. Fill the tube with fine compost.
  2. Sow a few seeds into each tube.
  3. Thin to the strongest seedling.
  4. Keep the tube moist but not soaked.
  5. Plant out while the seedling is still young.
  6. Do not let the taproot hit the bottom before planting.

Use this as a short-term starter, not a way to hold parsnips in pots for weeks.

Covering the Row to Hold Moisture

Another useful trick is covering the drill after sowing. Some gardeners use a plank of wood laid over the row to help hold moisture in the soil while the seed germinates. Others use fleece, cloches or clear covers to add a little warmth and protection.

This can work well in dry springs, but you do need to check regularly.

The aim is to:

  • Hold moisture in the seed drill.
  • Protect the surface from drying winds.
  • Add a little warmth in cool weather.
  • Stop the soil from crusting over too quickly.

As soon as seedlings begin to show, remove the cover or lift it enough to let light and air in. You are trying to hold moisture, not trap seedlings in the dark or cook the row on a warm day.

MethodBest ForMain Caution
Chitting on damp kitchen paperTesting seed viability and avoiding empty rows.Plant as soon as the tiny root appears because it is fragile.
Toilet roll tubes or root trainersRepeated direct-sowing failures or slug-heavy ground.Plant out early before the taproot hits the bottom.
Covering the drill with a plankHolding moisture during germination.Check often and remove once seedlings appear.
Fleece, cloches or clear coversWarming the row and protecting spring sowings.Vent or remove in warm spells so the row does not overheat.
Oversowing stationsReducing gaps in patchy rows.Thin properly or the roots will be crowded.

The key is not to overcomplicate things too early. Try the simple direct-sown method first. If that fails more than once, then it makes sense to experiment with chitting, covers or toilet roll tubes.


Parsnip Spacing and Layout

Good spacing makes a big difference with parsnips. If the plants are too close together, they will still grow, but the roots are more likely to be small, thin or uneven.

As a simple guide:

  • Leave 10–15 cm between plants in the row.
  • Leave 30–45 cm between rows if growing in traditional rows.
  • Use wider spacing if you want larger roots.
  • Use slightly closer spacing for smaller kitchen-sized roots.
  • Avoid crowding, especially in shallow or dry soil.

Traditional Rows, Raised Beds and Square Foot Spacing

Rows are usually spaced around 30–45 cm apart. Wider rows make weeding and lifting easier, especially on allotments where paths and access matter.

In raised beds, you can grow parsnips in blocks or staggered rows, as long as each plant has enough room to form a decent root. This can make better use of space than traditional rows, but do not pack them in too tightly just because there is a gap.

Layout StyleSuggested SpacingBest For
Traditional rows10–15 cm between plants, 30–45 cm between rowsAllotments, open beds and easy weeding.
Raised bed blocks10–15 cm between plants in staggered rowsMaking good use of bed space.
Square foot growingAround 9 plants per square foot for smaller roots, or 4 for larger rootsSmall beds and planned layouts.
Station sowing3–5 seeds every 10–15 cm, thinned to one plantReducing gaps and improving reliability.

Why Station Sowing Works Well

Station sowing suits parsnips because germination can be patchy. Instead of scattering seed thinly and hoping for the best, you sow a small cluster where each plant should eventually grow.

The basic idea is simple:

  1. Sow 3–5 seeds at each station.
  2. Space each station 10–15 cm apart.
  3. Wait for the seedlings to appear.
  4. Keep the strongest seedling.
  5. Remove the extras carefully.

If the seedlings are close together, snip the weaker ones off with scissors rather than pulling them out. It is a small detail, but it helps avoid disturbing the taproot of the plant you want to keep.

Do Parsnips Need Perfect Spacing?

Not really. Better spacing gives you better roots, but this is still a kitchen crop, not a show bench.

The aim is to give each parsnip enough space to develop into a useful root. A slightly wonky parsnip with good flavour is still a win.

If you want to map your parsnip spacing before sowing, use the Allotment Planner to lay out your root bed and avoid cramming too much into one space.

Watering, Feeding and Care

Parsnips do not need much fuss once they are established. The most important care happens early, while the seed is germinating and the seedlings are still small.

At this stage, focus on:

  • Keeping the seed drill evenly moist.
  • Stopping weeds from smothering tiny seedlings.
  • Watching for slugs and snails.
  • Avoiding heavy feeding or fresh manure.
  • Giving each plant enough space to settle in.

Watering Parsnips

The seedbed should stay evenly moist until the seedlings appear. This does not mean soaking the row every day. Instead, aim to avoid the cycle of dry soil, panic watering, then dry soil again.

Parsnip seed can sit in the ground for weeks, so steady moisture matters more than heavy watering.

Once the plants are growing well, parsnips are fairly low-maintenance. In normal UK conditions, they usually only need extra water during dry spells, especially if you are growing in:

  • Sandy soil.
  • Raised beds.
  • Containers.
  • Very exposed allotment plots.
  • Recently prepared soil that dries quickly.

Long dry periods can slow growth. Then, if heavy rain arrives suddenly after a dry spell, roots can sometimes split. You cannot control the weather, but keeping the soil more even where possible does help.

Feeding Parsnips

Feeding should be kept simple. Parsnips are not a greedy crop, and too much nitrogen can encourage leafy growth rather than good roots.

Avoid before sowing:

  • Fresh manure.
  • Heavy nitrogen feeds.
  • Very rich compost in the sowing row.
  • Large lumps of half-rotted organic matter.

These can increase the chance of forked roots, uneven growth and too much top growth. If the bed was improved the previous year, that is usually enough for a decent crop.

Weeding and Mulching

Weeding is more important than feeding. Young parsnip seedlings are slow, and they are easy to lose among weeds if you take your eye off the row for too long.

When weeding near young parsnips:

  • Weed gently by hand where possible.
  • Avoid dragging a hoe too close to the seedlings.
  • Be careful not to disturb the taproot.
  • Keep the row visible, especially while germination is patchy.

Mulching can help later in the season, once the plants are big enough. A light mulch between rows can hold moisture, reduce weeds and stop the soil surface baking hard in dry weather.

Just avoid burying tiny seedlings before they have had a chance to grow.

JobWhen It Matters MostPractical Advice
WateringGermination and dry spellsKeep the drill evenly moist until seedlings appear, then water during prolonged dry weather.
FeedingBefore sowingAvoid fresh manure and heavy nitrogen feeds. Parsnips usually prefer steady, moderate fertility.
WeedingEarly growthKeep rows clear while seedlings are small and slow. Weed carefully by hand near the plants.
MulchingAfter seedlings establishUse a light mulch between rows to hold moisture and suppress weeds.
Pest checksSeedling stageWatch for slugs and snails, especially if seedlings seem to vanish overnight.

The main rule is simple: help them through the slow start, then let them get on with it. Once parsnips have a decent root system and enough space, they usually become one of the calmer crops on the plot.


Common Parsnip Growing Problems

Most parsnip problems start early. If you can get fresh seed to germinate in decent soil, the crop usually becomes much easier from that point on.

The most common issues are usually linked to:

  • Old or weak seed.
  • Cold, wet spring soil.
  • Dry seed drills.
  • Slug and snail damage.
  • Heavy clay, stones or compacted ground.
  • Leaving roots too long into spring.

Here are the main problems to watch for.

ProblemLikely CausePractical Fix
Nothing germinatedOld seed, cold soil, dry drills, waterlogged soil or giving up too soon.Use fresh seed, wait for warmer soil, keep the row moist and allow at least 3–4 weeks before assuming failure.
Patchy rowsUneven moisture, old seed, poor soil contact, slugs or washout.Station sow, oversow slightly, keep the drill moist and resow gaps in May if needed.
Seedlings vanishedSlugs, snails, birds, heavy rain or seedlings being lost among weeds.Check at night for slug damage, keep rows weeded, protect young seedlings and avoid assuming every gap is failed seed.
Forked or twisted rootsStones, compacted soil, fresh manure, root disturbance or hard clay layers.Prepare deeper soil, avoid fresh manure, remove large stones and use raised beds or prepared planting stations on difficult ground.
Small rootsLate sowing, overcrowding, poor thinning, drought or shallow soil.Sow in the main spring window, thin properly, water during dry spells and give each plant enough room.
Roots splittingDry spells followed by sudden heavy rain, or uneven watering in light soil.Keep soil more evenly moist where possible and mulch once plants are established.
Woody rootsRoots left too long into spring after plants start regrowing.Harvest through winter and lift remaining roots before strong spring growth begins.
Parsnip cankerWet soil, damaged crowns, stressed plants or susceptible varieties.Improve drainage, rotate crops, avoid damaging roots and try canker-resistant varieties if it keeps happening.
Carrot fly damageParsnips are related to carrots and can be attacked by the same pest.Use fine mesh if carrot fly is a known issue, avoid bruising foliage and rotate with other crop families.

Why Didn’t My Parsnips Germinate?

Poor germination is the classic parsnip problem. Before blaming yourself, check the basics.

Common causes include:

  • Seed that was too old.
  • Soil that was too cold or wet.
  • A seed drill that dried out.
  • Seed sown too deeply.
  • Seedlings being eaten before you noticed them.
  • Not waiting long enough before giving up.

Parsnip seed loses reliability quickly, so fresh seed is always the safest option. Timing matters too. If the row was sown into cold, wet soil in February or early March, the seed may simply have struggled.

Also, remember that parsnips are naturally slow. A row that looks empty after two weeks may still be doing something underground. Give it at least three weeks, and often closer to four, before deciding it has failed.

Why Are My Parsnips Forked?

Forked parsnips are usually caused by resistance in the soil. The taproot tries to grow down, hits an obstacle, and splits or twists around it.

The usual causes are:

  • Stones.
  • Compacted layers.
  • Hard clay.
  • Fresh manure.
  • Root disturbance.
  • Growing in shallow soil.

You can reduce forking by preparing the bed deeply, avoiding fresh manure and removing the worst stones before sowing. On heavy soil, raised beds, shorter varieties or prepared dibber holes can help.

Still, do not treat every forked root as a disaster. Forked parsnips may not win prizes, but most are still perfectly good in the kitchen once trimmed and cleaned.

Why Did My Parsnip Seedlings Disappear?

Sometimes an empty row is not failed seed at all. Tiny seedlings may have appeared and then been eaten before you noticed them.

This is especially common when you have:

  • Damp weather.
  • Slug-heavy beds.
  • Weedy rows.
  • Heavy rain after sowing.
  • Birds disturbing the soil surface.

If you see gaps, look closely before blaming the seed. Check around the row in the evening, look for slug trails, and keep the area weeded so seedlings are easier to spot.

If the row is badly gapped, a May resow can still be worthwhile.

How to Avoid Small Parsnips

Small roots are usually caused by stress, lack of space or a short growing season. They are still usable, but you can improve the next crop by fixing the growing conditions.

Common causes include:

  • Late sowing.
  • Overcrowding.
  • Poor thinning.
  • Dry spells.
  • Shallow soil.
  • Too much competition from weeds.

Thin the crop properly, water during long dry periods and give each root enough space to swell.

How to Avoid Woody Parsnips

Woody roots are more of a timing issue. Parsnips are excellent winter crops, but if they are left too long into spring, they can start putting energy back into new growth.

At that point, the root can become:

  • Tougher.
  • More fibrous.
  • Less sweet.
  • Less pleasant to roast or mash.

For the best eating, harvest through winter and clear the last roots before strong spring regrowth starts.


When and How to Harvest Parsnips

Parsnips are usually ready to harvest from autumn onwards, depending on when you sowed them and how well they have grown. Most crops take around 4–6 months from sowing, although late sowings and slow seasons may need longer.

You can start lifting parsnips once the roots are a useful size. The tops will usually be strong by then, and you may see the shoulder of the root pushing slightly at the soil surface.

Good signs that parsnips are ready include:

  • Strong, established top growth.
  • A visible root shoulder at soil level.
  • Autumn or winter timing.
  • Roots that feel firm when gently tested.
  • Enough size to make lifting worthwhile.

If you are unsure, gently loosen one as a test rather than pulling half the row too early. It is better to check one root properly than guess and end up lifting the crop before it has had time to size up.

Does Frost Improve Parsnip Flavour?

Parsnips do not need frost to be edible, but cold weather usually improves the flavour. As temperatures drop, the roots often become sweeter, which is why they are such a classic autumn and winter crop.

For the best flavour, many growers leave parsnips in the ground and lift them as needed through winter. This is one of the easiest storage methods, because the soil does the storing for you.

Harvesting Parsnips in Winter

The catch with leaving parsnips in the ground is frozen soil. If the ground freezes solid, getting parsnips out can be awkward, especially on heavy clay.

Before a hard frost, you can:

  • Lift a few roots for the kitchen.
  • Mulch the row with straw.
  • Mark the row clearly before the foliage dies back.
  • Loosen a few roots in advance if hard weather is coming.
  • Avoid leaving yourself with frozen soil and no way to lift dinner.

Leaving parsnips in the ground is one of the easiest storage methods, but it only works if you can still get them out when the ground freezes.

How to Lift Parsnips Without Snapping Them

To harvest parsnips, loosen the soil with a fork before lifting. Push the fork in beside the root rather than straight through it, then ease the soil up gently.

Long parsnips can snap if you pull hard from the tops, especially in heavy soil. Take your time here. A snapped root is not wasted, but it is always nicer to lift them cleanly if you can.

A simple lifting method is:

  1. Push a garden fork into the soil beside the root.
  2. Lever the soil gently to loosen it.
  3. Hold the leaves close to the crown.
  4. Ease the parsnip out slowly.
  5. Brush off excess soil before storing.
Harvest PointPractical Advice
Earliest harvestFrom autumn, once roots are a useful size.
Best flavourUsually after cold weather, when roots become sweeter.
Winter storageLeave in the ground and lift as needed if the soil is workable.
Hard frostLift a few in advance or mulch the row with straw.
Lifting methodLoosen with a fork first, then ease roots out gently.
Spring warningDo not leave roots too long once strong spring regrowth starts, or they can turn woody.

Storing Lifted Parsnips

You can store lifted parsnips for a short while in a cool, dark place, but they are usually best kept in the ground until needed.

If you do lift a batch:

  • Brush off excess soil rather than washing them straight away.
  • Keep them cool.
  • Keep them frost-free.
  • Use damaged roots first.
  • Do not leave them somewhere warm and dry.

Try not to leave the last roots sitting into spring for too long. Once parsnips start putting energy back into fresh leaf growth, the roots can become tougher, woodier and less pleasant to eat.


Best Parsnip Varieties for UK Gardens

Variety choice can help, but it will not rescue old seed, cold soil or poor soil preparation. With parsnips, the basics still matter most:

  • Fresh seed.
  • Warm enough soil.
  • Steady moisture during germination.
  • Enough depth for the root to grow.
  • Sensible spacing and thinning.

That said, some varieties suit certain gardens better than others. If you have deep, well-prepared soil, you can try longer traditional types. However, if you are growing in heavy soil, shallow beds or containers, shorter or broader-rooted varieties may be more forgiving.

Choosing a Parsnip Variety for Your Soil

A simple way to choose is to match the variety to your growing conditions:

  • Deep, loose soil: Try longer traditional varieties.
  • Heavy clay: Look for shorter or more forgiving varieties.
  • Shallow beds: Avoid very long-rooted types.
  • Containers: Choose shorter varieties and use a deep pot.
  • Canker-prone plots: Look for varieties sold as canker-resistant.
VarietyWhy Growers Choose ItBest For
Tender and TrueA traditional, well-known variety often grown for long roots and good flavour.Deeper, well-prepared soil.
White GemA shorter, broader type that can be more forgiving than very long varieties.Heavier soil, shallower beds and general garden growing.
Gladiator F1Often sold as a reliable, canker-resistant option.Growers who have had canker problems before.
Javelin F1A modern type often chosen for uniform roots and reliability.Regular garden and allotment crops.
Warrior F1Usually grown as a canker-resistant variety.Wetter sites or gardens with previous canker issues.
Bayonetta F1A modern variety often aimed at long, clean roots.Better-prepared soil and growers wanting straighter roots.

Should Beginners Worry About Variety?

If you are new to growing parsnips, do not overthink the variety too much. Choose fresh seed from a reliable supplier and pick a type that suits your soil.

For heavy or shallow ground, avoid chasing the longest roots. A shorter, reliable parsnip is better than a long variety that forks badly, struggles in the soil or never gets going properly.

What About Parsnip Canker?

If parsnip canker has been a regular problem on your plot, it is worth looking for varieties sold as canker-resistant. They are not a complete guarantee, but they can reduce the risk when combined with:

  • Better drainage.
  • Crop rotation.
  • Careful lifting.
  • Avoiding root damage.
  • Not leaving damaged crowns sitting in wet soil.

Treat variety choice as a helpful extra, not a magic fix. Fresh seed, timing, moisture and soil prep still matter more.


Companion Planting for Parsnips

Parsnips are not especially fussy companions. The main thing is to give them enough space, avoid disturbing the roots, and rotate them sensibly rather than treating companion planting as a magic fix.

Good companion choices for parsnips are usually crops that:

  • Grow quickly and finish early.
  • Do not cast heavy shade over the row.
  • Do not compete too heavily at root level.
  • Leave enough room for weeding and lifting.
  • Fit sensibly into your crop rotation.

Best Companion Crops for Parsnips

Because parsnips sit in the ground for a long time, they work best with crops that either finish quickly or grow upright without smothering the row.

Radish is one of the most useful companions because it germinates quickly and can mark the row while parsnips are still hidden underground. Just pull it carefully, as the last thing you want is to disturb tiny parsnip seedlings after waiting weeks for them to appear.

Onions, leeks and garlic can also work well nearby because they make good use of bed space and do not create a dense, spreading canopy. Lettuce can work as a short-term filler too, as long as you harvest it before it starts shading or crowding the parsnips.

Companion CropWhy It Can WorkPractical Note
RadishGerminates quickly and marks the row while parsnips are slow to appear.Harvest carefully so you do not disturb tiny parsnip seedlings.
OnionsUpright growth makes good use of space nearby.Keep enough room for weeding and lifting.
LeeksUseful winter crop pairing in nearby rows or beds.Avoid overcrowding; both crops sit in the ground a long time.
GarlicTakes up little surface space and fits well in mixed veg beds.Best kept to neighbouring rows rather than packed into the parsnip line.
LettuceQuick crop that can fill gaps early in the season.Harvest before it shades young parsnips.
Peas or beansCan fit into broader bed rotations and improve overall soil use.Keep taller crops positioned so they do not shade the row.

What Not to Plant Too Close to Parsnips

There are not many true “bad companions” for parsnips, but some crops make life harder if they are planted too close.

Avoid heavy competition from crops such as:

  • Squash.
  • Courgettes.
  • Dense brassicas.
  • Tall crops that shade the row.
  • Anything that makes weeding difficult while the seedlings are small.

These crops may not harm parsnips directly, but they can shade the row, compete for moisture and make it harder to keep young seedlings clear of weeds.

Rotation Matters More Than Companion Planting

Try not to grow parsnips in the same bed year after year, especially if you have had canker, carrot fly or other root-crop problems.

A sensible rotation helps reduce repeated pest and disease pressure. In practice, that usually matters more than finding the perfect companion plant.

The most useful companion planting trick with parsnips is still the simple one: use radish as a marker crop, then remove it gently once the parsnips are visible.


Plan Your Parsnip Bed Before You Sow

Parsnips are worth planning before the seed packet comes out because they sit in the ground for a long time. Once they are sown, thinned and growing, you do not really want to move them.

Before sowing, think about:

  • Where the row will go.
  • How much space each plant needs.
  • What was growing in the bed last year.
  • Whether nearby crops will shade the seedlings.
  • How you will reach the row for weeding and lifting.
  • Whether the soil is deep enough for the variety you are growing.

This is especially useful in raised beds and allotments. It is very easy to squeeze in one more row in spring, then regret it later when the crop needs more space or the row becomes awkward to weed.

A quick plan can help you avoid:

  • Overcrowded roots.
  • Awkward rows that are hard to weed.
  • Poor crop rotation.
  • Shaded seedlings.
  • Planting long-season crops where you need quick turnover.

If you want to plan your parsnip bed before sowing, use the Allotment Planner to map your spacing, rows, companion crops and crop rotation in one place.


Parsnip Growing FAQs

Can you grow parsnips in pots?

Yes, you can grow parsnips in pots, but the container needs to be deep. A shallow pot usually gives short, twisted or cramped roots.
For the best results:
– Choose a deep tub, barrel or large container.
– Use a shorter parsnip variety.
– Fill it with loose, stone-free compost.
– Keep the compost evenly moist while the seed germinates.
– Avoid letting the container dry out completely.

How long do parsnips take to grow?

Parsnips usually take around 4–6 months from sowing to harvest, depending on the variety, sowing date and growing conditions.
They are slow compared with many vegetables, but that is part of their value. Once established, they can sit in the ground through autumn and winter, giving you a useful crop long after quicker summer veg has finished.

Are parsnips easy to grow?

Parsnips are easy once they are established, but they can be frustrating at the germination stage.
The hardest part is usually getting fresh seed to germinate in soil that is:
– Warm enough.
– Moist enough.
– Not waterlogged.
– Not too compacted.

After that, parsnips are fairly low-maintenance.

What is the most common mistake when growing parsnips?

The most common mistake is using old seed or sowing too early into cold, wet soil.
Parsnip seed does not stay reliable for long, and cold spring soil can make germination slow, patchy or completely unsuccessful. Fresh seed and warmer soil are two of the biggest improvements you can make.

Can you sow parsnips in May?

Yes, May is often a useful month for resowing failed parsnip rows.
The roots may be smaller than an earlier sowing, but you can still get a worthwhile winter crop if:
– The soil is warm.
– The seed is fresh.
– The drill stays moist.
– The seedlings are thinned properly.

Can you sow parsnips in June?

Early June can work in some UK seasons, especially if you can keep the seedbed moist. However, treat it as a late backup rather than the main source.
Expect smaller roots rather than large ones, and do not let the row dry out while the seed is germinating.

Why won’t my parsnip seeds germinate?

Parsnip seed often fails because it is old, sown into cold wet soil, allowed to dry out, or not given long enough.
To improve germination:
– Use fresh seed.
– Sow into warmer soil.
– Keep the drill moist.
– Mark the row clearly.

Wait at least three to four weeks before assuming failure.

Why did my parsnip seedlings disappear?

Sometimes an empty row is not a failed seed. Tiny seedlings can be eaten by slugs or snails, washed out by heavy rain, dried out during germination or hidden among weeds.
Before resowing, check for:
– Slug trails.
– Bird disturbance.
– Weed cover.
– Soil crusting.

Signs that seedlings appeared and then vanished.

Should I chit parsnip seed before sowing?

You can chit parsnip seed on damp kitchen paper if you struggle with poor germination or want to test seed viability. It is optional, not essential.
Chitting is useful because it shows which seeds are alive, but the tiny root is fragile. Plant chitted seeds as soon as they sprout and handle them carefully.

Can you grow parsnips in toilet rolls?

Yes, but toilet rolls should only be used as a short-term starter.
Parsnips dislike root disturbance, so the key points are:
– Plant them out while young.
– Do not let the taproot hit the bottom of the tube.
– Keep the tube moist but not soaked.
– Avoid holding them in tubes for weeks.

Direct sowing is still the simplest and safest method for most growers.

Can you grow parsnips in clay soil?

Yes, but expect more odd shapes unless you prepare the soil well.
For clay soil:
– Remove large stones.
– Avoid fresh manure.
– Loosen the row deeply.
– Try raised beds if drainage is poor.
– Consider shorter parsnip varieties.
– Use prepared dibber holes if the soil is very heavy.

Do parsnips need frost to taste good?

Parsnips do not need frost to be edible, but cold weather usually improves the flavour. After autumn and early winter cold, the roots often become sweeter and better for roasting.
That is why many growers leave parsnips in the ground and harvest them through winter.

Can you leave parsnips in the ground all winter?

Yes, and this is often the easiest way to store them. The soil does the storing for you.
The only catch is frozen ground. If hard frost is forecast:
– Lift a few roots in advance.
– Mulch the row with straw.
– Mark the row clearly.
– Keep some roots accessible for winter meals.

When are parsnips ready to harvest?

Parsnips are usually ready from autumn onwards, once the roots have reached a useful size.
Good signs include:
– Strong top growth.
– A visible shoulder at soil level.
– Firm roots when gently tested.
– Autumn or winter timing.

You can lift one as a test, then leave the rest in the ground and harvest through winter as needed.

Why are my parsnips forked?

Forked parsnips are usually caused by stones, compacted soil, fresh manure or root disturbance.
To reduce forking:
– Prepare the bed deeply.
– Remove the worst stones.
– Avoid fresh manure.
– Direct sow rather than transplanting where possible.
– Use shorter varieties in difficult soil.
– Odd-shaped roots are usually still fine to eat.

Why are my parsnips woody?

Parsnips can become woody if left too long into spring, especially once they start putting energy back into new leaf growth.
To avoid woody roots:
– Harvest through winter.
– Lift remaining roots before strong spring regrowth.
– Use damaged or split roots first.
– Do not leave mature roots sitting too long once the season turns.

Which parsnip varieties are best for UK gardens?

Good results depend more on fresh seed and soil prep than variety alone, but variety choice can still help.
UK growers often mention:
– Tender and True
– White Gem
– Gladiator
– Javelin
– Warrior
– Bayonetta
If canker is a repeated issue, look for varieties sold as canker-resistant. If your soil is heavy or shallow, try shorter or more forgiving varieties rather than chasing the longest roots.

Facebook
X
Pinterest
Reddit

Related Articles

Scroll to Top