Introduction
I tried to avoid using garden netting for vegetable beds for a while.
Not because I had anything against it. I just wanted the softer, more natural methods to work first. Like a lot of growers, I liked the idea of sorting pest problems with planting rather than barriers.
So I tried things like:
- Repellent herbs around vulnerable crops.
- Sacrificial plants to draw pests away.
- Mixed planting to make the beds feel less exposed.
- A more wildlife-friendly setup, with pollinators and beneficial insects in mind.
I still think all of that has a place. I would not stop growing herbs, flowers or companion plants. They bring life into the garden, support pollinators and make the whole plot feel healthier.
But, on their own, they did not reliably protect the crop.
In reality, a lot of the sacrificial and repellent plants just became extra food. The insects still found the brassicas. The wood pigeons still damaged young plants. The squirrels still dug in the beds, buried things in the soil and helped themselves when they fancied it.
This year, I finally added netting over the most vulnerable vegetable beds, especially:
- Summer salads.
- Brassicas.
- Young seedlings.
- Freshly planted or exposed allotment beds.
The difference has been obvious. The plants look cleaner, the damage has dropped, and young crops have had a much better chance to get established.
I do not think every crop needs covering. Some beds are fine left open, especially once the plants are strong. However, for salads, brassicas, seedlings and exposed allotment beds, netting has become one of the most useful forms of crop protection I use.
So this is not an argument against companion planting, herbs or biodiversity. I still want all of that in the garden.
It is more of a practical lesson:
Grow the herbs and flowers. Encourage the wildlife. But protect the crop when it needs protecting.
Why I Finally Gave In to Garden Netting
For a long time, I saw garden netting as something I would rather avoid if possible.
I liked the idea of building a mixed, living garden where herbs, flowers and sacrificial plants did most of the work. In theory, that sounds ideal. In practice, it only got me so far.
The issue was not that companion planting had no value. It did. The beds looked better, pollinators came in, and the whole growing space felt more alive.
However, when pest pressure was heavy, the actual crop still took the hit.
The main problems were:
- Cabbage white butterflies still found the brassicas.
- Wood pigeons pecked at leaves and pulled at young plants.
- Squirrels dug in freshly worked soil and disturbed seedlings.
- Sacrificial crops sometimes became extra food rather than protection.
- Young salads and brassicas were still vulnerable in summer.
The Brassicas Made It Obvious
Brassicas were the clearest example.
Once the cabbage white butterflies were about, they still found the leaves. A few helpful herbs nearby did not stop them. Sacrificial plants may have distracted some pests for a while, but they also became another food source.
So, instead of protecting the crop, I had simply grown more things for insects to eat.
Birds and Squirrels Were Just as Bad
The same thing happened with birds and squirrels.
Wood pigeons damaged young plants, pecked at leaves and pulled at seedlings. Meanwhile, squirrels dug in freshly worked soil, buried things in the beds and disturbed small plants before they had properly rooted.
Even when the squirrels were not eating the crop, the digging alone caused enough damage to make netting worthwhile.
The Difference Was Immediate
The biggest difference came when I covered the most vulnerable vegetable beds, especially:
- Salad beds.
- Brassica beds.
- Freshly planted plugs.
- Newly sown or freshly worked areas.
It was not subtle. The crops looked cleaner, the seedlings established better, and the beds were no longer open to every passing pigeon, butterfly or squirrel.
That was the point where I stopped seeing netting as a last resort and started seeing it as basic crop protection. Not for every bed, and not all year round, but definitely for the crops that need it.
Natural pest-control planting still has value. I would not remove the herbs, flowers or sacrificial plants from the garden. But when pest pressure is high, especially on exposed allotment beds, physical protection is much more reliable.
What Crops Actually Need Netting?
Not every vegetable bed needs netting. That is one of the biggest things I have learned from using it properly.
If you try to cover everything, it soon becomes a faff. You spend half your time lifting netting, moving frames and trying to get at crops that were probably fine uncovered anyway.
A better approach is to protect the crops that actually need it. For me, that means focusing on:
- Brassicas.
- Salads.
- Young seedlings.
- Freshly worked allotment beds.
- Soft fruit once it starts ripening.
Brassicas
Brassicas are the obvious one.
Kale, cabbage, broccoli, cauliflower, Brussels sprouts and similar crops are easy targets for cabbage white butterflies in summer. Once the caterpillars get going, they can make a real mess of the leaves.
So, with brassicas, I would rather net the bed early than try to rescue shredded plants later.
Netting before the butterflies start laying eggs is much easier than dealing with caterpillar damage afterwards.
Salads
Salads are another crop I now protect more often.
Lettuce, rocket, spinach, mustards and other leafy crops are soft, quick-growing and easily damaged. They also suffer quickly in hot, dry or windy weather.
Netting helps by:
- Keeping birds off young leaves.
- Reducing wind stress.
- Taking the edge off harsh summer sun.
- Giving the plants a better chance to establish.
This is especially useful if you are using shade or windbreak-style garden netting rather than very fine insect mesh.
Young Seedlings
Young seedlings are worth covering, even if they only need protection for a short time.
Freshly planted plugs and newly sown beds are vulnerable because:
- The soil is loose.
- The roots are shallow.
- The plants have not anchored themselves properly yet.
- Birds and squirrels can disturb them easily.
That is exactly when pigeons, squirrels and general disturbance seem to cause the most trouble.
Once the plants are rooted and growing strongly, you can often move the netting somewhere else.
Soft Fruit
Soft fruit is slightly different.
Strawberries, currants and other fruiting crops may not need covering all season. However, once the fruit starts to ripen, birds and squirrels quickly notice.
That is where temporary netting can save a crop. It does not have to be permanent. It just needs to protect the fruit at the point when everything else wants it too.
Lower-Priority Crops
Some crops are lower priority. I do not usually rush to net these once they are established:
- Onions.
- Garlic.
- Potatoes.
- Stronger, tougher plants that are already growing well.
They can still get disturbed when young, especially in loose soil, but they are not usually the first crops I worry about.
Crops That Need Pollination
The main exception is anything that needs pollination.
If a crop relies on bees and other insects to set fruit, think carefully before covering it. Netting can protect the plant, but it can also block pollinators if it is left on at the wrong time.
This matters with crops like courgettes, cucumbers, squash, pumpkins, beans and fruiting plants while they are in flower.
| Crop Group | Netting Priority | Why |
|---|---|---|
| Brassicas | Essential in summer | Protects from cabbage white butterflies, pigeons and leaf damage |
| Salads | Very useful | Helps reduce bird damage, wind stress and summer scorch |
| Young seedlings | Very useful | Stops birds pulling shoots and squirrels digging in loose soil |
| Strawberries and soft fruit | Useful when fruiting | Helps keep birds and squirrels off ripening fruit |
| Onions, garlic and potatoes | Usually lower priority | Less likely to need full netting once established |
| Pollinated crops | Use carefully | Bees and pollinators may need access when flowers appear |
On an allotment, I would start with the most vulnerable beds first:
- Net the brassicas.
- Protect the salad bed.
- Cover freshly planted areas until the crops are established.
- Use temporary netting on soft fruit when it starts ripening.
After that, use netting where it solves a real problem rather than turning the whole plot into a cage.
The Netting I Use
The netting I use most is a shade and windbreak-style garden netting. It feels closer to scaffold netting than the fine white insect mesh you often see sold for brassicas.
I started using it because I wanted something practical. Not another fiddly bit of kit that only solved one problem. I wanted netting that was:
- Tough enough for regular use.
- Easy to handle and move around.
- Useful for more than one job.
- Good for wind, sun and general pest protection.
- Strong enough for exposed allotment beds.
It gives the plants some shelter from wind, takes the edge off strong summer sun and creates a physical barrier between the crop and anything trying to land, dig or peck in the bed.
Why It Works Well for Salads
For salads, this type of netting has worked really well.
Lettuce, rocket and other leafy crops can struggle quickly in exposed beds, especially when the weather turns hot, dry or windy. The netting gives them a bit of protection without completely sealing the bed off.
It helps by:
- Giving the plants light shade.
- Reducing wind stress.
- Stopping pigeons walking through the crop.
- Making it harder for squirrels to dig in the bed.
- Protecting soft leaves while the plants establish.
That bit of shelter can make a noticeable difference. Salads do not need much stress before they sulk, bolt or toughen up.
Why It Helps Seedlings
For young plants and seedlings, the main benefit is simple protection.
The plants get time to root without being:
- Pulled up.
- Scratched out.
- Pecked by birds.
- Disturbed by squirrels.
- Dried out by harsh wind.
That early stage matters. Once a plant is properly established, it can usually cope with a bit more damage. When it is small, one pigeon or squirrel can undo the whole planting.
Why Brassicas Need More Thought
Brassicas need a bit more care.
Shade and wind netting still helps against birds and general damage. However, cabbage white butterflies are a different problem. If the holes are too large, butterflies may still reach the leaves or lay eggs through gaps.
They do not need much of an opening to cause trouble.
So, I would treat shade and wind netting as good general protection, not always perfect butterfly protection. If cabbage white butterflies are your main problem, proper butterfly netting or fine insect mesh is usually the better choice.
For brassicas, the netting needs to be:
- Fine enough to stop butterflies reaching the leaves.
- Secured around the edges.
- Held away from the crop.
- Checked regularly for gaps or trapped pests.
Match the Netting to the Problem
The main lesson is simple: match the netting to the pest.
| Netting Type | Best For | Main Limitation |
|---|---|---|
| Shade or windbreak netting | Pigeons, squirrels, wind and summer stress | May not be fine enough for cabbage white butterflies |
| Butterfly netting | Brassicas and cabbage white butterfly protection | Less useful as shade or wind protection |
| Fine insect mesh | Smaller insects and strong brassica protection | Can reduce airflow and may block pollinators |
| Bird netting | Birds and larger pests | Mesh size may be too large for insects |
On a real allotment, more than one type of netting can have a place. A stronger shade or windbreak net can be ideal for salads, seedlings, pigeons, squirrels and summer stress. Fine mesh is better when you are trying to stop butterflies and smaller insects.
My Simple Bamboo and Hose Netting Frame
My netting frame is very simple. It is not a polished fruit cage or a bought-in vegetable cage. It is just a cheap, practical setup made from bits I already had around the plot.
The main parts are:
- Bamboo canes.
- Short pieces of old hose.
- Garden netting.
- Pegs, clips, stones or timber for securing the edges.
That is part of why it works so well. It is quick to build, easy to adjust and simple to move around as crops change through the season.
If you are building frames, edging beds or weighing netting down, my guide to garden landscaping materials in the UK is useful for choosing practical bits like timber, gravel, stone and other materials that can be reused around the plot.
Building the Frame
For most vegetable beds, I start by pushing bamboo canes into the corners. If the bed is longer, I add a few extra canes down the sides so the netting has enough support.
The aim is not to build anything fancy. You just need enough height and shape to hold the netting above the plants.
A simple frame only needs to do three things:
- Keep the netting off the crop.
- Stop the sides collapsing in the wind.
- Make it easy to lift the netting when you need access.
That last point matters. If the frame is annoying to use, you will end up leaving gaps or not putting the netting back properly after watering or harvesting.
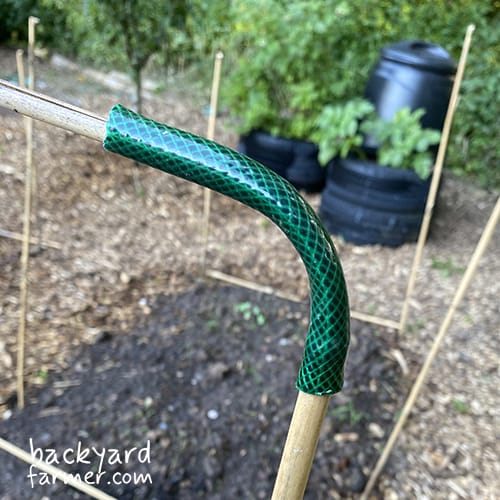
Adding the Hose
Once the canes are in place, I use short pieces of old hose over the tops or between contact points.
This is the small trick that makes the whole setup easier. Bamboo ends can be:
- Sharp.
- Rough.
- Split at the top.
- Awkward when pulling netting over them.
Netting catches on bare bamboo constantly. The hose gives the mesh something smoother to sit on, so it slides over the frame instead of snagging every time you move it.
It is a tiny detail, but it saves a lot of swearing at the side of the bed.
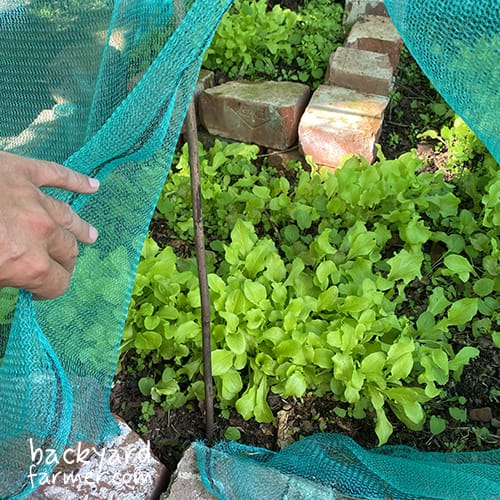
Covering and Securing the Bed
Once the frame is up, I drape the netting over the top and secure the edges.
You can use whatever you have available, such as:
- Ground pegs.
- Plant clips.
- Stones or bricks.
- Lengths of timber.
- The edge of the bed itself, if the netting can be tucked in.
The edges are important. A covered top is useful, but if there are gaps around the base, pests will still find their way in.
This matters even more with squirrels. If they can push underneath loose netting, they usually will.
Leaving Room for Plant Growth
I also try to leave enough space for the plants to grow.
Netting should not be pulled tight across the leaves, especially with brassicas. If the leaves are pressed against the mesh:
- Butterflies may still lay eggs through it.
- Birds may still peck at the leaves.
- The plants can rub against the netting in the wind.
- Growth can become cramped as the crop gets bigger.
A bit of height makes the protection much more effective. It also makes watering, checking and harvesting less awkward.
Why This Works Well on Allotment Beds
This setup looks basic, but it suits allotment beds really well.
It is:
- Cheap to make.
- Quick to build.
- Easy to repair.
- Easy to move when crops rotate.
- Reusable from one season to the next.
If I change the bed layout, I can pull the canes out, roll the netting up and use the same materials somewhere else. That is exactly what I want from a practical allotment setup.
Why the Hose Trick Works So Well
The old hose is only a small part of the setup, but it makes a big difference.
Anyone who has tried pulling garden netting over bamboo canes will know the problem. The mesh catches on the cane tips, snags as you pull it into place and sometimes tears before you have even finished covering the bed.
It is one of those small, annoying jobs that makes you avoid lifting the netting at all. That is when gaps get left, edges stay loose, and the whole setup stops working as well as it should.
The Problem with Bare Bamboo
Bamboo is useful because it is:
- Cheap.
- Light.
- Easy to push into the ground.
- Simple to move when crops rotate.
- Strong enough for basic netting frames.
However, the cane ends can be sharp, split or rough. That is fine when the canes are being used as plant supports, but it is a nuisance when you are trying to move netting over them.
Bare bamboo can cause a few problems:
- Netting catches on the cane tips.
- Mesh snags when you lift or adjust it.
- Sharp ends can tear weaker netting.
- The frame becomes more annoying to use day to day.
How the Hose Solves It
Short pieces of old hose solve that problem nicely.
I cut the hose into small lengths and slip them over the tops of the canes, or use them where the netting is likely to rub. Instead of catching on a sharp point, the netting slides over a smoother, rounded surface.
It is a tiny change, but it makes the whole frame easier to manage.
The hose helps because it:
- Covers sharp cane ends.
- Creates a smoother contact point.
- Reduces snagging when lifting the netting.
- Helps stop the mesh tearing.
- Makes the frame easier to dismantle and reuse.
Why It Makes the Frame Easier to Use
The biggest benefit is day-to-day use.
If I need to lift the netting for watering, weeding or harvesting, I can do it without fighting with every cane. That means I am more likely to keep the bed covered properly afterwards.
It also helps protect the netting over time. Garden netting can last for years if you look after it, but sharp edges and repeated snagging quickly weaken it. Smoothing those contact points reduces wear and makes the whole setup feel less temporary.
A Simple Bit of Recycling
There is no need to overthink it. Any old garden hose can be cut into short pieces and reused around the plot.
It is useful for:
- Cane tops.
- Frame corners.
- Cross points where netting rubs.
- Any rough area where mesh tends to catch.
It saves a lot of fiddling about with knots, ties and awkward cane tops.
That is why I like this method so much. It is cheap, practical and easy to adjust. The netting goes on more smoothly, comes off more easily and is far less likely to tear every time you move it.
Does Netting Stop Squirrels and Wood Pigeons?
Netting helps a lot with squirrels and wood pigeons, but it does not work in exactly the same way for both.
For me, the difference is simple:
- Wood pigeons are mostly about stopping landing access.
- Squirrels are mostly about stopping digging access.
If the netting is fitted properly and the edges are secure, it can reduce damage from both. If the edges are loose, squirrels will usually find the weak spot.
How Netting Helps with Wood Pigeons
With wood pigeons, the main benefit is that netting stops them getting direct access to the bed.
They cannot easily:
- Land in the middle of the crop.
- Walk across young seedlings.
- Peck at soft leaves.
- Pull at freshly planted plugs.
- Flatten small plants before they establish.
For salads, brassicas and freshly planted plugs, that alone can make a big difference.
Wood pigeons can do a surprising amount of damage in a short time. They are heavy birds, and they are not exactly gentle around young plants. Even if they only peck a few leaves or tug at a few shoots, small seedlings can be ruined before they have had a proper chance.
How Netting Helps with Squirrels
Squirrels are more persistent.
Netting can put them off, especially if it blocks easy access to the soil. However, it needs to be secured well. A squirrel that can push underneath loose netting will usually find the gap.
They are especially likely to investigate beds with:
- Freshly worked soil.
- New compost.
- Newly planted crops.
- Loose mulch.
- Soft fruit or tempting young plants.
The biggest squirrel problem in my beds is not always direct eating. Sometimes it is the digging.
They bury things in the soil, scratch around the surface and disturb young plants. A seedling does not need to be eaten to be lost. If it gets dug up, buried, snapped or left with its roots exposed, the result is often the same.
Why the Edges Matter
This is where even a simple netting barrier helps.
It makes the bed less inviting and harder to use as a digging patch. It also protects the crop while the plants are at their most vulnerable.
That said, netting is not magic.
A determined squirrel may still:
- Chew weak netting.
- Push underneath loose sides.
- Force through gaps.
- Dig at unsecured edges.
The top matters, but the base matters just as much. Pegging the sides down, weighing the edges with timber or stones, or tucking the netting tightly around the bed makes the setup much more effective.
Full Cover or Perimeter Net?
You do not always need to fully cover every crop.
In some situations, a simple perimeter net or low barrier around the bed can be enough to:
- Discourage casual digging.
- Stop pigeons walking straight in.
- Protect freshly worked soil.
- Reduce damage on lower-risk beds.
Full coverage is better for brassicas, salads and seedlings. However, partial protection can still help where the crop does not need a complete cage.
So, the main thing is to match the netting to the problem. Pigeons need to be stopped from landing and walking through the crop. Squirrels need to be stopped from getting easy digging access.
A well-secured netting frame can help with both.
Why Wood Pigeons Damage Young Plants
Wood pigeons can make a mess before you even realise they have found the bed.
They are especially frustrating with young plants because the damage often happens right when the crop is least able to recover. A strong plant can lose a few leaves and carry on. A small seedling does not have that luxury.
What Wood Pigeon Damage Looks Like
Wood pigeon damage can look a bit random at first.
They may:
- Peck at soft leaves.
- Pull at new shoots.
- Walk through freshly planted areas.
- Flatten small plants.
- Lift seedlings or plugs out of the soil.
- Leave young plants lying on the surface with their roots exposed.
With bigger plants, that might only mean a few torn leaves. With seedlings and young plugs, it can mean losing the whole plant.
Why They Pull at Seedlings
Sometimes it looks like pigeons are eating the plants. Other times, it looks more like they are testing, tugging or investigating the soil.
Some gardeners reckon pigeons pull at shoots because they mistake them for worms or movement in the ground. They may also just be pecking at tender growth because it is easy food.
Either way, the result is the same:
Small plants get damaged before they have properly rooted.
Crops They Seem to Target
Brassicas are a common target, especially when the leaves are young and tender.
The main crops I would watch are:
- Kale.
- Cabbage.
- Broccoli.
- Cauliflower.
- Brussels sprouts.
- Lettuce and other soft salads.
- Freshly planted plugs of almost anything.
Salads suffer because they are soft and exposed. Brassicas suffer because pigeons seem quite happy to peck them, pull them and walk through the bed while they are still small.
Why Netting Helps
Netting works because it removes direct access.
The pigeons cannot easily:
- Land in the middle of the bed.
- Walk across the seedlings.
- Stand there pecking at leaves.
- Pull at freshly planted plugs.
- Flatten young crops while moving through the bed.
Even a simple barrier can be enough to make the bed less inviting.
This is why I now see netting as early-stage protection as much as pest protection. It gives young plants time to anchor themselves, toughen up and start growing properly.
Once plants are bigger and stronger, they can cope with a bit more pressure. When they are small, keeping pigeons off them can make all the difference.
Where Sacrificial Crops and Repellent Herbs Still Fit
I do not want this to sound like I have given up on companion planting, herbs or sacrificial crops. I have not.
I still think they are useful. In fact, I would much rather grow in a mixed, living plot than have bare beds with nothing but crops in neat rows.
The difference is that I now see those plants as part of the wider system, not the main line of defence.
What These Plants Are Still Good For
Herbs, flowers and companion plants still earn their space. They help create a healthier, more diverse growing area.
They can help by:
- Bringing in pollinators.
- Attracting beneficial insects.
- Adding scent and diversity around the beds.
- Making the plot feel more alive.
- Supporting the wider garden ecosystem.
Plants like mint, thyme, rosemary, coriander, nasturtiums, calendula and other flowering herbs can all help create a more interesting growing space.
That matters, especially if you are trying to build a garden that supports more than just the crop.
Where Sacrificial Crops Can Help
Sacrificial crops can also have a place.
Nasturtiums, for example, can draw aphids and caterpillars away from other plants in some situations. Extra leafy growth can sometimes spread the pressure around, which may reduce damage on a main crop.
In a balanced year, that can be enough to make a difference.
Sacrificial planting may help by:
- Drawing some pests away from the main crop.
- Spreading pest pressure across more plants.
- Supporting insects and wildlife in the plot.
- Giving you an early warning that pest numbers are rising.
However, that does not make it guaranteed crop protection.
The Problem with Relying on Them Completely
The problem comes when those methods are treated as a proper barrier.
They are not.
If pest pressure is heavy, sacrificial crops can simply become extra food. Repellent herbs may make a bed more diverse, but they will not reliably stop cabbage white butterflies, wood pigeons or squirrels when they are determined.
That was the lesson for me. I still want:
- Herbs around the plot.
- Flowers near the vegetable beds.
- Companion plants mixed in where they make sense.
- Pollinators and beneficial insects moving through the garden.
But if I have a bed of brassicas in summer, I am not trusting a few nearby herbs to save it.
Netting Has a Different Job
Netting fills a different role.
It is not there to replace biodiversity. It is there to protect vulnerable crops while the rest of the garden does its thing.
That is the balance I have settled on:
- Companion plants support the system.
- Herbs and flowers support biodiversity.
- Sacrificial crops may reduce pressure in some situations.
- Netting gives vulnerable crops a physical barrier.
So the balance is simple: grow the companion plants, keep the flowers, encourage the wildlife, but use netting where the crop genuinely needs a barrier.
Companion planting is part of the system. Netting is the protection.
What I Would Not Waste Time On Again
There are a few things I would not rely on again, at least not as the main form of crop protection.
They may still have a place in the garden. However, when pest pressure is heavy, they are not enough on their own.
Expecting Herbs to Do Too Much
The first one is expecting herbs to do more than they realistically can.
I like growing herbs around vegetable beds, and I still think they are worth having. They add scent, flowers, pollinator value and general life around the plot.
But I would not plant a few strong-smelling herbs and expect them to keep everything away.
A few herbs will not reliably stop:
- Cabbage white butterflies.
- Wood pigeons.
- Squirrels.
- Slugs.
- Caterpillars.
- General summer pest pressure.
They help create a more mixed growing space, but they do not replace a physical barrier.
Leaving Brassicas Uncovered in Summer
I also would not leave summer brassicas uncovered and hope for the best.
Brassicas are too attractive to too many pests. They can be hit by:
- Cabbage white butterflies.
- Caterpillars.
- Wood pigeons.
- Slugs and snails.
- General leaf damage.
Once the damage starts, it is much harder to get back on top of it. Covering the bed early is far easier than trying to rescue shredded plants later.
This is one of those jobs where doing it before there is a problem saves a lot of bother.
Relying on Sacrificial Crops as the Only Defence
The same goes for relying on sacrificial crops as the whole plan.
They can help in some situations, but they can also become extra food. If you already have plenty of pests around, adding more soft leafy growth nearby does not always distract them away from the main crop.
Sometimes it just feeds the problem.
That does not mean sacrificial crops are useless. It just means I would treat them as support, not as the main defence.
Letting Netting Sit on the Crop
I would also avoid letting netting sit directly on delicate crops.
It might look covered, but it is not always properly protected. If the leaves are pressed against the mesh:
- Birds can still peck through it.
- Butterflies may still lay eggs through it.
- Wind can rub the netting against the plants.
- Leaves can become bent, cramped or damaged.
A simple frame makes the whole setup much more effective. The netting needs to protect the crop, not sit on top of it like a blanket.
Using Flimsy Frames
Flimsy frames are another false economy.
If the frame collapses as soon as the wind picks up, the netting becomes more of a nuisance than a solution. It does not need to be fancy, but it does need to:
- Hold its shape.
- Keep the netting above the crop.
- Stay secure in wind.
- Let you lift the netting when needed.
- Be easy enough to use that you actually keep it in place.
A basic frame is fine. A frame that falls over every other day is not.
Trying to Make the System Perfect
I would not waste too much time trying to make the system perfect either.
The best setup is the one you will actually use. A cheap bamboo frame with hose on the joints, well-secured edges and the right netting for the crop is better than an overcomplicated plan that never gets built.
The lesson is simple:
- Use companion planting and sacrificial crops as support, not your only defence.
- Cover the crops that really need covering.
- Keep the frame practical.
- Get the netting on early, before the damage starts.
That is the balance I would aim for now: useful planting around the bed, but proper protection over the crops that need it.
Mistakes to Avoid When Netting Vegetable Beds
Netting is simple, but a few small mistakes can make it much less effective.
Most problems come down to three things:
- Leaving gaps.
- Poor support.
- Using the wrong netting for the pest you are trying to stop.
None of this needs to be complicated. However, if the frame is loose, the mesh is wrong or the edges are open, pests will usually find the weakness.
Leaving Gaps Around the Base
This is probably the biggest mistake.
It is easy to cover the top of the bed and think the job is done. But pigeons, squirrels and butterflies will all make use of weak points. If the sides are loose, lifted by the wind or tucked in badly, pests can still get in.
The edges need to be:
- Pegged down.
- Clipped in place.
- Tucked under the bed edge.
- Weighed down with stones, timber or bricks.
It does not have to look perfect. It just needs to close the obvious routes in.
Using Mesh That Is Too Large
Some garden netting is fine for birds and squirrels, but too open for cabbage white butterflies.
If a butterfly can reach the leaves through the mesh, or squeeze through a gap at the side, it can still lay eggs on your brassicas. That defeats the point of covering them in the first place.
For brassicas, the netting needs to be:
- Fine enough to stop butterflies.
- Secured properly around the edges.
- Held away from the leaves.
- Checked regularly for gaps.
That last point matters. If the mesh is lying directly on the crop, butterflies may still lay eggs through it, and birds may still peck at the leaves.
Covering Pollinated Crops at the Wrong Time
Another easy mistake is covering crops that need pollination.
This is less of an issue with leafy crops like lettuce, kale and cabbage, but it matters with fruiting crops. If bees and other pollinators need access to the flowers, netting can block them.
Be careful with crops like:
- Courgettes.
- Cucumbers.
- Squash.
- Pumpkins.
- Beans.
- Strawberries and other fruiting crops while they are in flower.
In those cases, remove the netting during flowering, lift it during the day, or only use it once fruit has started forming and needs protection.
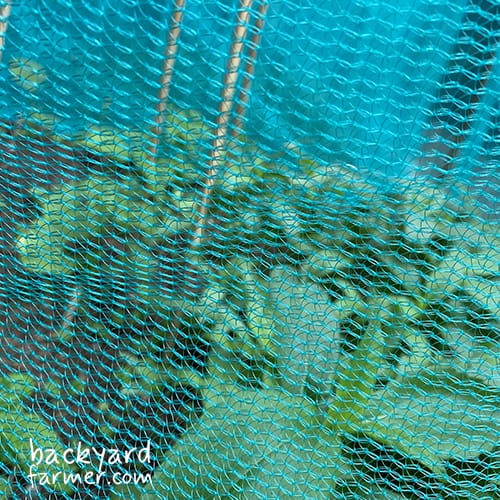
Leaving Loose or Sagging Netting
Loose netting is worth avoiding.
If it is sagging, blowing around or trailing on the ground, it can become a problem for birds and wildlife. It can also rub against the plants and make harvesting more awkward.
A simple frame helps because it keeps the netting:
- Lifted above the crop.
- Easier to move.
- Safer for wildlife.
- Less likely to rub against leaves.
- Less likely to collapse in wind.
This is one of the reasons I prefer a basic frame over just throwing netting straight across the bed.
Forgetting to Check Underneath
Netting can keep pests out, but it can also hide problems that are already inside.
It is still worth checking for:
- Slugs.
- Caterpillars.
- Aphids.
- Damaged leaves.
- Plants growing into the mesh.
- Gaps caused by wind, watering or harvesting.
A quick check while watering or picking leaves keeps you ahead of problems. Otherwise, you can end up protecting the pests as well as the crop.
Making the Frame Too Low
Frame height makes a big difference.
If the frame is too low, the plants grow into the netting. This is especially common with brassicas, which need more headroom as they mature.
Give extra space to crops like:
- Kale.
- Cabbage.
- Broccoli.
- Brussels sprouts.
- Cauliflower.
It is better to give them more room early than to rebuild the frame when the plants are already pushing against the mesh.
Not Securing the Windward Side
Wind is another thing to watch, especially on exposed allotment beds.
If the netting catches the wind, it can:
- Pull loose.
- Flatten plants.
- Drag the frame over.
- Open gaps around the base.
- Rub the netting against the crop.
A few extra pegs, stones or pieces of timber on the exposed side can save a lot of bother.
When to Remove or Lift Netting
Netting works best when it is easy to manage.
If it becomes awkward to lift, you are less likely to:
- Weed properly.
- Water properly.
- Harvest regularly.
- Check the crop for pests.
- Put the netting back securely afterwards.
That is why I prefer a simple frame that lets me lift one side, do what I need to do, and put it back without rebuilding the whole thing. If a setup is too fiddly, it usually ends up being left half-open, which defeats the point.
Brassicas
For brassicas, I would keep the netting on during the main cabbage white butterfly season.
This is when the plants need the most consistent protection. If butterflies get in, they can lay eggs, and the caterpillars can quickly damage crops like:
- Kale.
- Cabbage.
- Broccoli.
- Cauliflower.
- Brussels sprouts.
However, it is still worth checking the plants regularly, even when they are covered. Netting can stop butterflies getting in, but it will not fix a problem that is already there.
If eggs or caterpillars were on the plants before you covered them, they can carry on under the netting. A quick check of the leaves, especially the undersides, is still worth doing.
Salads
For salads, I lift the netting whenever I need to harvest, water or tidy the bed.
In hot, dry or windy weather, I tend to keep the cover on more often because the shade and wind protection help the plants. This can be useful for leafy crops like:
- Lettuce.
- Rocket.
- Spinach.
- Mustards.
- Young salad mixes.
These crops can bolt, wilt or toughen up quickly when they are stressed. So, with salads, netting is not just pest protection. It can also help keep the growing conditions a bit gentler.
Seedlings and Young Plants
Seedlings may only need netting for a short time.
Once the plants are rooted, growing strongly and less likely to be pulled up or scratched out, you can often remove the cover or move it to another bed.
This is where flexible netting frames are useful. You can move protection around the plot as different crops need it, rather than leaving every vegetable bed covered all the time.
Pollinated Crops
Pollinated crops need more care.
If you are growing crops that rely on bees and other insects to set fruit, do not leave them covered through flowering unless the mesh allows pollinators through.
Be careful with crops like:
- Courgettes.
- Cucumbers.
- Squash.
- Pumpkins.
- Beans.
- Strawberries and other fruiting crops while in flower.
For these, you may need to:
- Remove the netting when flowers appear.
- Lift the netting during the day.
- Use netting only once fruit has started forming.
- Switch to a wider barrier that protects fruit without blocking all insect access.
Otherwise, you might protect the plant from pests but stop it cropping properly, which is not exactly a win.
When Plants Start Touching the Mesh
You should also lift or adjust netting if the plants start growing into it.
This is especially common with brassicas. Kale, cabbages, broccoli and Brussels sprouts can quickly reach the mesh if the frame is too low.
Once leaves press against the netting:
- Protection is weaker.
- Leaves can rub in the wind.
- Birds may still peck through the mesh.
- Butterflies may still lay eggs through the netting.
- Growth can become cramped.
It is better to raise the frame early than wait until the plants are already tangled in the netting.
Final Verdict: Is Garden Netting Worth It?
For me, yes. Garden netting is worth it, but only when you use it on the right crops and in the right places.
I would not cover every vegetable bed just for the sake of it. That would make the plot harder to manage and create extra work where it is not needed.
Some beds are better left open for:
- Pollinators.
- Airflow.
- Easy harvesting.
- Stronger crops that are already established.
- Plants that do not suffer much pest damage.
However, for vulnerable crops, netting has made a huge difference.
If you are trying to make your plot easier to manage overall, my guide on how to simplify gardening covers the same idea: protect what matters, reduce unnecessary faff, and build systems you will actually keep using.
Where Netting Has Helped Most
The biggest improvements have been with:
- Salads.
- Brassicas.
- Young seedlings.
- Freshly planted plugs.
- Exposed allotment beds.
- Beds with loose soil that squirrels like digging in.
In those areas, netting has reduced damage, helped young plants establish and stopped the beds being open to every passing pigeon, squirrel and cabbage white butterfly.
That is the bit that changed my mind. It was not theory. The crops simply looked better once they had a barrier around them.
Netting Is Not a Failure of Natural Gardening
The biggest lesson has been that netting is not a failure of natural gardening.
It is just practical crop protection.
I still want all the good stuff around the plot:
- Herbs.
- Flowers.
- Companion plants.
- Pollinators.
- Beneficial insects.
- A mixed and living garden.
Those things make the garden healthier and more alive. But they are support systems, not solid barriers.
When Netting Earns Its Place
When pest pressure is low, you may get away with open beds and a bit of companion planting.
When pest pressure is high, especially in summer, vulnerable crops need more help. That is where netting earns its place.
A good setup does not need to be expensive or complicated. Mine is mainly:
- Bamboo canes.
- Old hose.
- The right netting for the job.
- Secure edges.
- Enough height to keep the netting off the crop.
That is enough to protect a bed without turning the whole garden into a fortress.
FAQ: Garden Netting for Vegetable Beds
No. Focus on the crops that suffer most, such as brassicas, salads, young seedlings and soft fruit.
Established crops like onions, garlic and potatoes usually need less protection once they are growing well.
Yes, but only if the mesh is fine enough and the edges are secure.
For brassicas, keep the netting lifted above the leaves so butterflies cannot lay eggs through the mesh.
Fine butterfly netting or insect mesh is usually best for brassicas.
Shade or windbreak netting can help with birds and weather, but it may not be fine enough to stop cabbage white butterflies.
It can help, especially over loose soil, seedlings and soft fruit.
Squirrels are persistent, so secure the edges well. If they can push underneath, they probably will.
Yes. Bird netting stops pigeons landing in the bed, walking over seedlings and pecking young leaves.
It is especially useful for brassicas, salads and freshly planted plugs.
Shade or windbreak netting similar to scaffold netting can work well for birds, squirrels, wind and strong sun.
For cabbage white butterflies or smaller insects, use a finer mesh.
Slip short pieces of old hose over the bamboo tops.
This covers the sharp ends, stops the netting catching and helps prevent tears.
Lift it for watering, weeding, harvesting and checking the crop.
Remove or lift it when flowering crops need pollinators. Keep brassicas covered during peak cabbage white butterfly season.