
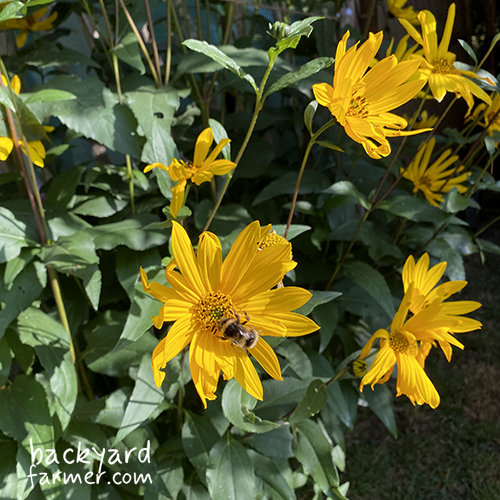
Jerusalem artichokes are one of the easiest winter-harvest crops to grow in the UK. Plant the tubers in spring, give the tall plants plenty of room and harvest once the foliage dies back in late autumn. They need little maintenance and can produce heavy crops, but choose their position carefully: Jerusalem artichokes are perennial, and any tubers missed at harvest can grow again the following year.
When to Plant Jerusalem Artichokes in the UK
The main time to plant Jerusalem artichokes in the UK is from February to April. Plant as soon as the soil is workable and no longer frozen or saturated.
You can plant earlier in mild areas if the soil drains freely, and autumn or winter planting is possible in light, well-drained ground. However, heavy clay soil can remain cold and wet during winter, so it is usually safer to wait until late winter or early spring.
There is normally no need to start Jerusalem artichokes indoors. Plant the tubers directly into their final growing position, where they can remain undisturbed for the season.
Where to Grow Jerusalem Artichokes
Choose the site carefully because Jerusalem artichokes are tall, vigorous and perennial.
Full sun produces the strongest growth and usually the best crop, although the plants tolerate partial shade. They grow in a wide range of soils, provided the ground is reasonably fertile and does not remain waterlogged. Improve poor soil before planting by incorporating compost or well-rotted organic matter.
Most varieties reach 2–3m, so position them towards the back or north side of a bed where possible. This reduces the risk of them shading shorter vegetables. Their height can also be useful: a row of Jerusalem artichokes makes an effective seasonal screen or informal windbreak.
Choose the site with next year in mind. Jerusalem artichokes are perennial, and any tubers missed during harvest can produce new plants. They are often best treated as a semi-permanent crop rather than included in a normal annual rotation.
How to Plant Jerusalem Artichoke Tubers
Planting Jerusalem artichokes is straightforward.
- Prepare the soil by removing perennial weeds and breaking up any compacted areas.
- Plant healthy tubers around 10–15cm deep.
- Space individual tubers approximately 30cm apart.
- Leave roughly 90cm between rows if you need room to walk, weed or harvest.
- Cover the tubers with soil and water if the ground is dry.
A light mulch of compost after planting can help conserve moisture and suppress weeds. Avoid burying the tubers too deeply, particularly in heavy soil, as this makes harvesting more difficult.
Can You Plant Supermarket Jerusalem Artichokes?
Yes. Healthy Jerusalem artichokes bought from a supermarket or greengrocer can grow successfully if they have viable buds.
Choose firm, undamaged tubers with several visible eyes or buds. Very small tubers can be planted whole, while larger ones can be divided into sections, provided each piece retains at least one healthy bud. Planting whole tubers is the simplest approach.
Named varieties give you greater certainty over the eventual height, tuber shape and cropping characteristics. Supermarket tubers may be productive, but their variety is not always clear.
Growing Jerusalem Artichokes in Containers
Growing Jerusalem artichokes in containers is useful where you want to restrict their spread or do not have suitable open ground.
Use a large, sturdy container at least 45cm wide and 45cm deep for one or two tubers. Fill it with good-quality multipurpose compost or a mixture of compost and loam-based growing medium. Plant the tubers 10–15cm deep and water them in thoroughly.
Containers dry out faster than garden soil, particularly when the plants are tall and leafy, so check the compost regularly and water during dry weather. Container-grown plants may produce a smaller crop than those grown in open ground, but they are often easier to harvest.
The container must be stable because the plants can become top-heavy, especially in windy weather. Add a stake or support if the stems begin to lean.
Containers contain the tubers much more reliably than an ordinary raised bed that is open to the soil beneath it.
Caring for Jerusalem Artichokes
Jerusalem artichokes need relatively little maintenance once established.
Watering
Established plants tolerate dry conditions reasonably well, but water during prolonged dry spells. Consistent moisture helps the tubers swell and may produce larger, smoother crops. Pay particular attention during the first few weeks after planting and remember that container-grown plants need more frequent watering because their compost dries out quickly.
Feeding
Jerusalem artichokes usually need little extra feeding in reasonable allotment soil. Adding compost or well-rotted organic matter before planting is normally sufficient. A spring mulch of compost can provide a gentle supply of nutrients while helping the soil retain moisture.
Earthing Up and Supporting Tall Plants
Earth soil around the stems once the plants reach approximately 30cm tall. This helps support them and reduces the risk of stems being blown over.
In sheltered gardens, the plants may stand without support. In exposed positions, use stakes, posts and garden twine to keep the stems upright. A simple line of posts and twine along each side of a row is often enough.
Very tall stems can be shortened in late summer if wind damage is a serious concern. Avoid cutting back too much foliage, because the leaves are still helping the plant fill the underground tubers.
How to Stop Jerusalem Artichokes Spreading
Jerusalem artichokes are often described simply as invasive, but the practical problem is usually a combination of underground spread and tubers being missed during harvesting.
The plant produces tubers on underground stolons. Some are close to the main crown, while others form further away. Small tubers can be easy to overlook, particularly in loose soil, and each viable tuber left behind can produce a new plant the following spring.
Some varieties form tighter clusters than others, but no variety should be assumed to be completely contained. Light soil can also allow tubers to spread further or deeper.
The most reliable ways to control Jerusalem artichokes are:
- Grow them in a large container.
- Give them a dedicated, semi-permanent bed.
- Harvest thoroughly every winter.
- Remove new shoots promptly if they appear outside the intended area.
How to Remove an Established Patch
Removing an old patch can take more than one season, but it is possible.
- Lift as many tubers as possible during winter.
- Fork through the surrounding soil carefully, working outwards from the original plants.
- Remove every tuber you find, including small pieces.
- Watch for new shoots the following spring.
- Pull or dig out regrowth promptly.
- Repeat the process whenever new plants appear.
Avoid rotavating an established patch, as this can chop tubers into smaller pieces and spread them through the soil.
Jerusalem artichokes are difficult rather than impossible to remove. An old patch may take more than one season to clear completely.
When to Harvest Jerusalem Artichokes
Jerusalem artichokes can be ready from late October, but November onwards is generally the main harvest period in the UK.
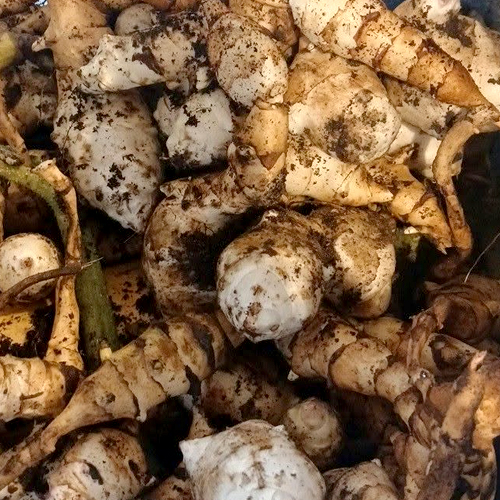
The plants spend much of the summer producing tall stems and leaves. The tubers continue developing later in the season, so avoid lifting the crop while the foliage is still actively green unless you need to clear the area.
Harvest can continue throughout winter and into early spring, although the exact timing depends on the weather and variety. Frost is not essential before harvesting, but many gardeners find that the flavour becomes sweeter or more rounded after a period of cold weather.
You can leave the tubers in the ground and lift them as required. This is often the easiest storage method, provided the soil is not too wet or frozen to dig.
How to Harvest Jerusalem Artichokes
Harvest Jerusalem artichokes carefully because the irregular tubers are easily damaged.
- Cut the dead stems back, leaving a short stump so you can locate the crown.
- Start digging around the plant rather than directly through the centre.
- Use a garden fork where possible, as it is less likely than a spade to slice through the tubers.
- Work outwards from the main stem because tubers can form beyond the crown.
- Lift the soil gradually and collect both large and small tubers.
- Check the surrounding soil carefully for detached pieces.
Do not wash the entire crop unless you are going to use it immediately. Brush off loose soil and store the tubers somewhere cool for short-term use.
In heavy soil, avoid digging when the ground is very wet. Wet clay sticks to the tubers and can be easily compacted by repeated digging. Work slowly and carefully, as damaged tubers deteriorate more quickly.
Should You Harvest Them All at Once?
No. Jerusalem artichokes store particularly well in the ground, so you can lift them as needed throughout winter.
A thick mulch of straw, leaves or compost can make the ground easier to dig during cold weather. If you want to prevent the crop returning, lift the remaining tubers before spring growth begins and check the soil thoroughly for small pieces.
Eating tip: Jerusalem artichokes are high in inulin, which can cause wind or bloating in some people. Start with a small portion if you have not eaten them before.
Best Jerusalem Artichoke Varieties for UK Gardens
Fuseau – Best All-Round Choice
Widely available in the UK, Fuseau produces tall plants with pale, relatively smooth and elongated tubers. The smoother shape makes the tubers easier to clean and prepare than very knobbly varieties.
Dwarf Sunray – Best for Exposed or Smaller Spaces
Dwarf Sunray is shorter than standard Jerusalem artichokes, usually reaching approximately 1.2–1.8m. Its compact growth can be useful in smaller gardens or exposed allotments, although it still needs enough room underground.
Gerard – Best Red-Skinned Option
Gerard is a French cultivar that produces red-skinned, rounder tubers. It offers a useful alternative to pale-skinned varieties such as Fuseau, although availability can be more limited.
Common Jerusalem Artichoke Problems
Jerusalem artichokes are generally trouble-free, but a few problems are worth watching for.
Wind damage: Tall stems can lean or snap on exposed plots. Earth up and support them where necessary.
Slugs and snails: These mainly affect young spring shoots. Established plants usually grow away from early damage.
Powdery mildew: This may appear later in summer but is usually more cosmetic than serious, particularly as the foliage begins to die back.
Sclerotinia: This is uncommon but more serious. Remove infected material and avoid repeatedly growing susceptible crops on affected ground.
Small or knobbly tubers: These can result from dry conditions, crowding, compacted soil or the natural characteristics of the variety.
Jerusalem Artichoke FAQs
Plant in late winter or spring and harvest from late autumn onwards. The plants spend most of the growing season developing tall leafy stems before the tubers bulk up later in the year.
Most standard varieties reach around 2–3m. Shorter cultivars such as Dwarf Sunray usually stay lower, at approximately 1.2–1.8m.
Yes. They are perennial, and any viable tubers left in the ground can produce new shoots the following spring.
They tolerate partial shade, but full sun generally produces stronger growth and better crops. Avoid planting them where taller trees or buildings shade them for most of the day.
No. Harvest once the foliage has died back. Cold weather may improve the flavour, but frost is not required for the tubers to be ready.
Final Verdict
Jerusalem artichokes are one of the easiest winter-harvest crops for UK allotments: productive, hardy and happy in a wide range of soils. The main thing to plan is their position. Most varieties grow 2–3m tall, and tubers left behind can return the following spring, so a dedicated patch or large container often makes sense.
Use the free BYF Allotment Planner to work out their spacing and position before planting.