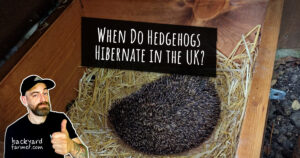

A hedgehog house provides a quiet, sheltered place to rest, nest and hibernate. This design uses suitable reclaimed pallet boards to create a compact shelter with a raised floor, a 300mm entrance tunnel and a removable roof protected by a loose weatherproof covering.
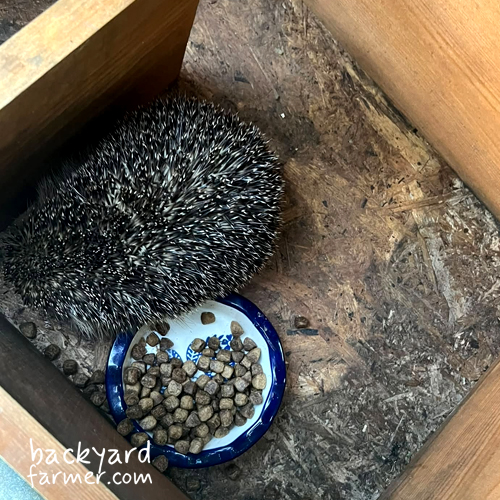
Pallet boards do not need to be identical in width. Join enough boards to reach each finished measurement, then trim the completed panels square. This makes the project practical when working with reclaimed timber.
A house may be used for nesting, hibernation or daytime shelter, but there is no guarantee that a hedgehog will move in. Provide a safe structure, place it carefully and leave it undisturbed.
Pallet Hedgehog House: Project at a Glance
| Detail | Specification |
|---|---|
| Difficulty | Basic DIY skills |
| Timber required | One large or two ordinary suitable pallets |
| Main shell | 400 × 300mm |
| Wall height | 300mm |
| Entrance | 130 × 130mm clear |
| Entrance tunnel | 300mm long |
| Floor | Solid and raised on runners |
| Roof | Removable and weather-covered |
After assembly, the entrance and full tunnel must retain a clear 130 × 130mm route. Check this with a simple 130mm square template before fixing the tunnel permanently.
Before You Start: Is Your Pallet Safe?
Use only unpainted pallet wood obtained with permission, carrying a legible IPPC HT mark and remaining visibly clean, dry, sound and odour-free.
Inspect the pallet before dismantling it. Look for the IPPC stamp, usually printed on a block or side member, with the treatment code HT, meaning heat treated. Do not use timber marked MB or SF, or pallets with no readable treatment mark. See the GOV.UK guidance on wood packaging material for import and export.
HT confirms the treatment used when the pallet was manufactured; it does not guarantee that the wood has remained uncontaminated. Reject boards with oil, fuel, chemical, paint or strong musty odours, as well as timber showing mould, rot, deep staining, extensive splitting or serious insect damage.
Use only pallets obtained with permission. Blue CHEP pallets and other pooled rental pallets remain their owners’ property.
| Suitable candidate | Do not use |
|---|---|
| Legible IPPC HT mark | MB- or SF-marked timber |
| Unpainted boards | Painted or coated pallets |
| Clean and odour-free | Oil or chemical stains |
| Dry, solid timber | Mould, rot or heavy damage |
| Pallet obtained with permission | Blue CHEP or other pooled rental pallets |
| All metal removed | Unmarked or unknown timber |
DB and KD markings do not replace a clear HT mark. Sanding removes splinters but cannot make contaminated timber suitable. One large pallet may provide enough usable wood, although two ordinary pallets allow more room for damaged boards, battens and mistakes.
How the Pallet-Board Design Works
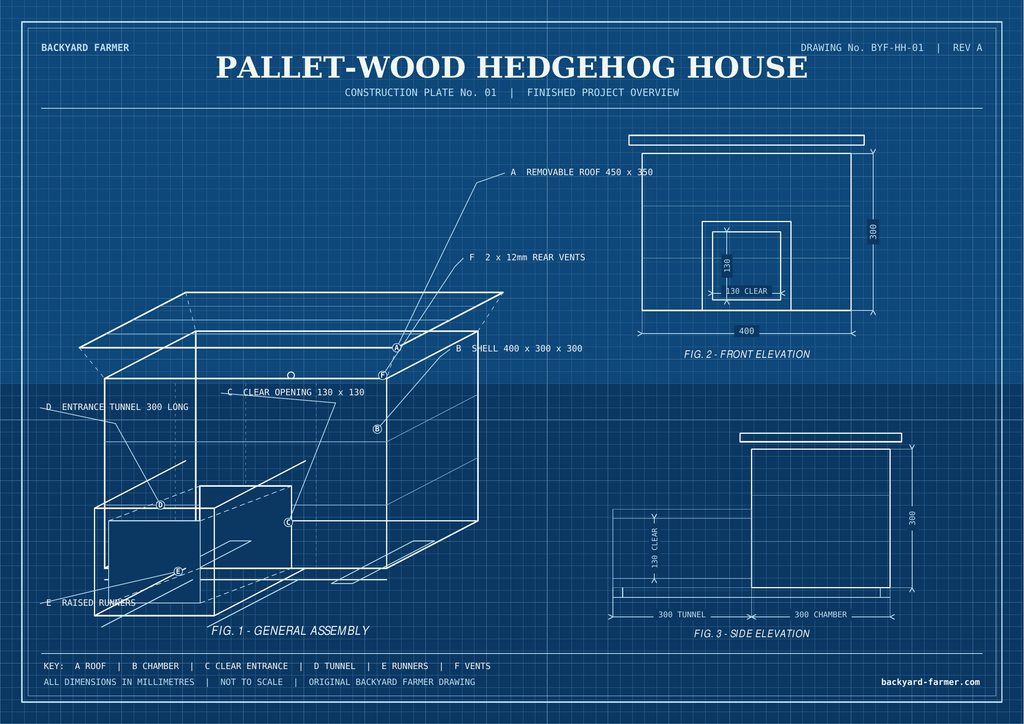
The house is a rectangular chamber with a raised floor, a front tunnel and a removable roof. The main shell measures 400mm wide, 300mm deep and 300mm high. The front and back panels are each 400 × 300mm; the side panels fit between them, so their final length depends on the actual thickness of the front and back boards.
Stand the front and back panels on the base and measure the gap between their inner faces. This accounts for the timber you have available. The entrance is centred in the front panel and must remain 130 × 130mm clear. A 300mm tunnel reduces direct exposure to wind, rain and disturbance, but it is not predator-proof or rat-proof. For wider guidance, see the British Hedgehog Preservation Society’s Hedgehog Homes guidance and People’s Trust for Endangered Species.
Finished-Project Diagram
The Board-Count Rule
Cut several similar boards to the stated length and lay them edge to edge. Add boards until their combined width reaches the finished measurement, join them, then trim the completed panel square.
Do not assume that a fixed number of boards will produce a 300mm-high panel. Pallet-board widths and thicknesses vary, so the finished measurement is always the checkpoint.
Tools and Materials
Materials
- One large or two ordinary suitable HT-marked pallets
- Clean solid timber or pallet stringers for battens
- Approximately 80 corrosion-resistant countersunk exterior screws
- Heavy-duty polythene sheet measuring at least 550 × 450mm
- Flat stone, paving offcut or short log to secure the roof covering
- Dry deciduous leaves
Use exterior-grade screws that will not rust quickly in damp conditions. Avoid treated, painted or chemically stained offcuts on internal surfaces.
Tools
- Tape measure
- Pencil and square
- Hand saw or jigsaw
- Drill/driver
- Pilot drill bit
- Countersink bit
- 12mm wood bit
- Hammer and pry bar or pallet dismantling tool
- Pliers or nail puller
- Sandpaper
- Clamps if available
- Gloves, eye protection and dust protection
Inspect every board for hidden nails, staples and metal fragments. Wear eye protection when dismantling, drilling and cutting, and suitable dust protection when sanding reclaimed timber.
Pallet-Wood Cut List
Use these finished measurements as checkpoints. Join enough boards to reach each size, then trim the completed panel square.
| Part | Quantity | Finished size |
|---|---|---|
| Base | 1 | 400 × 300mm |
| Front wall | 1 | 400 × 300mm |
| Back wall | 1 | 400 × 300mm |
| Side walls | 2 | Measured gap × 300mm |
| Roof | 1 | 450 × 350mm |
| Tunnel sides | 2 | 300 × 130mm |
| Tunnel roof and floor | 2 | 300mm × measured outer tunnel width |
| Wall battens | 8 | Approximately 250–260mm long |
| Base runners | 2 | Approximately 250mm long |
| Tunnel runners | 2 | 300mm long |
| Roof battens | 2 | Mark from the assembled shell |
| Tunnel mounting cleats | 2 | Approximately 130mm long |
Group boards by similar thickness so the walls sit evenly. Keep the straightest boards for the roof and entrance tunnel.
For battens and cleats, use sound timber approximately 25–35mm wide and 20–30mm thick where practical. Adapt the dimensions to the timber available, but ensure screws finish at least 5mm short of the opposite face. Screws around 35–40mm long suit many builds; check the combined timber thickness before fixing.
How to Build the Hedgehog House
Step 1: Prepare the Pallet Boards
Dismantle the permitted pallet carefully, prying near the supporting blocks and alternating between both ends to reduce splitting.
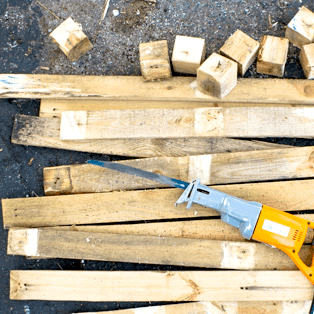
- Remove every nail and staple, including broken pieces below the surface.
- Sort boards by length, width and thickness.
- Reject contaminated, mouldy, rotten, badly split or weak timber.
- Lightly sand faces and edges to remove splinters.
Step 2: Build the Raised Floor
Cut enough boards to 400mm long to form a panel at least 300mm deep.
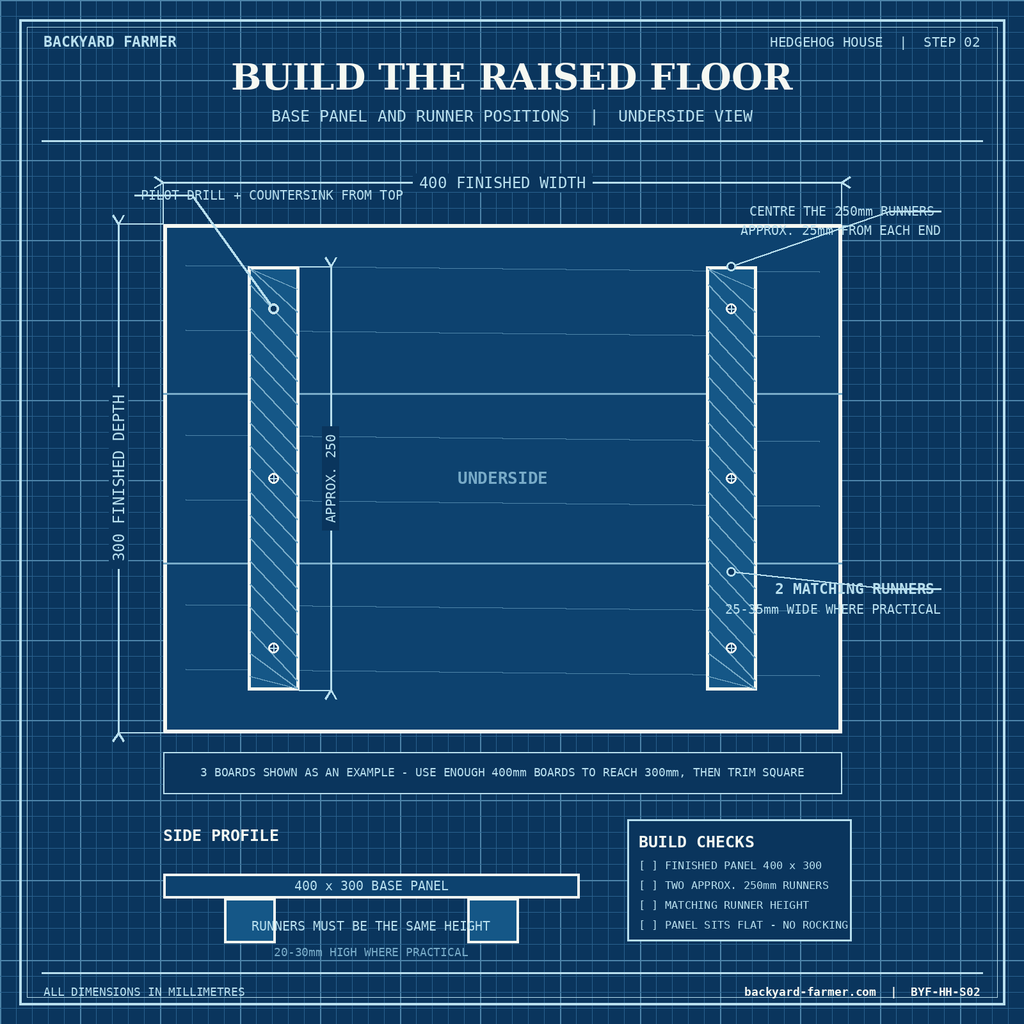
- Lay the boards edge to edge, join them and trim the panel to 400 × 300mm.
- Fix two approximately 250mm runners underneath, one near each side.
- Use runners of matching height so the floor sits level.
- Pilot-drill, countersink and screw through the floor boards into the runners.
- Turn the base over and check that it sits flat without rocking.
The runners raise the floor slightly above the ground, reducing contact with persistent dampness.
Step 3: Make the Front and Back Panels
Cut enough boards to 400mm long to create two panels 300mm high.
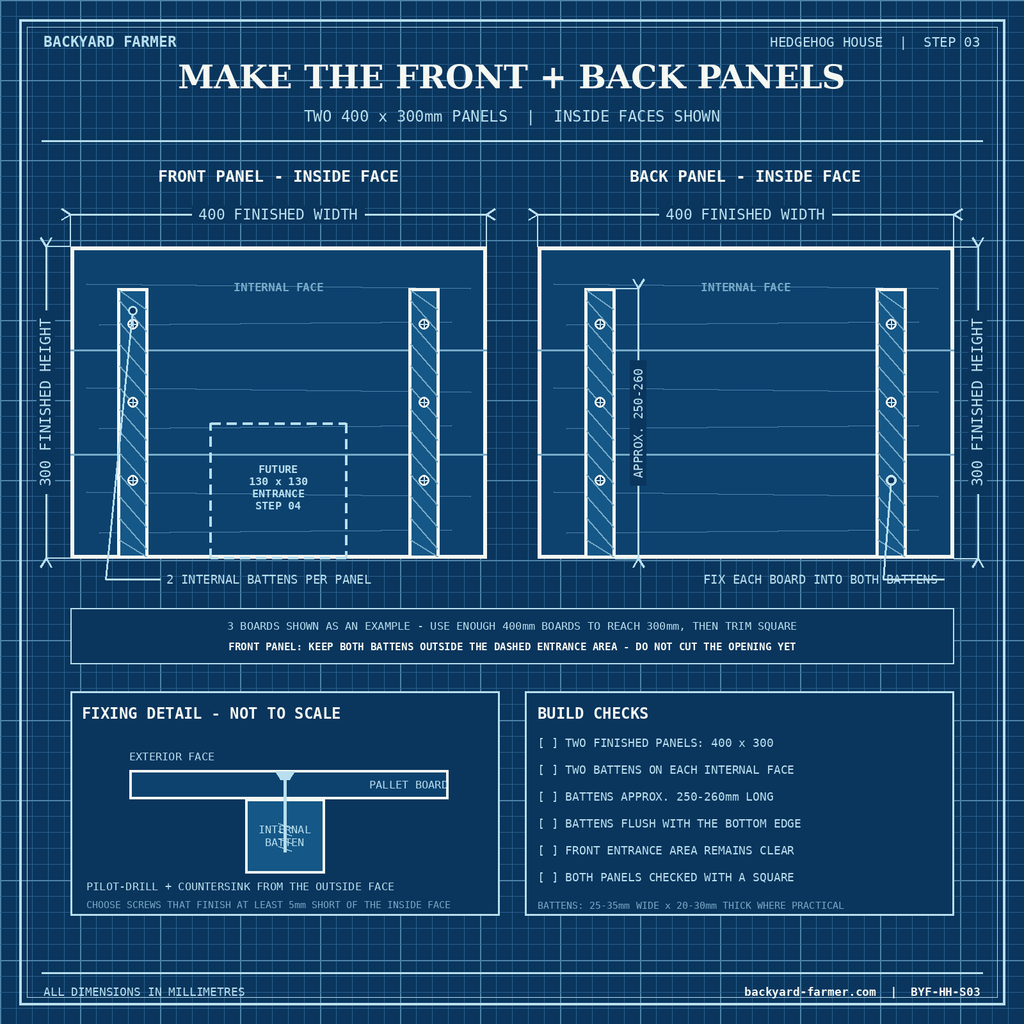
- Arrange the strongest, straightest edges on the outside faces.
- Join each panel with two internal vertical battens.
- Keep the front battens clear of the entrance area.
- Pilot-drill and countersink every screw.
- Check each panel with a square.
Step 4: Cut the Entrance
Mark a centred 130 × 130mm opening from the bottom edge of the front panel.
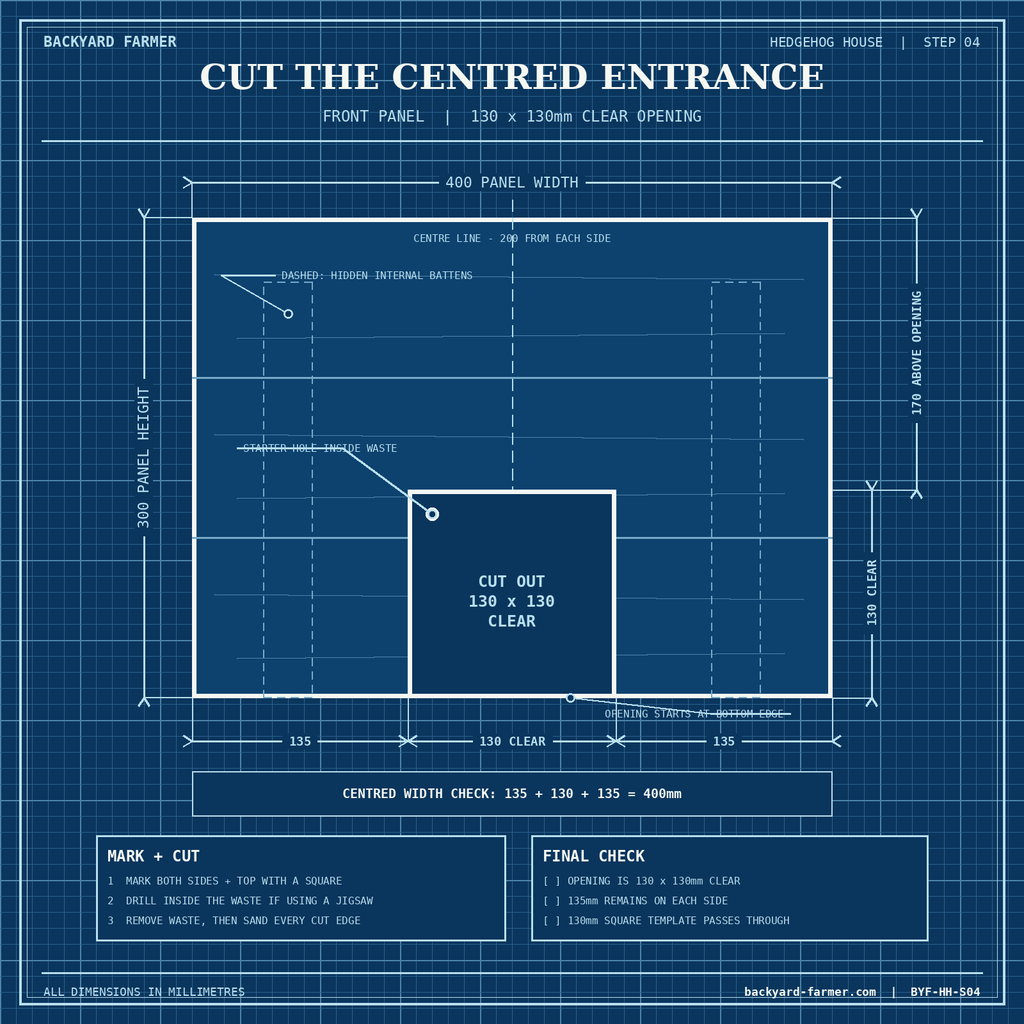
- Mark the sides and top with a square.
- Drill a starter hole if using a jigsaw, or cut carefully with a hand saw.
- Remove the waste section and sand every edge.
- Check the opening with a 130mm square template.
The opening should begin at floor level so a hedgehog can walk directly into the tunnel.
Step 5: Measure and Build the Side Panels
Stand the front and back panels on the base in their final positions and measure between their inner faces at the top and bottom.
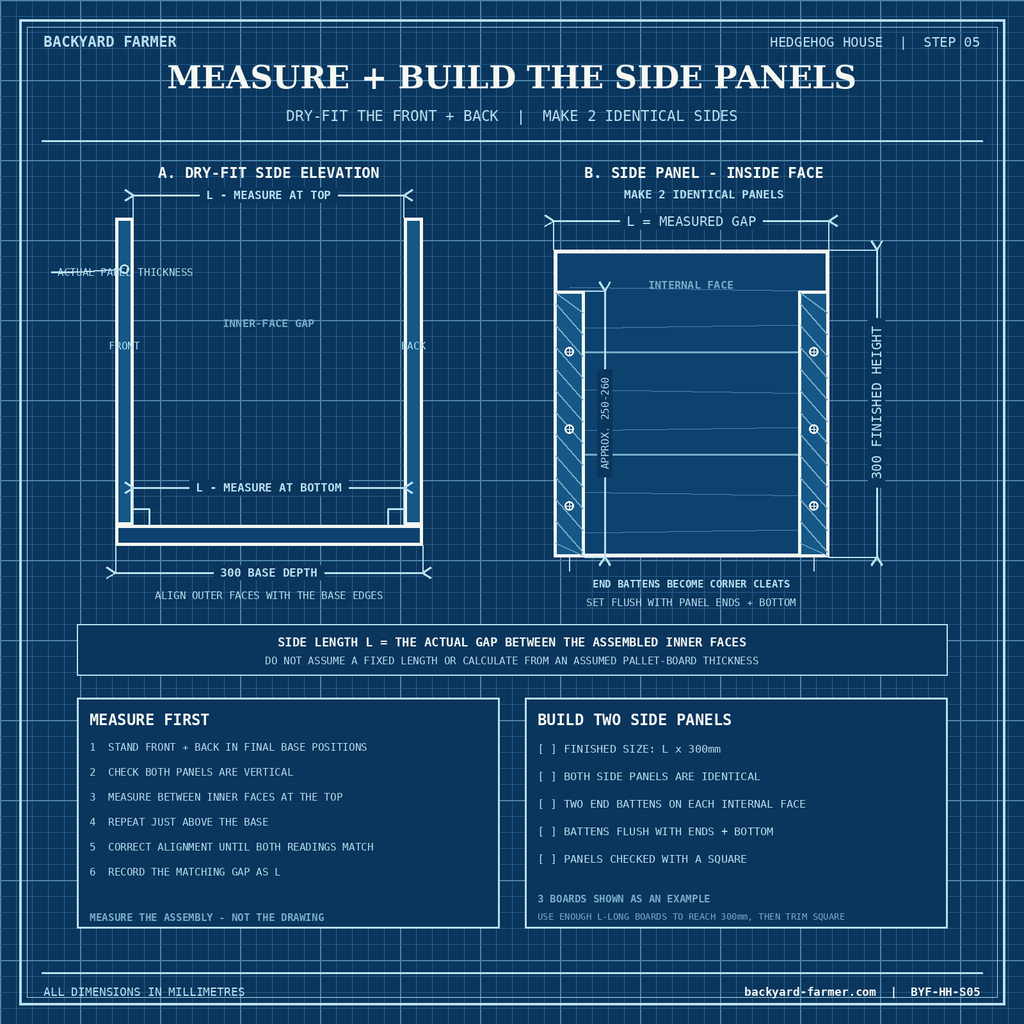
- Correct the alignment if the measurements differ.
- Use the measured gap as the side-panel length.
- Build two panels to that length × 300mm high.
- Position the end battens so they can act as corner cleats during assembly.
Step 6: Assemble the Main Chamber
Fit the side panels between the front and back panels.
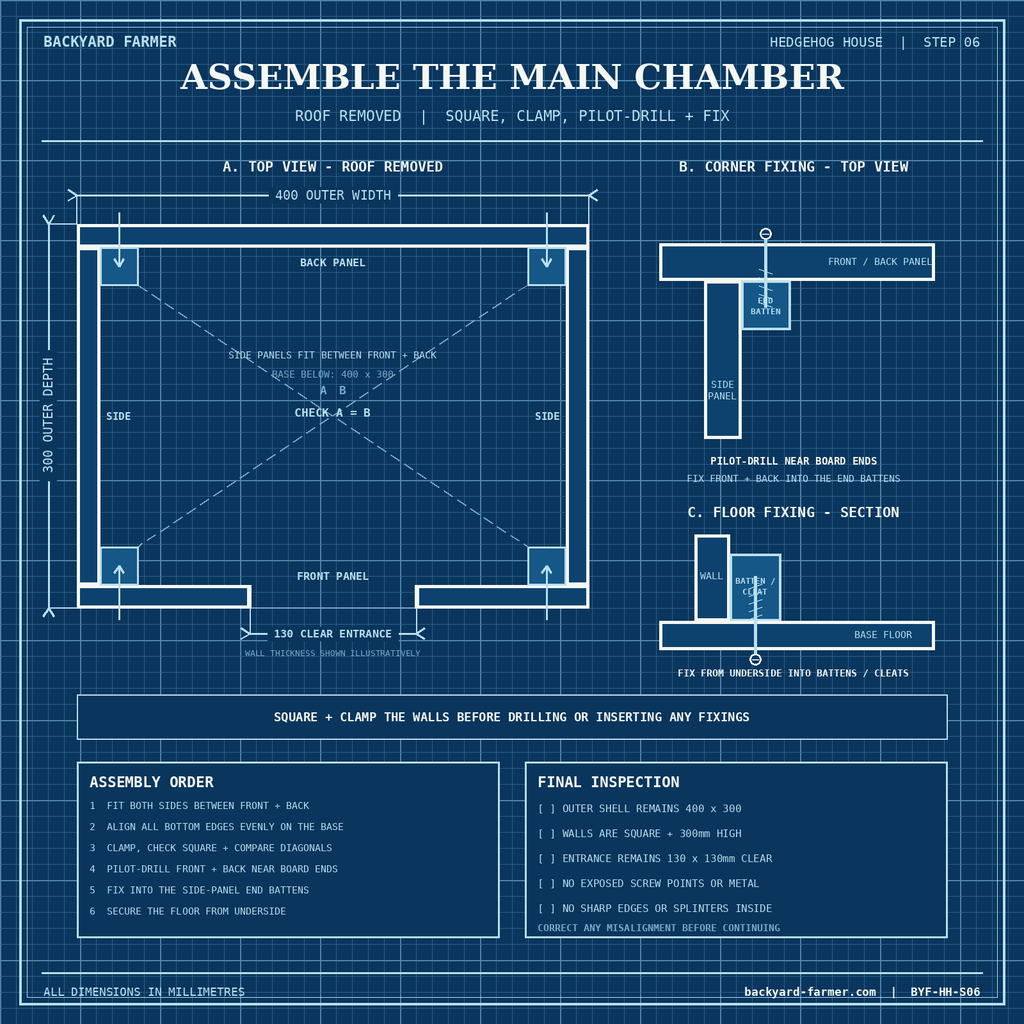
- Clamp the walls if possible.
- Check that the walls are square and their bottom edges sit evenly on the base.
- Pilot-drill near board ends before inserting screws.
- Fix the front and back panels into the side-panel end battens.
- Secure the floor to the wall battens and corner cleats from underneath.
- Inspect the interior for screw points, sharp fragments and splinters.
Step 7: Add the Ventilation Holes
Drill two 12mm holes high in the back panel, approximately 70mm below the roof.
- Avoid battens, board joints and screw heads.
- Drill with a slight downward fall towards the outside.
- Smooth the edges and remove loose sawdust.
- Keep the openings high and modest to avoid floor-level draughts.
The 12mm size is a practical design choice for this project, not an established welfare minimum.
Step 8: Build and Attach the Entrance Tunnel
Make a temporary 130 × 130mm square spacer and use it while assembling the tunnel.
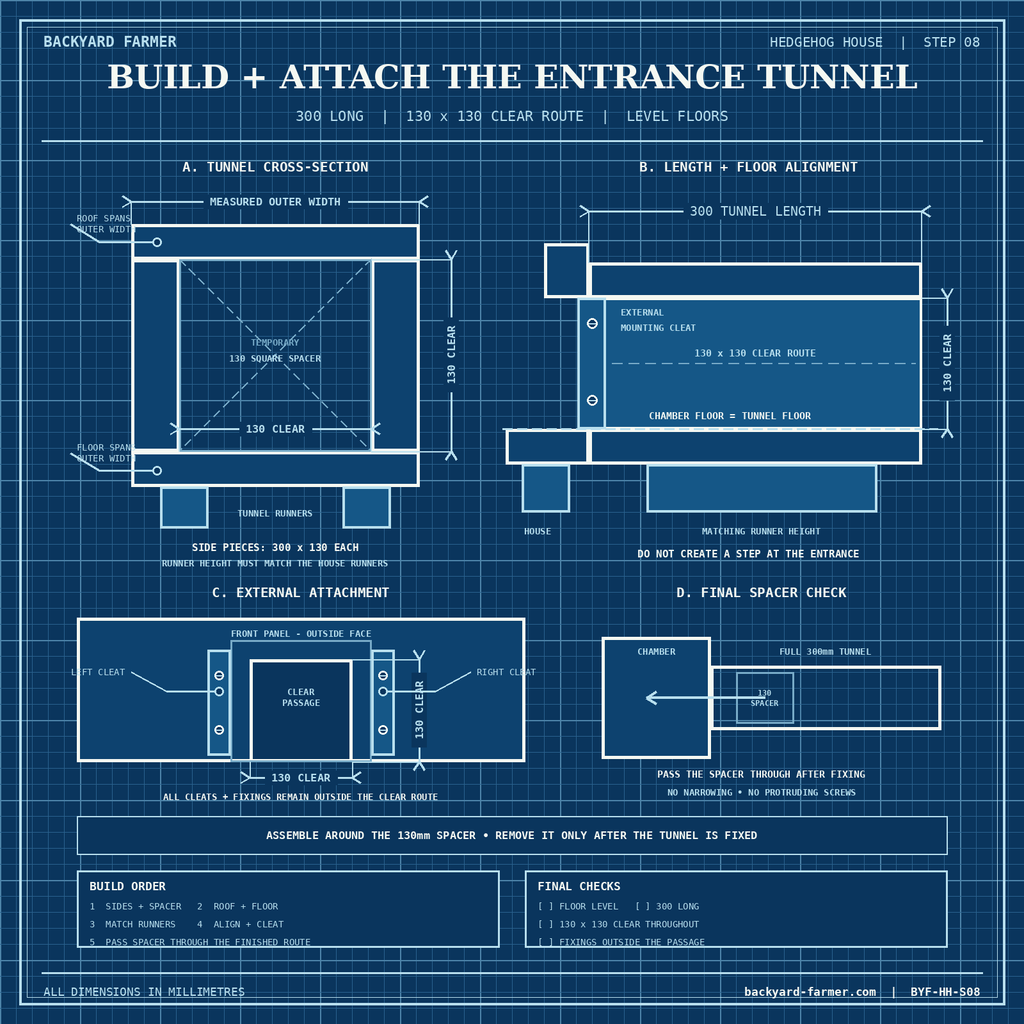
- Build the tunnel 300mm long.
- Cut two side pieces to 300 × 130mm.
- Make the roof and floor span the measured outer tunnel width.
- Add runners beneath the tunnel floor to match the house runners.
- Align the tunnel floor with the chamber floor.
- Attach the tunnel with external mounting cleats.
- Keep all fixings outside the clear passage.
- Pass the spacer through the completed tunnel to check for narrowing.
Step 9: Make the Removable Roof
Assemble a roof panel approximately 450 × 350mm, using enough boards to provide a modest overhang on every side.
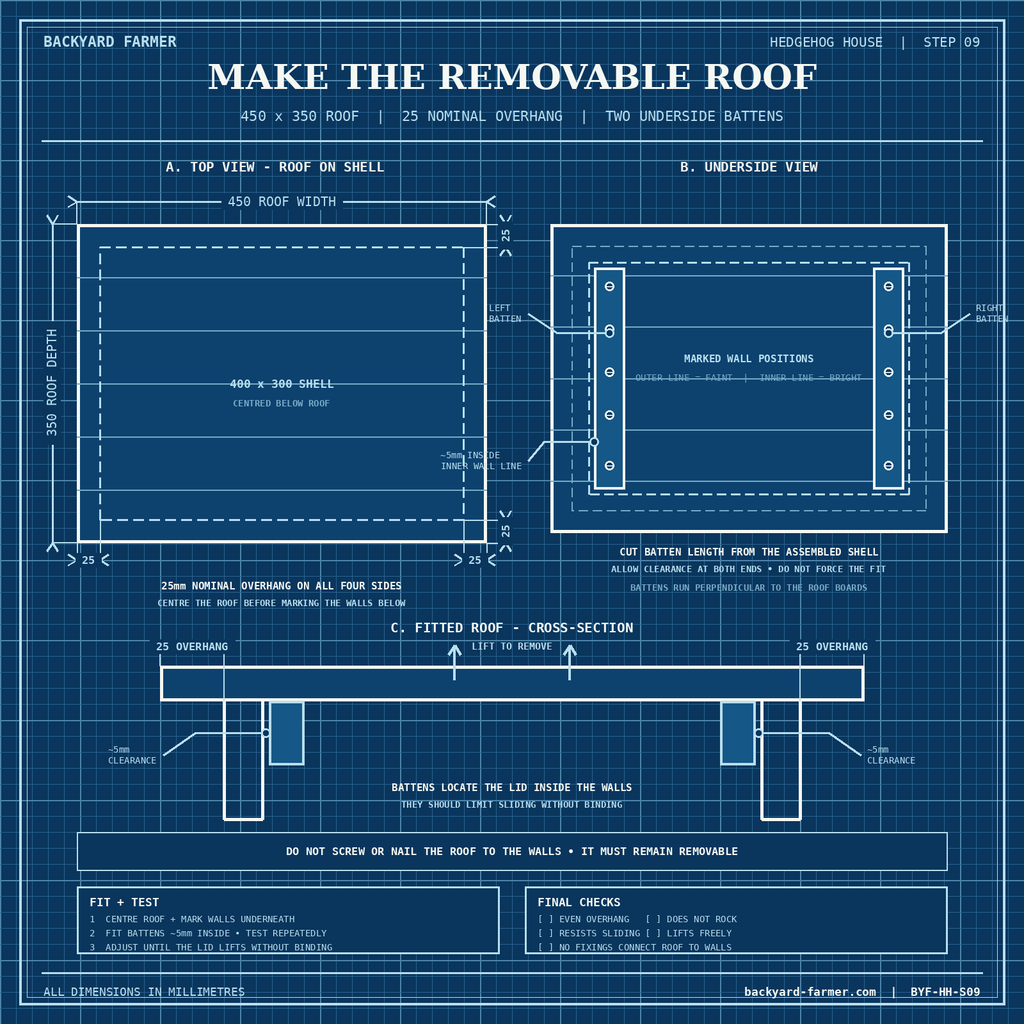
- Join the boards with two battens underneath.
- Place the roof over the shell and mark the wall positions underneath.
- Fit the battens approximately 5mm inside the wall lines.
- Test the lid several times.
The roof should resist sliding in ordinary weather but remain easy to lift when the house is confirmed vacant. Do not permanently fix it to the walls.
Step 10: Add the Weatherproof Covering
Centre the heavy-duty polythene over the roof and turn it down over the sides.
- Keep the covering loose rather than permanently fixing it.
- Turn it down over the roof joint so rain runs away from the walls.
- Hold it with a removable flat stone, paving offcut or short log.
- Add natural cover such as leaves.
- Keep the entrance and ventilation holes clear.
- Do not wrap the membrane beneath the floor.
The weight should prevent movement without making the roof impossible to lift.
Final Hedgehog-House Safety Checklist
- The pallet was obtained with permission.
- All timber is clean, unpainted and appropriately HT marked.
- Every nail and staple has been removed.
- The entrance and tunnel remain 130 × 130mm clear.
- No screw points or splinters are exposed.
- The floor and tunnel are level.
- The base is raised from persistent ground moisture.
- The roof is secure, weatherproof and removable.
- The ventilation openings are unobstructed.
Only place the house in the garden after it has passed this inspection.
Where to Put the Hedgehog House
Choose a quiet, shaded, level and free-draining position where the house can remain undisturbed.
- Place it beside a hedge, shrub, log pile or dense planting.
- Keep it away from paths, children’s play areas, dogs and garden machinery.
- Provide access through gaps beneath fences or other safe routes.
- Face the entrance away from prevailing wind and driving rain.
- Add loose leaves, twigs and small logs around the house without covering the entrance, ventilation holes or roof.
What Should You Put Inside?
Add a loose handful of dry, medium-sized deciduous leaves to the chamber, with a few more near the entrance for a hedgehog to carry inside.
Do not pack the chamber tightly or place food and water inside. Avoid fabric, shredded paper and decorative bedding, which can catch claws, become damp or compact. Natural leaf litter is the simplest option.
Should You Check or Clean the House?
Never open, move or clean a hedgehog house if it may be occupied.
Do not open a newly installed house just to check whether it is being used. Disturbance can cause an animal to abandon a nest, particularly during hibernation or when young are present.
To look for signs without blocking the entrance, place a loose leaf, flower head or small twist of paper partly across the doorway. Movement may suggest use, but it is not a reliable occupancy test.
Late March or April and October may provide suitable cleaning windows, but occupancy and weather matter more than fixed dates. Clean only when the house appears vacant for several nights:
- Open it cautiously.
- Replace the roof immediately if you find an animal, nest or fresh signs.
- Remove old leaves and scrub the timber with hot water.
- Allow it to dry completely before adding fresh leaves.
- Do not use bleach, disinfectant or scented detergent.
Annual cleaning is not essential when vacancy cannot be confirmed. For further guidance, see Hedgehog Street’s cleaning guidance and the British Hedgehog Preservation Society.
Timber Finish
Leaving the timber untreated is simplest. If you use a preservative, choose a water-based product, apply it only to external surfaces and allow it to cure completely before placing the house outside. Do not use creosote or solvent-based treatments.
Final Verdict
A successful pallet-wood hedgehog house depends on three decisions:
- Choose permitted, visibly clean, unpainted timber with a legible HT mark.
- Maintain the critical 130 × 130mm clear entrance and tunnel.
- Provide a stable, dry and sheltered structure that can remain undisturbed.
Join enough boards to reach each finished measurement, trim the panels square and measure the side-wall gap from the assembled front and back panels. Once installed, give the house time: a hedgehog may use it immediately, months later or not at all.