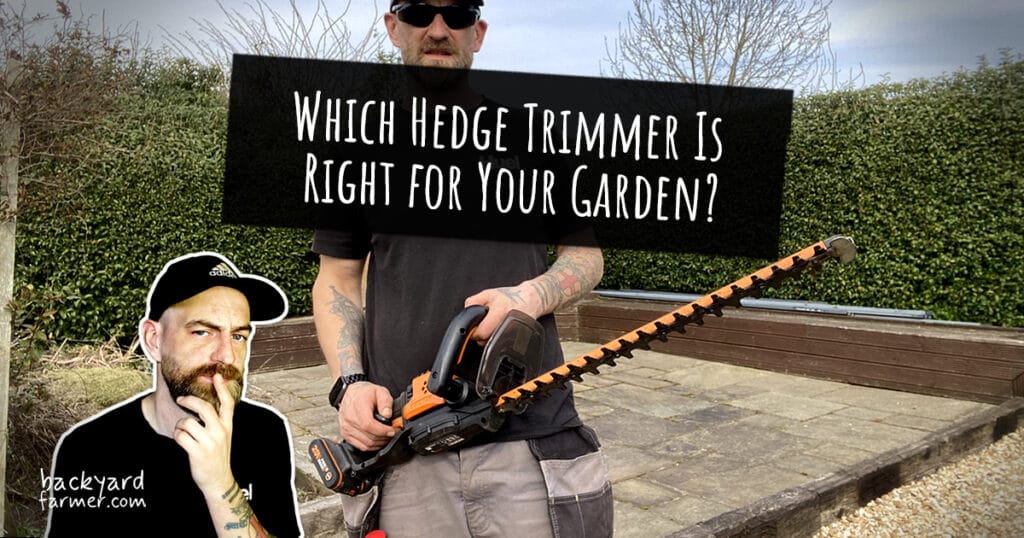
Introduction
Brussels sprouts can be a brilliant winter crop, but they are not one of those veg you can half-get-right and still expect much from later. They take a while, they get bigger than plenty of people expect, and by autumn they have a habit of showing up every mistake you made back in spring.
If you want to learn how to grow Brussels sprouts in the UK, the main thing to understand is that they are a long-season brassica. They need an early enough start, firm ground, decent spacing, and steady conditions if you want proper tight sprouts later in the year instead of loose, blown, disappointing ones.
That is why Brussels sprouts divide opinion a bit. When they go right, they are a proper winter crop and you can keep picking from the stem for weeks. When they go wrong, they can take up a fair bit of room for not much reward.
In my experience, the difference usually comes down to a few basics:
- Timing
- Firm soil
- Enough space
- Support in windy spots
- Netting before the usual brassica pests move in
In this guide, I’ll walk through how to grow Brussels sprouts in the UK in a simple, practical way for gardens, raised beds, and allotments. If you just want the quick version, use the guide widget below. If you want to avoid the common mistakes that lead to weak plants and poor sprouts, read on.
When to Plant Brussels Sprouts in the UK
Timing matters with Brussels sprouts more than it does with a lot of other veg. They are a long-season crop, so if you start too late, the plants often drift into autumn without enough size or strength to make a decent winter crop.
For most UK growers, the safest route is:
- Sow from late February to April under cover
- Or sow outdoors from March to May in a seed bed
- Plant out from May into June once the plants are sturdy and hardened off
In real life, March is often the practical sowing month that makes the most sense. It is early enough to get the plants moving properly, but not so early that you are forcing things for the sake of it.
When to sow Brussels sprouts
If you are starting under cover, sow from late February through April in modules or small pots. That usually gives you the easiest start and makes planting out much simpler later on.
If you are sowing outside, March to May is the usual window, depending on your conditions. Colder northern gardens, exposed plots, and heavy wet soils may push you a little later. Milder southern or coastal gardens can often get going a touch earlier.
When to plant Brussels sprouts outside
Plant Brussels sprouts out from May to June, once they are stocky, well rooted, and properly hardened off. Do not rush weak seedlings into the bed just because the calendar says so. A solid young plant put in at the right time is far more useful than a leggy one that never really settles.
By planting out in late spring or early summer, you give the plants time to build a strong stem and root system before autumn slows things down. That matters because Brussels sprouts do not crop well off weak, rushed plants.
Can you grow Brussels sprouts for Christmas?
Yes, but this is where timing and variety both matter. If you want sprouts around Christmas, they need to be sown early enough and matched with a variety that suits that harvest window.
As a rough guide:
- Early varieties can start cropping in autumn
- Mid-season varieties usually carry you into Christmas
- Late varieties are often better for winter and early spring picking
Choosing varieties for your harvest window
Variety choice matters more with Brussels sprouts than many beginners expect. If your plot has a specific issue, it is worth choosing with that in mind rather than just grabbing the first packet you see.
- Crispus F1 is a sensible choice where clubroot is a concern
- Doric F1 is often mentioned as a good option for exposed plots and winter picking
- Bosworth F1 and Trafalgar F1 are both worth a look if your aim is a reliable Christmas-style crop
- Maximus F1 is another one growers often mention as a solid all-rounder
The main mistake with Brussels sprouts is not usually sowing a week too early or too late. It is leaving them too late altogether and then expecting undersized plants to somehow turn into a proper winter crop.
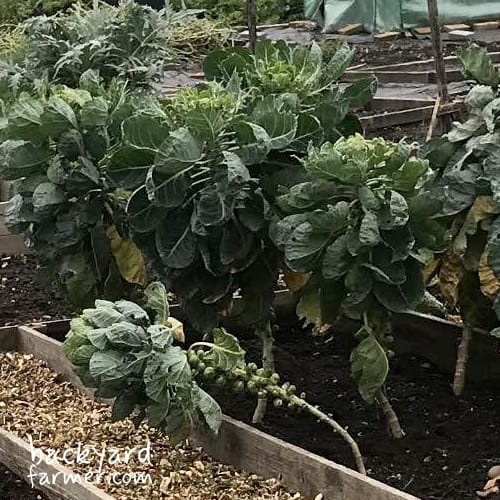
How Brussels Sprouts Grow
Brussels sprouts make a lot more sense once you picture what the plant is actually doing. They do not grow like a cabbage, where you are waiting for one main head to form. Instead, they build a tall central stem first, then form small buds in the leaf joints up that stem.
That growth habit explains why Brussels sprouts take so long, why they need more room than people often expect, and why weak early growth nearly always catches up with them later.
In most UK gardens, Brussels sprouts are a long-season brassica. You sow them in spring, grow them on through summer, and usually start harvesting from autumn onwards. They are not a quick crop, which is why rushing them rarely pays off.
How Brussels sprouts grow on the plant
A healthy Brussels sprout plant usually:
- Grows upwards as a single stem
- Carries large leaves along that stem
- Forms sprouts where each leaf joins the stem
- Ripens from the bottom upwards
That is why the lower sprouts are normally ready first. It is also why the plant can end up looking a bit top-heavy by autumn, especially if it has grown well.
On exposed plots, that height can work against you if the roots are loose or the soil was never properly firmed in the first place.
How long do Brussels sprouts take to grow?
Brussels sprouts are not quick. From sowing to first harvest, you are usually looking at several months rather than a few weeks. The exact timing depends on the variety and when you sowed it, but the main thing is that they need a full season to become worthwhile.
This is one of the reasons late sowing so often ends in disappointment. If the plant is still trying to bulk up when autumn arrives, it often never really catches up.
How tall do Brussels sprout plants grow?
They usually grow much taller than beginners expect. A mature plant can easily become a tall upright brassica rather than a neat low crop, which is one reason:
- Spacing matters
- Wind protection matters
- Staking sometimes matters more than people think
If you only picture sprouts as the little green buttons on your plate, it is easy to underestimate the size of the actual plant. In the garden, they behave more like a proper winter brassica than a compact filler crop.
Once you understand that, the rest of the advice starts to click into place. Firm soil, honest spacing, and support in windy spots are not extras with Brussels sprouts. They are part of how you get a decent crop in the first place.
Where to Grow Brussels Sprouts
Where you grow Brussels sprouts makes more difference than a lot of people think. They are not especially delicate, but they do best when they have enough light, enough room, and a bed that holds moisture without turning into a bog. More than anything, they like a solid footing.
In most UK gardens, Brussels sprouts do best in a sunny, open spot with fertile, moisture-retentive soil. Full sun is ideal if you want strong plants and a worthwhile winter crop, although a bit of light shade is usually fine. What matters more is avoiding a starved, bone-dry bed or a patch that never really settles after digging.
Best soil for Brussels sprouts
Brussels sprouts like rich soil with enough moisture to keep them moving through summer, but they also want the ground to feel firm rather than fluffy. That is one of those brassica quirks that sounds a bit odd until you have seen a tall plant rocking around later in the year.
If you have added compost or manure, that is fine, but it helps if the bed has had time to settle before planting. Freshly worked, airy ground can encourage the plants to wobble later on, especially once they start getting some height.
As a simple rule, Brussels sprouts do best in soil that is:
- Fertile
- Moisture-retentive
- Firm underfoot
- Well drained rather than waterlogged
If clubroot is already an issue on your plot, avoid planting them back into the same tired brassica ground year after year. Brussels sprouts are one of those crops where rotation genuinely matters.
Can you grow Brussels sprouts in raised beds?
Yes, and they can do very well there, but this is where people often underestimate the crop. Raised beds work best when the soil is fertile, the bed has settled properly, and you are honest about spacing.
The usual mistake is treating Brussels sprouts like a tidy filler crop and squeezing too many into one bed. In practice, a few strong plants nearly always give a better result than a crowded row that never really gets going.
Can you grow Brussels sprouts in pots?
You can, but they are not the easiest container crop. Brussels sprouts need a large, deep pot, regular watering, and enough feed to keep going for the full season. They also get top-heavy, which makes them less forgiving in exposed spots.
If you only have a patio or a small garden, it can be done, but it usually makes more sense to grow one or two properly than expect a big crop from undersized pots.
Choosing the right spot from the start
The ideal place for Brussels sprouts is somewhere you can do the basics well. That means:
- Enough sun
- Enough space
- Enough shelter or support if the site is windy
- Enough room to net the crop properly
So although Brussels sprouts are often described as hardy, they are not a crop to shove into any spare gap and hope for the best. Give them a proper bed, firm soil, and a position that lets them stand steady right through to winter, and they are far more likely to earn their keep.
How to Sow and Plant Brussels Sprouts
Brussels sprouts are not difficult to start, but they do reward a steady, sensible approach. For most UK growers, the easiest route is to raise them in modules or small pots first, then plant them out once they are short, sturdy, and ready.
You can also sow them into an outdoor seed bed, but whichever method you use, the goal is the same: strong young plants that settle quickly and keep moving without a check.
Sowing Brussels sprouts under cover
For most people, sowing under cover is the simplest and most reliable method. Start seeds in modules or small pots from late February through April, using a decent seed compost and sowing them around 1cm deep. Water them in gently, keep them in good light, and do not let them sit waterlogged.
Modules work well because Brussels sprouts do not need much fuss early on, and they are easier to move later without too much root disturbance.
At this stage, you are aiming for:
- Short, sturdy seedlings
- Good root development
- No obvious check to growth
If seedlings go leggy, they are usually too warm, too shaded, or both. Strong light and slightly cooler conditions tend to give you sturdier plants.
Sowing Brussels sprouts outside
You can also sow Brussels sprouts outdoors from March to May in a seed bed if you prefer a more traditional route. This can work well on allotments if you have the space and the soil is workable, I use my nifty Hori Hori knife for help in soil thats a bit stubborn.
Sow thinly, keep the area weed-free, and thin the seedlings if they start crowding each other. A common mistake is leaving them cramped for too long. If they grow up weak and stretched in the seed bed, they rarely improve much after transplanting.
If you sow outside, keep an eye out for:
- Slugs
- Pigeons
- Any obvious check to growth while plants are young
Planting Brussels sprouts out
Once the plants are sturdy, well rooted, and hardened off, they can go into their final bed from May into June. This is the stage that makes a real difference later on.
Before planting, make sure the bed is reasonably fertile and, just as importantly, reasonably firm. Brussels sprouts do not thank you for being dropped into a fluffy, freshly worked patch of loose soil. If the ground feels too soft underfoot, firm it first.
When planting out:
- Plant deeply enough that each seedling feels well anchored
- Firm the soil around the roots properly by hand
- Water them in well
- Add cabbage root fly collars if needed
- Net the bed early if pigeons or cabbage whites are common
If the site is windy, think ahead here too. Planting them firmly from the start gives you a much better chance of keeping them steady later in the season.
The easiest method for beginners
If you are new to Brussels sprouts, the simplest reliable route is:
- Sow in modules under cover in spring
- Grow the seedlings on in good light
- Harden them off before planting out
- Plant them into firm, fertile soil
- Water them in properly
- Net them early if pests are an issue
That avoids most of the usual beginner mistakes in one go.
The planting mistake that causes trouble later
The biggest mistake with Brussels sprouts is often not the sowing itself. It is planting them into loose ground and never really firming them in. That may not look like much at first, but later in the year it often shows up as wind rock, unstable plants, and poorer sprout formation.
With Brussels sprouts, a strong start is not about rushing them. It is about giving them a solid base to build from for the rest of the season.
Brussels Sprouts Spacing and Layout
Spacing is one of the areas where Brussels sprouts catch people out. Because the plants start off looking fairly modest, it is easy to think you can tuck in a few extra and get away with it. By the time autumn comes round, that usually looks like a bad idea.
Brussels sprouts are a big, upright brassica with a long growing season, so they need enough room to build a strong stem, hold their leaves properly, and stay healthy right through to harvest.
As a practical baseline, aim for:
- Around 60cm between plants
- Around 60 to 90cm between rows, depending on the variety and how much access you want
That can feel generous when the plants are still small, but later on it usually feels about right.
How far apart to plant Brussels sprouts
For most gardens and allotments, around 60cm apart is the most sensible starting point. Some growers give them more, especially for taller varieties or exposed plots where airflow and stability matter even more.
The main thing is not chasing a perfect number down to the centimetre. It is being honest about the final plant size. If you squeeze Brussels sprouts into 9 to 12 inch gaps, they may survive, but they are far more likely to end up weak, crowded, awkward to net, and disappointing when it comes to the actual sprouts.
Why spacing matters with Brussels sprouts
Poor spacing causes more than one problem at once. Crowded plants compete for:
- Light
- Water
- Root space
Airflow drops, leaves overlap, and the whole bed becomes harder to inspect, weed, net, and harvest.
That usually leads to:
- Weak, stretched plants
- More wind rock later in the season
- Poor airflow around the leaves and stem
- Harder pest control and harvesting
- Smaller or looser sprouts
This is one of the reasons Brussels sprouts so often feel disappointing in small raised beds. It is not that they cannot be grown there. It is that they are often given half the room they really need.
Brussels sprouts in raised beds and tight spaces
If you are growing in a raised bed, it usually pays to grow fewer plants and do them properly. A small number of strong, well-spaced Brussels sprouts will nearly always outperform a crowded planting that never really gets going.
This matters even more once you factor in netting. A generous layout is easier to protect, easier to inspect for caterpillars and aphids, and easier to harvest from once the sprouts start forming up the stems.
Plan the bed before you plant
Brussels sprouts are one of those crops that benefit from a bit of planning before they go in. Because they stay in the ground for months, any spacing mistake sticks around for months too.
If you want to map your Brussels sprouts spacing properly, use the Allotment Planner to lay out your brassica bed before you plant.
The short version is simple: give Brussels sprouts more room than you think they need. Most of the time, that extra space pays you back in stronger plants, fewer headaches, and better sprouts later on.
Watering, Feeding, and Care
Brussels sprouts do not need constant pampering, but they do respond badly if the basics swing around too much. The aim is steady growth. If they are dry one week, soaked the next, then loosened by wind after that, the plants usually show it later in the quality of the sprouts.
The main jobs here are simple:
- Keep them growing steadily
- Stop them drying out badly in summer
- Keep the plants firm and stable as they get taller
Watering Brussels sprouts
Once Brussels sprouts are planted out, water them well until they settle in. After that, they usually do best with steady moisture rather than constant light watering.
In an average UK summer, you may not need to fuss over them too much. However, during hot or dry spells it is worth watering thoroughly so the roots stay active and the plants do not check. This matters even more once the plants bulk up and start putting energy into the sprouts themselves.
If the bed dries out badly and then gets soaked again, that stop-start growth can stress the plants and make them less reliable later on. A proper deep watering when needed is usually far better than a quick splash every evening.
Mulching and moisture retention
A mulch can help a lot, especially on lighter soils or in a dry summer. It helps:
- Hold moisture in the ground
- Cut down how often you need to water
- Keep the root area more stable
That is especially useful with Brussels sprouts because they sit in the ground for so long. Anything that keeps them growing steadily through summer is usually worth doing.
Feeding Brussels sprouts
Brussels sprouts like fertile ground, but most of that feeding wants to happen before or around planting rather than through constant liquid feeds later on. If the bed has been improved with compost or well-rotted manure beforehand, you are already doing most of the important work.
On poorer soil, a modest nitrogen-rich boost earlier in the season can help the plants get moving, but it is easy to overdo this. Too much rich feeding later on can push soft leafy growth rather than helping the plant mature properly.
A good rule is:
- Feed the soil first
- Feed the plant second
Support, staking, and re-firming
This is one of the most important care jobs with Brussels sprouts, especially on allotments and exposed plots. As the plants get taller, wind can loosen them surprisingly quickly. Once that starts happening, sprout quality often suffers.
If the plants feel wobbly, re-firm the soil around the base before the problem gets worse. On windy sites, it is often worth staking plants before they look like they need it, rather than waiting until they have already started rocking.
A simple cane and tie is often enough. In some gardens, lightly earthing up around the base can help too, as long as you are not burying them too heavily or creating soggy conditions.
Weeding and general upkeep
Keep the bed reasonably weed-free while the plants are getting established. Once Brussels sprouts are large, they shade the ground more and tend to hold their own better, but young plants do not want extra competition early on.
It can also help to remove the odd yellowing lower leaf later in the season if it improves airflow or makes harvesting easier. There is no need to strip plants aggressively.
The care jobs that matter most
If you want the short version, focus on this:
- Water well in dry spells rather than little and often
- Mulch if the bed tends to dry out
- Grow them in fertile soil rather than trying to rescue hungry plants later
- Re-firm the base if wind or rain loosens them
- Stake plants in exposed spots before they start rocking badly
- Keep weeds down while plants establish
Brussels sprouts are one of those crops where consistency beats overattention. On exposed plots in particular, support can make more difference than extra feed. Keep the plants steady, keep them growing, and a lot of the later problems become easier to avoid.
Common Brussels Sprout Problems
Brussels sprouts are one of those crops where the problems are usually fairly predictable once you know what to watch for. In the UK, the usual trouble tends to come from the same few places: loose soil, wind rock, brassica pests, crowded planting, and plants getting checked by drought or poor timing.
The good news is that most of these issues are easier to prevent than fix later. If you catch them early, you can still save a decent crop.
Loose or blown sprouts
This is one of the most common let-downs with Brussels sprouts. Instead of producing firm, tight little buttons, the sprouts stay loose, open, or fluffy.
That usually comes back to stress somewhere along the line. Common causes include:
- Loose soil
- Wind rock
- Inconsistent watering
- Late planting
- Overcrowding
- Too much soft leafy growth
- A variety that just is not performing well on your plot
The best fix is usually getting the basics right together:
- Plant into firm ground
- Keep the plants steady in exposed spots
- Water consistently in dry weather
- Avoid overcrowding
- Choose reliable varieties that suit your harvest window
If the sprouts have already opened up, they are still perfectly usable. They are just a bit disappointing if you were hoping for proper tight winter sprouts.
Cabbage white caterpillars
If you grow brassicas in the UK, cabbage white caterpillars are more a question of when than if. The butterflies lay eggs on the leaves, and once the caterpillars hatch they can strip a plant surprisingly quickly.
The best defence is fine insect mesh put on early. Waiting until you notice damage usually means the problem is already under way.
If you do spot eggs or caterpillars, check the undersides of leaves and remove them before numbers build up. This matters even more with Brussels sprouts because the plants stay in the ground for so long.
Pigeon damage
Pigeons can be brutal on brassicas, especially on allotments or open gardens where they know there is a reliable food source. Young plants are most vulnerable, but pigeons can also weaken larger plants by stripping leaves.
Again, netting is usually the answer. If pigeons are a regular problem where you grow, it is better to assume Brussels sprouts will need protection rather than waiting to see what happens.
Try to keep the netting raised off the leaves where possible. If it sits directly on the plants, birds can still peck through it or distort the growth.
Cabbage root fly
Cabbage root fly is one of the quieter problems because the damage often shows up above ground before people realise what is happening below it. Plants may wilt, stall, or never properly get going because the roots are being damaged by larvae.
If this is a known issue on your plot:
- Use brassica collars when planting out
- Firm plants in well
- Rotate crops where possible
Sometimes badly affected plants never recover properly, so prevention is far better than trying to rescue them later.
Clubroot
Clubroot is one of the more serious brassica problems, especially on older allotments or plots where brassicas have been grown repeatedly. Infected plants often look stunted, wilt in warm weather, and never really thrive no matter how much attention you give them.
If you suspect clubroot, lift one failed plant and check the roots. Swollen, distorted roots are usually the giveaway.
The main ways to reduce the problem are:
- Rotate brassicas properly
- Avoid spreading infected roots around the plot
- Lime acidic soil where appropriate
- Start plants in modules or pots so they go out stronger
- Use resistant varieties such as Crispus F1 if clubroot is already known on the site
Aphids and whitefly
Aphids and whitefly tend to build up once the plants are well grown, especially if airflow is poor or the crop is already stressed. They often gather around leaf joints, undersides of leaves, and around forming sprouts.
A mild infestation is usually more of a nuisance than a disaster, but heavy build-up can weaken plants and make harvesting much less pleasant.
The best response is usually a practical one:
- Avoid overcrowding
- Improve airflow
- Remove badly infested leaves if needed
- Encourage natural predators where possible
- Keep plants healthy enough that they are not already struggling
Poor results after heat or drought
Brussels sprouts are a very UK crop in the sense that they usually prefer a steady, cooler season more than extreme heat. In hot, dry summers, they can struggle to keep moving properly. The result may be smaller plants, weaker stems, or looser sprouts later on.
This is where steady watering, mulching, and not adding extra stress through crowding or wind rock really help. You cannot control the weather, but you can make the plant’s job a bit easier.
The pattern to watch for
Most Brussels sprout problems are connected rather than separate. A plant that was sown late, planted too close, put into loose soil, left unnetted, and then allowed to dry out is far more likely to struggle than one that had a strong start.
That is why prevention matters so much with this crop. Get the timing, spacing, firmness, and protection right early on, and a lot of the usual problems become much easier to manage later.
When and How to Harvest Brussels Sprouts
Harvesting Brussels sprouts is usually much more of a gradual winter job than a one-day event. Unlike crops you lift all at once, Brussels sprouts tend to come ready in stages, which is one of the things that makes them so useful through autumn and winter.
In most UK gardens, harvest usually starts in autumn and can carry on through winter, depending on the variety and when you sowed it. Early varieties can start sooner, while later ones are often better for Christmas and beyond.
When are Brussels sprouts ready to harvest?
The easiest way to judge Brussels sprouts is by feel and appearance rather than by an exact date. A sprout is ready when it feels firm, looks tight, and has reached a worthwhile size. If it is still loose, open, or obviously immature, it usually needs more time.
A few simple signs help:
- The sprout feels firm
- The outer leaves look tight
- The lower sprouts are usually ready first
That is why harvesting normally starts at the bottom of the stem and works upwards over time.
How to harvest Brussels sprouts
Start with the lowest firm sprouts and work upwards as more of the stem matures. You can snap them off with a twist or cut them cleanly if you prefer.
The main thing is not to wait for every sprout on the plant to be perfect at the same time. Pick the ones that are ready, then leave the smaller upper ones to keep developing.
This gradual harvest is part of what makes them useful in winter. One good plant can keep giving for quite a while if it was grown well in the first place.
How do you know when Brussels sprouts have finished growing?
Brussels sprouts are more or less finished when:
- The remaining upper sprouts stop swelling properly
- The plant starts to look tired
- Winter conditions shut growth down altogether
By that point, you have usually already taken the best lower and middle sprouts. The uppermost ones may still be worth using if they are decent enough, but they are often smaller and slower.
Do Brussels sprout plants grow back after harvest?
Not in the sense of giving you a full second crop. Once the main sprouts are gone, the crop is usually more or less finished.
That said, the plant is not useless at the end. The sprout tops can be cut and cooked like greens, and sometimes you may get a few small side shoots, but Brussels sprouts are not a crop that properly resets and starts again.
Do Brussels sprouts taste better after frost?
A lot of growers think they do, and cold weather is often said to sweeten the flavour. That is one reason Brussels sprouts are so tied to winter eating in the UK.
You do not need to wait for hard frost before harvesting every sprout, though. If a sprout is firm and ready, it is usually better picked in good condition than left too long just for tradition’s sake.
What if the sprouts are loose or blown?
If the sprouts have opened up or stayed loose, they may not be the neat tight buttons you were hoping for, but they are still perfectly usable.
You can still use:
- Loose sprouts, sliced or shredded
- Sprout tops as greens once the main harvest tails off
The best way to think about Brussels sprouts is as a crop you pick through rather than clear in one go. Keep checking the lower sprouts first, harvest the firm ones as they come, and do not expect the plant to behave like a single-cut crop.
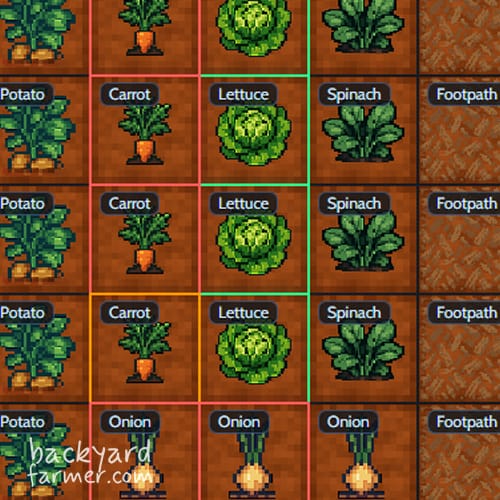
Companion Planting for Brussels Sprouts
Companion planting can be useful with Brussels sprouts, but it is worth keeping it in proportion. It is not the thing that makes or breaks the crop. With sprouts, spacing, crop rotation, firm soil, netting, and support in windy spots matter far more than clever pairings.
That said, a sensible mixed bed can still help. The main aim is to avoid crowding the sprouts while making practical use of the space around them early on.
Good companion plants for Brussels sprouts
Some of the better companions are:
- Onions and leeks
- Celery
- Lettuce as a temporary filler while the sprouts are still small
- Herbs nearby, especially in pots or around the edges
- Nasturtiums if you want a sacrificial plant or a bit more diversity
The reason these work is usually quite practical. They can sit around Brussels sprouts without causing too much competition if the layout is sensible.
What not to crowd Brussels sprouts with
The main thing to avoid is cramming Brussels sprouts in with other large, hungry crops and then calling it companion planting.
Try not to crowd them with:
- Other brassicas planted too tightly nearby
- Tall crops that throw too much shade
- Anything that makes netting awkward
- Strawberries if you are trying to keep rotation and layout simple
A practical way to use companion planting with sprouts
If you want to use companion planting here, the most useful approach is usually a simple one:
- Grow Brussels sprouts as the main crop with proper spacing
- Use small quick crops such as lettuce only while the sprouts are young
- Keep onions or leeks nearby if the layout suits it
- Prioritise access for netting, weeding, and harvesting over squeezing in extra plants
That last point matters most. Brussels sprouts stay in the ground for a long time, so any companion planting that makes the bed harder to protect or manage usually stops being worth it.
In practice, companion planting with Brussels sprouts is best treated as a supporting detail rather than a magic trick. A well-spaced, well-protected bed with a few sensible neighbours will usually do far better than an overcomplicated mix where the sprouts never really have room to become the crop they are meant to be.
Plan your Allotment with our Free Planner
Brussels sprouts are one of those crops that reward a bit of planning before you ever plant them. Because they stay in the ground for months, small layout mistakes have a habit of turning into season-long problems later on.
A quick plan helps you:
- See how many plants you can realistically fit
- Leave enough room for netting and access
- Avoid spacing mistakes that last all season
If you want to plan your brassica bed before planting, use the Allotment Planner to map your Brussels sprouts spacing, companion planting, crop rotation, and bed layout in one place.
It is a simple way to see how many plants you can genuinely fit before the bed gets crowded, awkward to net, or harder to work around later.
FAQ
For most UK growers, the usual pattern is to sow from late February to April under cover, or from March to May outdoors, then plant out from May into June once the plants are sturdy and hardened off. The main thing is giving them a long enough season to bulk up properly before autumn.
They do best in fertile, moisture-retentive soil that feels firm rather than loose and fluffy. Rich ground helps, but Brussels sprouts also like a solid footing. If the bed is too airy and unsettled, the plants are more likely to rock later in the year and produce poorer sprouts.
Yes, but they need a large, deep pot and regular watering to do well. They are usually easier in the ground, a raised bed, or an allotment bed because they get tall, stay in place for months, and can become top-heavy in exposed spots.
They are a long-season crop and usually take several months from sowing to first harvest. In practice, you are normally sowing in spring for harvests from autumn into winter rather than expecting a quick turnaround.
They often grow much taller than beginners expect. A healthy plant can become a tall upright brassica, which is one reason spacing, firm soil, and support matter more than people often think.
They are manageable for beginners, but they are not the quickest or most forgiving crop if space is tight. They need time, proper spacing, and protection from pests, so they suit growers who are happy to plan a bit rather than just squeeze something into a spare gap.
The biggest mistakes are usually starting too late, planting too close, or planting into loose ground. Brussels sprouts have a habit of magnifying early mistakes because they stay in the bed for so long.
You can push the timing a bit with some varieties, but late sowing often leads to weak winter crops because the plants have not had enough time to bulk up properly before growth slows.
Loose or blown sprouts are often linked with wind rock, loose soil, inconsistent watering, late planting, stress, overcrowding, or a variety that is not performing well in your conditions. Usually it is a mix of stresses rather than one single cause.
Poor growth can come from late sowing, dry spells, poor soil, root damage, overcrowding, cabbage root fly, clubroot, or plants being checked early and never really recovering. If growth seems badly stalled, it is worth checking both the roots and the general growing conditions.
In many UK gardens and allotments, yes. Netting is one of the most reliable ways to prevent pigeon damage and cabbage white caterpillars, and it works best when it goes on early rather than after the crop is already being eaten.
They should feel firm, look tight, and be a worthwhile size. The lower sprouts are usually ready first, so harvest normally starts at the bottom of the stem and works upwards over time.
Not usually as a full second crop. Once the main sprouts are gone, that is largely the plant finished. The tops can still be used as greens, and sometimes a few small side shoots appear, but it is not a crop that resets and starts again properly.
A lot of growers think they do, and cold weather is often said to improve the flavour. That said, there is no need to leave ready sprouts standing too long just to wait for frost if they are already in good condition.
They can be brilliant if you want a proper winter crop and have enough room to do them properly. They make most sense on allotments and larger veg plots. In very small spaces, some growers decide they are not worth the room compared with quicker or more productive crops.