
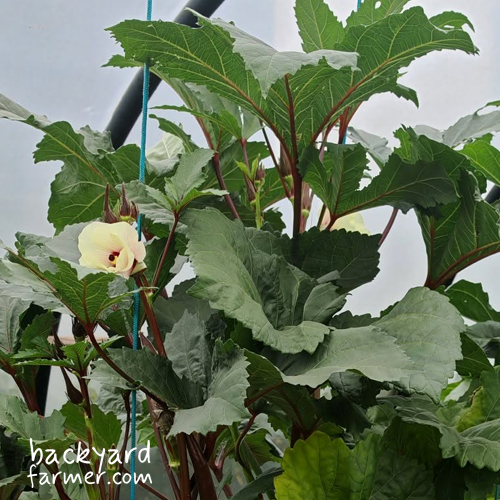
Okra (Abelmoschus esculentus), also known as ladies’ fingers or bhindi, can be grown in the UK, but it needs plenty of warmth to produce a worthwhile harvest. A greenhouse or polytunnel offers the most reliable conditions, although outdoor growing is possible in warm, sheltered locations during a good summer.
Where to Grow Okra in the UK
For most UK gardeners, a greenhouse or polytunnel is the best place to grow okra. Outdoor cultivation is possible, but harvests are more dependent on summer temperatures and local conditions.
Growing Okra in a Greenhouse or Polytunnel
Protected growing provides the warmth and shelter okra needs to develop, flower and produce pods.
Choose a sunny position with enough space for plants to reach their full height. Good ventilation is important during hot weather to prevent excessive heat and humidity.
An unheated greenhouse can still become cold overnight, particularly during spring. Wait until growing conditions are consistently warm before moving young plants into their final positions.
Even under protection, UK harvests can vary considerably between summers. A healthy plant may produce relatively few pods if temperatures remain too cool for vigorous growth and flowering. Focus on maintaining suitable conditions rather than expecting the yields achieved in warmer climates.
Growing Okra Outdoors
Okra can be grown outdoors in warm, sheltered gardens, particularly in southern England or during a favourable summer.
Choose a sunny, south-facing position protected from cold winds. A sheltered wall or fence can provide additional warmth, while fertile, well-drained soil supports healthy growth.
Only plant outdoors once frost risk has passed and the soil has warmed sufficiently. Cloches or fleece can provide temporary protection during cooler periods, with ventilation when needed to prevent overheating.
Outdoor crops are less reliable than those grown under protection, especially where summer nights remain cool.
Growing Okra in Containers
Okra grows well in large pots, making it suitable for greenhouses, patios and smaller gardens.
Choose a container at least 30cm wide and deep, although a larger pot provides more rooting space and retains moisture more effectively.
Use fertile, free-draining compost and position the container somewhere warm and sunny.
Pots can be moved under protection if temperatures fall, although established plants in large containers may be difficult to move.
When to Sow and Plant Okra in the UK
Okra needs a long, warm growing season, so starting seeds indoors gives plants time to establish before summer.
For most UK gardeners, March to April is the best time to sow, provided sufficient warmth and light are available.
| Month | Growing Activity |
|---|---|
| March–April | Sow seeds indoors using a heated propagator |
| April–May | Grow seedlings on in a warm, bright position |
| Late May–June | Plant into greenhouse borders, polytunnels or outdoor positions when sufficiently warm |
| July | Maintain steady growth; early flowers and pods may appear |
| August–September | Main potential harvesting period |
| October | Continue harvesting under protection if conditions remain favourable |
These timings are approximate. Regional climate, variety and growing conditions can all affect development.
Why Temperature Matters More Than the Calendar
Okra germinates most readily in warm compost, ideally around 25–30°C. The RHS advises keeping seeds above 16°C, but germination can be slower at lower temperatures.
Established plants also need sustained warmth for vigorous growth and flowering. Although the RHS recommends waiting until soil temperatures reach at least 15°C before planting, this is a minimum planting consideration rather than an ideal temperature for productive growth.
Moving plants into a cold greenhouse too early can cause growth to stall, even if frost is unlikely.
A minimum-and-maximum thermometer is useful for monitoring greenhouse temperatures, particularly overnight.
How to Sow Okra Seeds
Okra is usually started indoors from seed during spring. Its relatively hard seed coat and preference for warmth make a heated propagator particularly useful.
Recommended Variety: Okra ‘Clemson Spineless’
A good choice for UK greenhouse growing, producing tender green pods with relatively few prominent spines. Recommended by the RHS for protected cultivation.
Sowing Okra Seeds Step by Step
- Prepare the seeds: Optionally soak seeds in warm water for around two hours before sowing to help soften their outer coat.
- Fill individual pots: Use small pots or deep modules filled with moist, peat-free seed compost to minimise later root disturbance.
- Sow the seeds: Plant approximately 1cm deep and cover lightly with compost.
- Provide warmth: Place pots in a heated propagator, ideally maintaining compost temperatures around 25–30°C.
- Keep compost moist: Water carefully without saturating the compost.
- Provide light: Once seedlings emerge, remove propagator covers and move plants into a bright, warm position.
Germination time depends on temperature and seed quality. Avoid allowing compost to become cold and waterlogged.
Looking After Okra Seedlings
Grow seedlings in a warm, bright position, watering when necessary and allowing excess moisture to drain away.
Pot plants on when their roots begin filling the original containers, handling the root balls carefully.
Okra can be sensitive to unnecessary root disturbance, so avoid repeatedly repotting young plants.
Seedlings that collapse at soil level may be affected by damping off, particularly where compost remains excessively wet. See our guide to damping off in seedlings for help identifying and preventing the problem.
Planting Okra in a Greenhouse or Polytunnel
Move established plants into their final positions during late May or June, once conditions are consistently suitable for growth.
Plants should be healthy, actively growing and approximately 10–15cm tall before transplanting.
Preparing the Soil
Okra prefers fertile, well-drained soil that retains sufficient moisture without becoming waterlogged.
Before planting:
- Remove weeds and loosen compacted soil where necessary.
- Incorporate well-rotted compost if the soil needs improving.
- Ensure excess water can drain freely.
- Choose a position receiving plenty of direct sunlight.
A slightly acidic to neutral soil, around pH 6.0–7.0, is suitable, although okra tolerates a broader range.
Planting Okra Step by Step
- Check conditions: Ensure the soil is warm and plants are unlikely to experience damaging cold temperatures.
- Prepare planting holes: Make holes slightly larger than the existing root balls.
- Space plants appropriately: Allow approximately 45–60cm between standard varieties, adjusting for their expected mature size and seed-packet instructions.
- Transplant carefully: Keep the root ball intact and plant at the same depth as in the original pot.
- Water thoroughly: Settle the soil around the roots and maintain even moisture during establishment.
Plants destined for outdoor growing should be hardened off gradually before transplanting.
For container growing, plant one seedling into a large pot with drainage holes and suitable compost. Taller plants may need support as they develop.
Planning Your Growing Space?
Use our free Allotment Planner to arrange your crops, check planting space and plan your greenhouse or vegetable beds.
How to Care for Okra Plants
Once established, okra needs consistent moisture, fertile soil and sufficient warmth to support flowering and pod production.
Watering Okra
Keep the soil evenly moist, particularly during flowering and pod development.
Water thoroughly when needed, allowing moisture to reach the roots rather than repeatedly wetting only the surface.
Avoid prolonged drought or constantly saturated soil, both of which can interfere with healthy growth.
Container-grown plants need closer attention during hot weather because compost dries more quickly.
An organic mulch around established plants can help conserve moisture and reduce fluctuations in soil conditions.
Feeding Okra
Okra benefits from fertile soil containing adequate organic matter.
Plants growing in well-prepared greenhouse borders may not need additional feeding.
Container-grown plants have a more limited nutrient supply and may benefit from a high-potassium liquid feed once flowering begins, following the manufacturer’s instructions.
Avoid excessive nitrogen feeding, which can encourage leafy growth without necessarily improving pod production.
Temperature and Ventilation
Maintain warm growing conditions while providing adequate greenhouse ventilation.
Open vents and doors during hot weather to prevent excessive heat and humidity, taking care to avoid exposing plants to unnecessary cold draughts.
A minimum-and-maximum thermometer can help identify significant differences between daytime and overnight temperatures.
Supporting and Pruning Okra
Taller okra plants may need canes or other supports, particularly when carrying several developing pods.
Routine pruning is generally unnecessary. Focus on maintaining healthy growth and harvesting pods regularly.
Flowering and Pollination
Okra produces pale, mallow-like flowers with darker centres. These develop into elongated pods under suitable growing conditions.
Okra is predominantly self-pollinating, so a second plant is not required to produce pods.
Flowers are often short-lived, and developing pods can grow rapidly once conditions are favourable.
When and How to Harvest Okra
Okra pods are harvested while young and tender, before they become tough and fibrous.
In the UK, harvesting commonly begins during August, although plants grown under particularly favourable conditions may produce earlier.
Once flowering begins, check plants regularly for developing pods.
When Is Okra Ready to Harvest?
Many okra varieties are harvested when pods reach approximately 5–10cm long, although the ideal size varies between cultivars.
Young pods should be:
- Firm but tender.
- Relatively small for their variety.
- Fresh-looking and free from significant damage.
- Easy to cut without excessive resistance.
Pods left growing for too long become tougher and more fibrous.
For ‘Clemson Spineless’, the RHS recommends harvesting particularly young pods, around 4–5cm long. Picking before pods become oversized helps maintain eating quality.
How to Harvest Okra
Use clean secateurs or a sharp knife to cut the stalk just above each pod.
Avoid pulling pods from the plant, as this can damage stems and developing flowers.
During productive periods, check plants every one or two days. Regular picking helps prevent pods becoming oversized and supports continued harvesting while conditions remain favourable.
Okra stems and leaves can have fine hairs that irritate sensitive skin, so gloves and long sleeves may be useful.
Storing harvested okra: Fresh pods are best used soon after picking. Keep them dry and refrigerate briefly if necessary. For longer storage, okra can be blanched and frozen.
Common Problems Growing Okra in the UK
The most common difficulties with growing okra in Britain are often related to temperature, moisture and plant development rather than serious pest infestations.
Plants may germinate successfully but grow slowly, fail to flower or produce very few pods.
| Problem | Possible Cause | What to Do |
|---|---|---|
| Seedlings aren’t growing | Low temperatures, insufficient light or unsuitable moisture | Check compost warmth, light and watering |
| Plants stall after transplanting | Cold soil or transplant stress | Monitor temperatures and maintain appropriate root-zone moisture |
| Healthy plants but no flowers | Insufficient warmth, light or maturity | Check growing conditions and allow time |
| Flowers appear but no pods form | Environmental stress or unsuccessful pod development | Check temperatures, moisture and plant health |
| Yellowing leaves | Waterlogging, root stress, nutrient problems or pests | Inspect the soil and plant before adding fertiliser |
| Pods become woody | Harvesting too late | Pick smaller, tender pods more frequently |
| Aphids or whitefly | Sap-feeding pest populations | Inspect new growth and leaf undersides |
| Red spider mites | Often favoured by hot, dry greenhouse conditions | Check leaves regularly for early signs |
Why Are My Okra Plants Not Growing?
Slow or stalled growth is a common frustration among UK okra growers, particularly after transplanting.
A greenhouse may reach 30°C during the day but become cold enough overnight to slow plant development considerably.
Before replacing struggling plants, check:
- Daytime and overnight temperatures.
- Soil moisture and drainage.
- Light levels.
- Root development and container size.
- Signs of pests or disease.
If plants remain healthy, improving unsuitable conditions may allow growth to resume. However, recovery depends on plant condition and how much warm growing season remains.
Okra Pests and Diseases
Greenhouse-grown okra can be affected by aphids, whitefly and red spider mites.
Inspect developing shoots and the undersides of leaves regularly, particularly during warm weather.
Early identification helps prevent small infestations becoming more difficult to manage.
Maintain suitable growing conditions, provide adequate ventilation and encourage beneficial insects where possible.
For further advice on identification and control, see our UK aphid guide.
Seedlings can also be affected by damping off, while poorly drained growing conditions increase the risk of root problems. Good hygiene, suitable ventilation and careful watering help reduce these risks.
Frequently Asked Questions About Growing Okra in the UK
Yes. An unheated greenhouse can provide suitable conditions during summer, but temperatures may fall too low overnight in spring. Wait until conditions are consistently warm before planting and monitor temperatures during cooler periods.
Okra usually takes several months from sowing to harvesting in Britain. Seeds are commonly started in March or April, with harvesting typically beginning in August. Warm growing conditions may bring earlier crops, while cooler summers can delay or reduce production.
Okra seeds germinate best in compost around 25–30°C. Established plants also need sustained warmth for vigorous growth and flowering. Temperatures that are adequate for plant survival may still be too cool for productive cropping.
Yes. Choose a container at least 30cm wide and deep, preferably larger, with good drainage. Position it in a warm, sunny location and maintain consistent moisture. Greenhouse or polytunnel growing offers the most reliable results.
Cool temperatures, inconsistent watering and other environmental stresses can interfere with pod development. As okra is predominantly self-pollinating, investigate growing conditions before assuming a shortage of pollinating insects.